Building workflow awesome
As an organization grows, it begins to develop a unique culture based on how its employees work together within small teams. And a huge part of how a team functions relies on its workflow, a repeatable process that allows people to work together at scale.
I’m continually amazed by how many different types of organizations use JIRA Software to manage their workflows. JIRA Software's customizable workflow lets it adapt to all kinds of organizational cultures, both large and small. I’ve written several articles for Atlassian since joining the team, and I can say without a doubt that workflows are the most critical concept for getting the most out of JIRA Software. Workflows are the backbone of how JIRA Software works within your organization; much like finding that perfect item at the store, taking the time to customize your workflow will pay many dividends down the line.
First, let’s take a look at what defines a workflow. A workflow has four unique components: statuses, transitions, assignees, and resolutions. As an example, libraries have well-known workflows surrounding the materials they lend out to the public. Each item could be stored in JIRA Software as an issue, and administered in the following simple workflow:
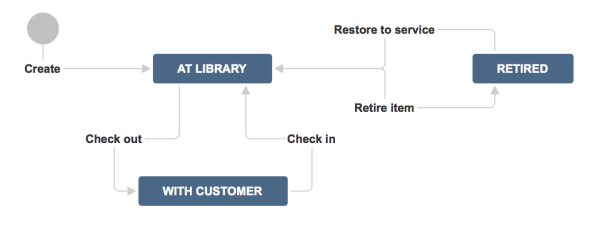
Statuses: where
Statuses represent the position of the issue within a workflow. In the library example, a book can be in one of three places: at the library, with a customer, or retired from inventory. Every status should be a unique state in your workflow.
Transitions: how
Transitions are the bridges between statuses; the way a particular issue moves from status to status. At the library, books are loaned out by librarians, returned by customers, and evaluated by library staff to see if they’re fit for circulation. Note that customers cannot evaluate if an item is fit for inventory – that must be decided by the library staff. With JIRA Software, you're able to set workflow permissions that allow only the right people to transition an issue.
Assignees: who
Workflows guide how people work together. In JIRA Software, the assignee dictates the responsible party for any given issue. In the library example, we would set the assignee to the borrower every time a book is loaned out, so that the library knows which customer has that book. When the book is returned from inventory, we would then remove the assignee when we transition the book back to inventory.
Resolutions: why
Resolutions explain why an issue transitions from an open status to a closed status. The act of retiring a book removes it from inventory; therefore, we can put a resolution on that book. In this example, we might use resolutions, such as damaged, out of date or lost. The two biggest mistakes new JIRA Software administrators can make are:

- Confusing resolution with status – Statuses describe where an item is in the workflow whereas resolutions explain why an item is no longer in flight. In order to effectively use these features to retire a book from circulation, our librarian should create a status called retired, and options for resolution that include things like lost, damaged, or out of date. Searching for everything that’s retired (or resolved) – with the ability to search for why it’s retired via the resolution options gives much better reporting metrics. That’s why JIRA Software uses resolution to know if the issue is considered inactive by the organization. The best way to check to see if you’ve got it right is to use the created versus resolved gadget. You can have a workflow between when an issue is tagged with a resolution and officially closed. Many organizations verify resolved issues to ensure they're resolved for the right reasons.
- Setting resolutions correctly – You must set a resolution when an issue moves from an open state to a closed state. Likewise, the resolution needs to be removed when an issue gets reopened. At the library, if the librarians decide to put the book back into circulation, they would need to remove the resolution from that book. For example, a book that is able to be checked out should not have a resolution of lost.
How do I create a workflow?
I’ve spent 10 years of my career building workflows for many different types of organizations. I’d like to lend you a few pieces of hard-learned advice.
Gather all of your stakeholders

Workflows are about scaling culture, and culture is about people. Whenever it's time to build a process around a set of people, identify all of the stakeholders in that workflow. For example, if you’re trying to build a workflow between product management, software development, and support, ensure you have one representative from each organization in the meeting. As the person designing the workflow, spend time talking with each stakeholder about what’s important to them. Before the meeting starts, draw a draft workflow on the whiteboard, then walk through each case in the meeting, and gather stakeholder feedback. Workflows are touchy, as they govern how people work, so be patient and your investment will pay off later.
Use a whiteboard in low fidelity so it’s easy to get feedback and make changes at this stage.
Keep the workflow simple: less is more
Most of the time, stakeholders want to have statuses for each part of the workflow. Generally, that’s a good thing, but remember: each status adds more transitions and complexity to the workflow. Workflows are designed to make things simple and scalable. Whenever you're adding a new status to a workflow, ensure that the stakeholder has no other option but to grow the workflow. Let’s look at two examples.
- In many organizations, code review is an important part of the software development process. Jane, the development manager, wants to add a specific status called code review so that it’s clear to the team which issues are under active development, and which issues are waiting review. Reviewing code is distinctly different from writing code. It makes sense to add a new state, as the review process indicates that development is done, and that somebody else is now responsible.
- Bill, the test manager, wants to add new status called rejected for all issues that don’t pass review by his team. I’d advise against doing this, as test engineers can simply reopen any issue that fails review. An alternative option is to move the issue into a resolved state with the resolution rejected.
As a JIRA Software administrator, you owe it to yourself and your users to keep your workflow simple.
Make every transition count
JIRA Software has a number of options administrators can employ when transitioning issues between states.
- Conditions – Conditions control who can perform a transition. For example, only someone in the library can retire a book from inventory.
- Validators – Validators ensure that a transition can happen given the state of the issue. For example, if a book is to be retired because it’s allegedly damaged by a customer, we’d like to ensure the book has been checked out at least once to verify that claim.
- Post functions – Post functions execute actions on issues after both conditions and validators pass. The most common post function is to clear the resolution when reopening an issue. In the library example, we would use a post function to clear the reason a book was retired when it got put back into service. JIRA Software keeps detailed history of issues, so we could look up when the issue was retired and why.
- Assignees – Whenever a transition occurs, always ask who the new owner of the issue is. Ensure that in every transition, there's a default action to route the issue to the right place. Users can override the default action as well.
- Properties – JIRA Software recognizes some properties on transitions. The most common one is to limit resolutions displayed to the user on a given transition. For example, we might want the resolution scratched to show up for disk media when retiring, but not for books.
How to build a workflow in JIRA Software
Once you’re ready to build your workflow in JIRA Software, take time to ensure your workflow diagram is presentation quality. You'll want to share the diagram with all of your stakeholders for a final round of feedback. You should also enable the option in JIRA Software to easily show where the current issue is in the workflow. All users have to do is click view workflow.

In closing
Helping people work together more efficiently is my favorite thing about developing workflows inside of JIRA Software. Always listen to your customers, have empathy, and help them understand why what they’re doing might be inefficient, and how new ways of working can help them scale. When people work well together, they have more fun and get more done. Who doesn’t want to be a part of that?
I said in the beginning that getting workflows right is fundamental. In the next article, we’ll look at how to visualize data inside of JIRA Software based on workflow.
Learn five steps to configure your workflows. Plus, check out this presentation for great workflow visuals to learn more and share with your team!
Hungry for more?
Watch the blogs in this space to get notified when new tips articles like this are posted. And if that's still not enough, sign up for JIRA Insiders – our monthly newsletter covering all things JIRA.
![]() Written by Dan Radigan, Technical Account Manager
Written by Dan Radigan, Technical Account Manager