Using workflow awesome
This is the second post in a two-part series about using workflows in JIRA Software. If you haven’t read the first post, Building workflow awesome, go ahead and start there. For those who already read it, this post will answer any questions you might have, as we’ll focus on practical applications to help solidify how to configure and how to use a workflow effectively in your organization.
Many of the items that we work with every day have a lifecycle that can be represented within a workflow. Going back to the library example from the first post, books are checked in and out until they've reached the end of their service life, and are subsequently retired. Bugs in a software project are logged, reviewed, fixed, verified, and then closed. The next question we need to ask ourselves is about what data we want out of our workflow. Let’s review the four main concepts in workflow:
- Status: where
- Assignee: who
- Resolution: why
- Transition: how
How to set up a status in a workflow
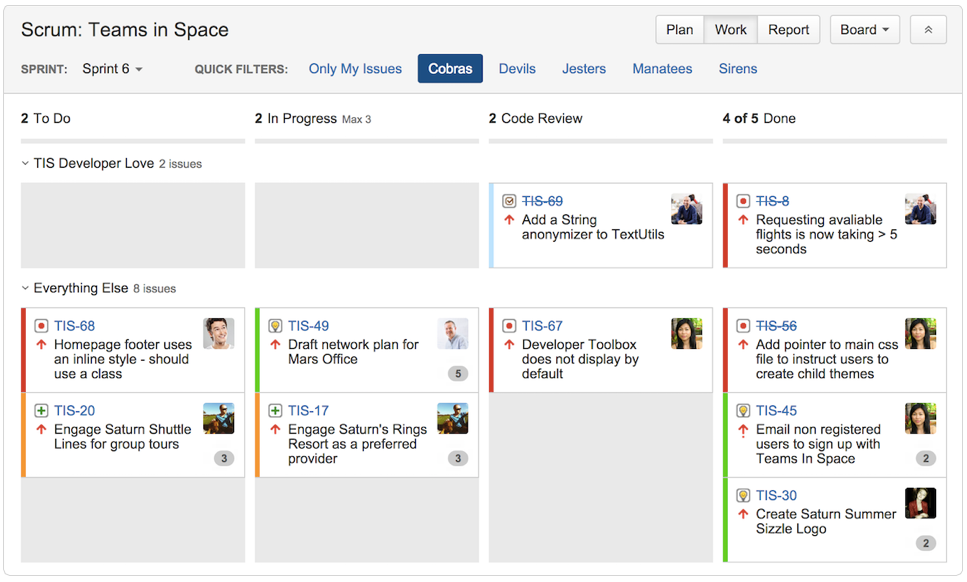
Each status in your workflow should represent a different phase or process in the issue’s lifecycle. With JIRA Software, it’s easy to set up a board showing the flow of work across each issue’s lifecycle. Let’s take a look at a board in action:

We can see each phase of work and how many issues are contained within each one. For teams that want to maximize flow, it’s simple to set up work-in-progress limits for states like code review, so a backlog of issues doesn’t pile up waiting for review. One of the many benefits of using an agile board is that workflow is very much a part of the core experience. Note that multiple statuses can be in one column; for example, in progress and code review could be in the same column if the intended audience for the board was stakeholders outside of the team. To them, both statuses communicate “in progress.”
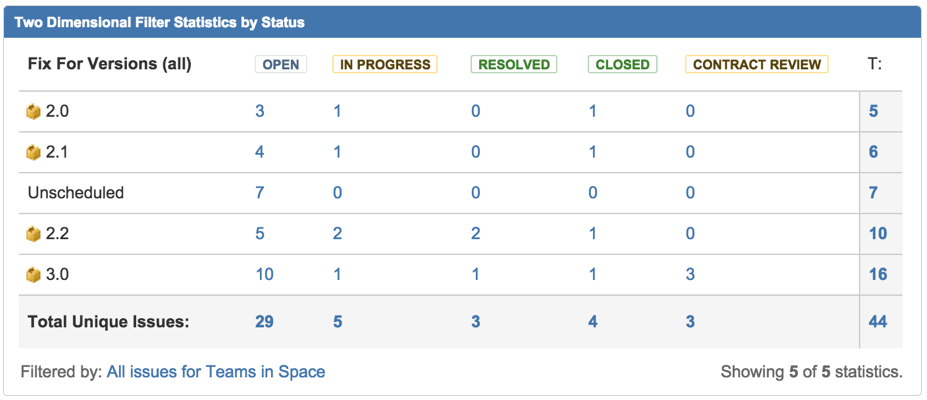
What if we're interested in seeing a very high-level overview of where work sits across a series of releases? The two-dimensional filter statistics gadget is my go-to solution. I set status on the X-axis, fix version on the Y-axis, and choose totals. The output is an easy-to-read matrix of your project. Clicking on any number displays the issues that represent the number.
Setup

Gadget in Action

How to set up and use the assignee field
Workflows are all about helping people be more efficient while working with one another. If you’re not using profile pictures in JIRA Software, I highly recommend using them! It’s critically important to display contribution from the team. I won’t recite all the points in the linked article here, but it’s worth a read. The two-dimensional filter statistics gadget, when set up to use the assignee field, makes it easy to see work distribution across the team. I find it helpful to see assignee and priority together to ensure that no team member has too many critical issues.

When is an issue resolved?
Every workflow has a “tipping point,” or the climax in the workflow. Back to the library example, when a book is retired, it's clearly on its way to done. In the software engineering workflow, when a developer checks in a change, the original issue begins the verification phase of its lifecycle. Just because an issue has a resolution doesn’t mean it’s done. Let me repeat: An issue that has a resolution is different from the issue being closed. In the library example, a book may be retired because it’s worn out; we could add a status called order pending while we're waiting for a replacement book.

The highlighted transition in blue would set resolution to needed replacement. When the new book is received, then the library would create a new issue for the new book. For software teams, once a developer checks in a change, the resolution on that issue should be set to fixed. The issue then transitions to a verification state for someone else to review. The issue is still open, but it has been “resolved.” Once the issue’s resolution has been verified, then it can be closed.
We can use the two-dimensional filter statistics gadget to track resolution as well. Often, engineers will view checking in a change as “I’m done.” Using this gadget to track resolved-but-not-closed work helps everyone see the total picture containing work that's still outstanding.
How to create and track transitions
As mentioned in the previous article, transitions are where the magic happens. If you want to understand how work is flowing in your organization, take a closer look at your issues using JQL, JIRA Software's query language. JQL will help you take a detailed look at how work flows through your organization. Fixes that don't pass verification are a key metric for software teams. Let’s say we want to see how many issues failed verification in the last month:
1 2 | project = TIS AND STATUS changed FROM "Quality Review" TO "In Progress" after -4w |
How many bugs in your organization get resolved without a fix? We can use JQL to see all of the issues with resolution invalid or cannot reproduce. Bugs that get filed but are not fixed are a drain on everyone involved.
1 2 | project = TIS AND STATUS changed TO Resolved after -4w AND resolution NOT IN (Fixed) |
We can also query the create transition by using the reporter and the create field. The JQL function membersof() makes it easy to work with groups of people. If you have a group defined in JIRA Software called product-engineering, you can then see how many bugs are reported outside of the core product team.
1 2 | project = TIS AND reporter NOT IN membersof(product-engineering) AND created > -4w |
Analyzing transitions between states is the best way to understand how your workflow can be improved. If you’re noticing a backup in any particular state, look at the volume and the reason(s) issues are transitioning into and out of that state. A few questions to ask:
- Do I verify that all of the issues coming into the state are well defined?
- How many issues in this state get returned to a prior state?
- How long do issues stay in the state? Is that in line with the team’s expectation?
- Why do issues get returned to this state?
Using JQL to track transitions can give you concrete examples of how to improve your workflow so that the team runs more optimally.
Make workflowa work for you
The best way to improve is to measure. The single biggest benefit of workflowa is that you can quantify and track how people work together. With JIRA Software, you don’t have to sacrifice how you want to work together. Like with all things agile: use where you are as a base point, define key metrics to measure, track results, and make changes as needed and team retrospectives.
Plus, check out this presentation for great workflow visuals to learn more and share with your team!
Hungry for more?
Watch the blogs in this space to get notified when new tips articles like this are posted. And if that's still not enough, sign up for JIRA Insiders – our monthly newsletter covering all things JIRA.
![]() Written by Dan Radigan, Technical Account Manager
Written by Dan Radigan, Technical Account Manager
