Configuring columns
Before you begin
You must be a Jira administrator or a board administrator for the board to configure its columns.
Editing columns
- Go to the desired board and select Board > Configure.
- Click the Columns tab.
- Edit the columns as described in the following table and the screenshot (below).
Add a new column | Click the Add Column button at the right of the page. A new column named 'New Column' is added in the second to the last column position. If you are using Simplified Workflow, then a new status will automatically be created to match your new column. |
|---|---|
Change the name of a column | Click in the name area of the column, modify the existing name, and press Enter. |
| Show the 'Days in column' indicator on cards | Click the Days in column checkbox. This shows a series of dots on each card (up to the width of the card or a maximum of 32), representing the number of days that the issue has been in the column. This can help you see issues that are stagnating — this is particularly useful when your board is displayed as a wallboard. Note that if you move an issue back to one of the columns that you moved it into previously, the indicator reflects a cumulative value of the number of days the issue stayed in that column. For example, you move an issue to the 'In Progress' column and it stays there for 2 days. You then move the issue to the 'Code Review' column and it stays there for 1 day. During code review, you receive feedback, which requires more development work for the issue, so you move the issue back to the 'In Progress' column and it stays there for 1 day. In this example, the indicator reflects the cumulative value of 3 days for the issue in the 'In Progress' column. Disabling this indicator can improve performance. If you have a large instance (i.e. 300,000+ issues, 100+ projects, 100+ boards, or 100+ open sprints), we recommend that you disable this. This indicator is disabled by default for Scrum boards and enabled by default for Kanban boards. |
Delete a column | Click delete in the "Drag to rearrange or delete" text at the top of the column. Any Jira workflow statuses that had been mapped to the deleted column are moved back to the 'Unmapped' column. |
Move a column | Hover over the top of the name of a column, then drag the column left or right to its new position. Wait until other columns have shifted position before dropping the selected column to its new position. |
Screenshot: the 'Board Configuration' screen — 'Columns' tab.
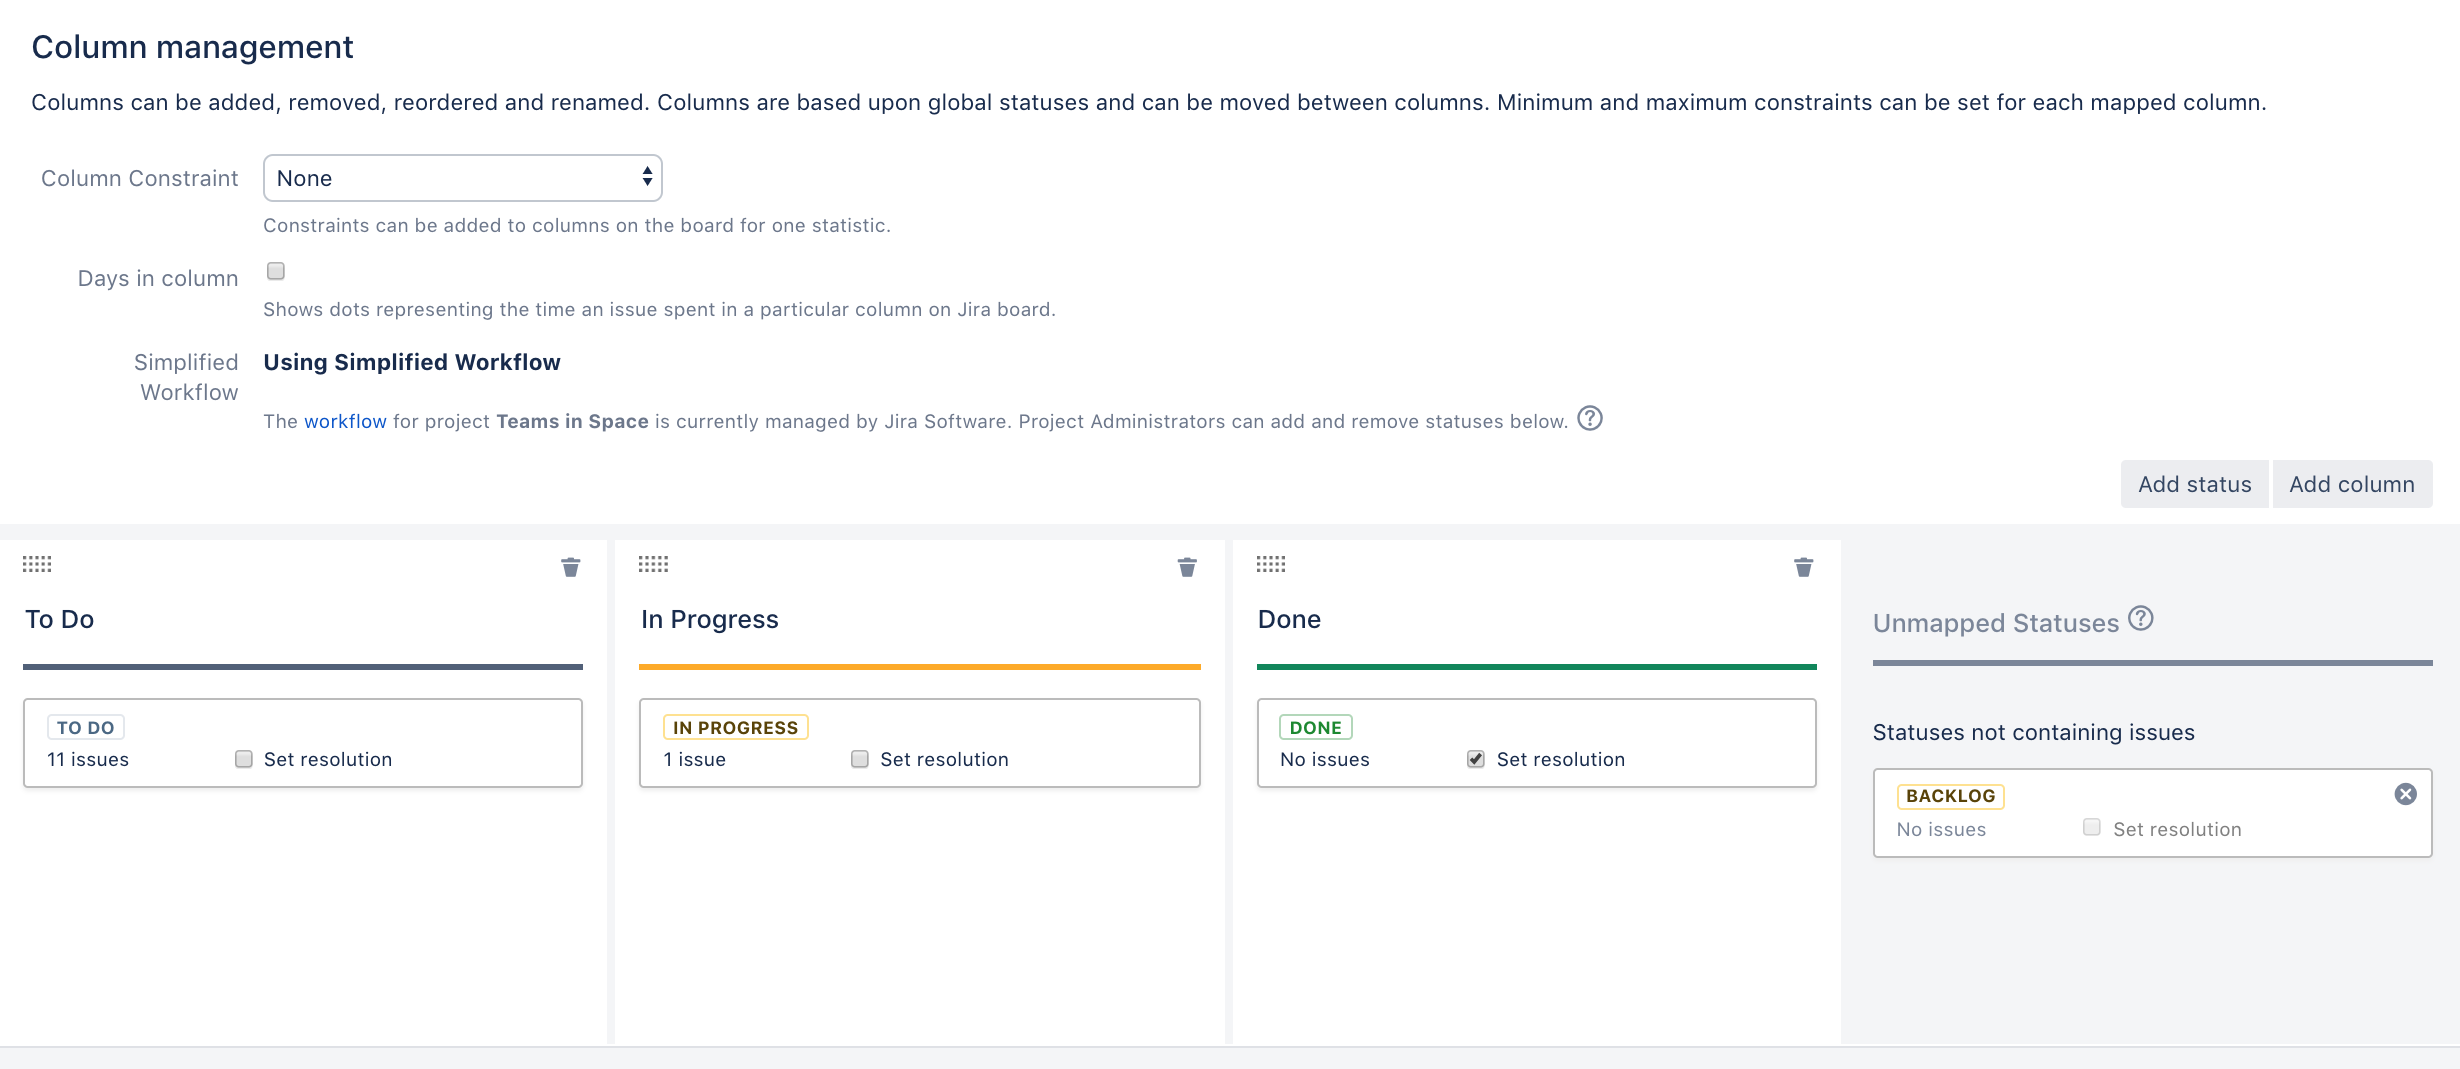
Each column has a blue, yellow, or green color, as shown in the screenshot above.
- The single left-most column will always be blue, representing items in 'new' state.
- The single right-most column will always be green, representing items in a 'successful' state.
- The middle column (or columns if you add more) are always yellow, representing items in progress.
You will see these colors shown in a number of places in Jira Software, e.g. in gadgets for JIRA applications.
Mapping statuses to columns
By default, a board's columns are mapped to the default Jira statuses, as shown in the following tables. You can change this if you wish. For example, if you are using additional, customized JIRA statuses, you will probably want to map them to appropriate columns in your board.
If your board's project is using the Jira default workflow:
| Default column | Default mapped Jira statuses |
|---|---|
| To Do | Open, Reopened |
| In Progress | In Progress |
| Done | Resolved, Closed |
If your board's project is using Simplified Workflow:
| Default column | Default mapped Jira statuses |
|---|---|
| To Do | To Do |
| In Progress | In Progress |
| Done | Done |
Editing the mapping of Jira workflow statuses to columns of a board
- Go to the desired board and select Board > Configure.
Click the Columns tab.
Change the mapping statuses, as described in the following table and screenshot (above).
Map a status to a column
Drag a status from the Unmapped column to the appropriate column on the right.
Unmap a status from a column
Drag a status from its current column on the right to the Unmapped column on the left.
Change the column mappings of a status
Drag a status from its original column to its relevant new column.
Note, all statuses configured in the Jira server are available from the board Configuration page. However, some statuses (in particular, custom statuses) may not be available for issues on your board if the Jira workflows used by these issues do not utilize those statuses.
Adding a new status
If your board is using Simplified Workflow:
- Go to the desired board and select Board > Configure.
Click the Columns tab.
Click the Add Status button at the right of the page.
 Note that the Add Status button is only available if you have the Jira 'Project Administrator' permission for this board's project. See Permissions overview for more information.
Deleting a status
You can only delete a status if:
- you are the 'Project Administrator' for this board's project(s), and
- there are no issues that currently have that status.
If any other workflows are using this status, then the status will be removed from your workflow, but not deleted.
If your board is using Simplified Workflow:
- Go to the desired board and select Board > Configure.
- Click the Columns tab.
- Drag the status to the Unmapped Statuses column.
- Click the Remove Status icon (x) for the status you wish to remove.
If your board is not using Simplified Workflow, you can only delete a status via the Jira administration interface. See Workflows for more information.
Setting column constraints
Setting constraints on each workflow state is a crucial part of Kanban, so that you can ensure that work is continually flowing through the pipeline. You may also find it handy in Scrum, so that you can see bottlenecks early, and adjust the scope of your sprint.
Constraints trigger a visual indicator when a maximum or minimum number of issues appear in a column. You can specify constraints for all columns, or just some of them. If a column constraint is exceeded, then the column will change color, as follows:
- Column colored red — Maximum number of issues exceeded
- Column colored yellow — Minimum number of issues not met
Please note:
- The values of the column constraints will appear at the top of each column you set them for. These values don't have any impact on the number of issues displayed in the columns.
- Column constraints apply to the total number of issues in a column, regardless of whether issues are hidden by a Quick Filter.
To set column constraints of a board:
- Go to the desired board and select Board > Configure.
- Click the Columns tab.
Edit the constraints, as described in the following table.
Enable column constraints
In the Column Constraint drop-down, select either Issue Count or Issue Count, excluding sub-tasks.
Note, enabling column constraints will show the issue count in each column.
You may want to exclude sub-tasks (particularly Scrum teams), so you can constrain the number of stories for your team, rather than the number of individual tasks.Set a column's 'Min' or 'Max' constraint
Edit the fields at the top of the desired column:
- Enter a minimum value in the yellow box.
- Enter a maximum value in the red box.Delete an existing value to remove the constraint.
Note, you can also remove constraints for all columns. In the Column Constraint drop-down, select None .
Enabling the Kanban backlog
You must be a Jira administrator or a board administrator for the board to enable the Kanban backlog.
Managing your backlog in the first column of your Kanban board is easy to do — as long as there are only a few issues in your backlog. As your backlog grows, viewing and scrolling through these issues can become difficult.
By using the Kanban backlog, you get a bigger backlog that gives you an optimized list view of the issues you're creating and ranking for your team. With versions and epics displayed in separate panels, you can also easily assign issues to specific releases, and filter these issues by epics that they belong to. The backlog is perfect for planning story development, without distracting your team from their work-in-progress in the Kanban board.
To enable the Kanban backlog:
- Go to the desired board and select Board > Configure.
- Click the Columns tab. The Column configuration page displays, with the Kanban Backlog as the leftmost column.
Screenshot: the 'Board configuration' screen — 'Columns' tab, columns section

- In the columns section, drag a status to the Kanban Backlog column. Typically, this would be the column for which you plan work for your team. Once you do this, the backlog will be enabled.
To change how epics are displayed in Jira:
After enabling the Kanban backlog, all epics are moved to the Epics panel in the backlog, and not displayed as cards on the board like all other issues. If you don't like it, you can use the 'Epics panel' toggle above the columns to disable the epics panel.
Next steps
Need help? If you can't find the answer you're looking for in our documentation, we have other resources available to help you. Check out Getting help.