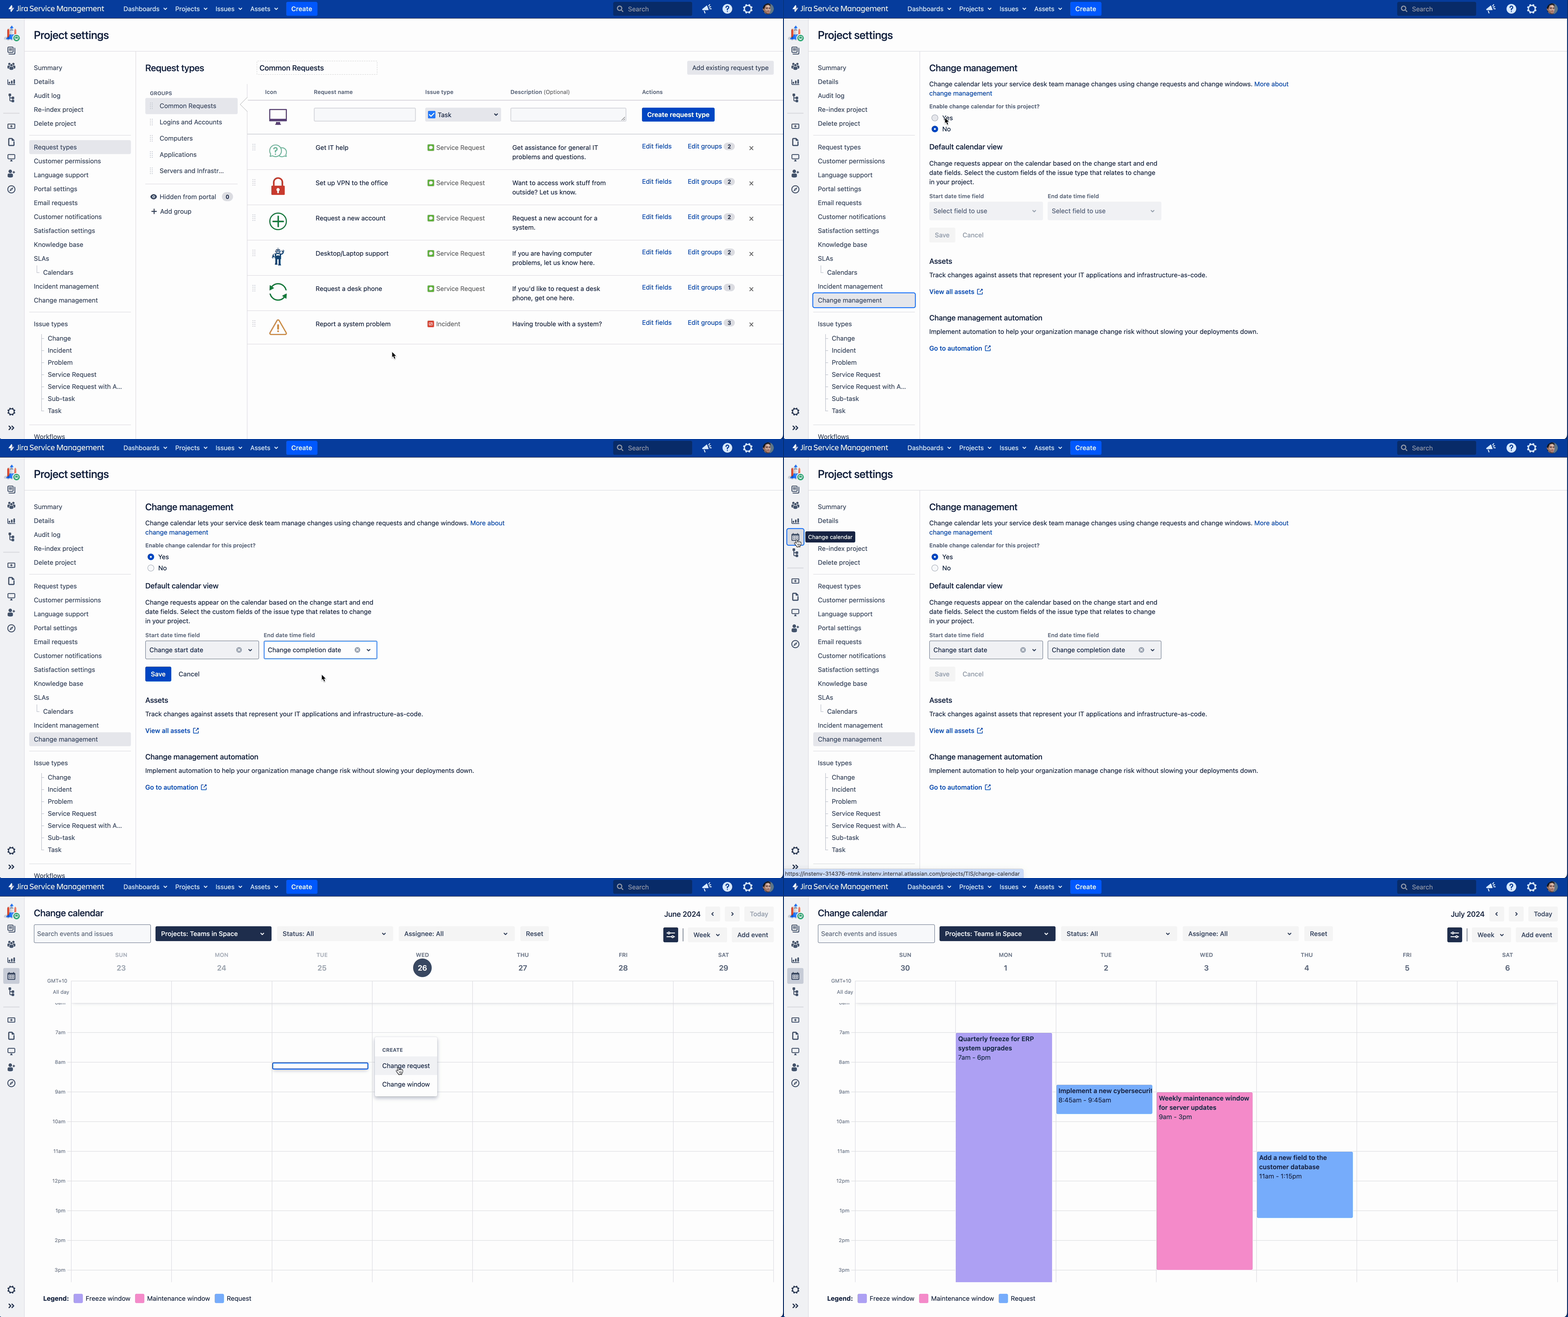
Set up a calendar to coordinate your changes
The change calendar gives you a visual representation of various events and changes in your service project, which can help you minimize service disruptions and plan changes to critical systems efficiently. You can create freeze and maintenance windows in the change calendar so that change approvers can easily assess requests from change requestors across multiple projects and adjust change schedules to avoid conflicts.
If you’re on version earlier than Jira Service Management 10.0, refer to our previous documentation on using Team Calendars in Confluence to set up a calendar.
Set up the change calendar in your service project
Change requests appear on the change calendar based on the data in the following custom fields:
- Change start date
- Change completion date
If your service project uses the ITSM template, the change calendar in already enabled and the above date time custom fields associated with the Change request issue type are by configured by default.
If you are using a different project template or your Jira admin has renamed the above custom fields, review the below procedure and take the necessary steps to set up the change calendar:
- Navigate to Project settings and select Change management.
- Enable the change calendar.
It is enabled by default in projects that use the ITSM template. - In the Default calendar view section, select the appropriate start and end custom date-time fields of the issue type that relates to change.
Change requests are plotted on the calendar based on the data in the fields you select here. - Select Save.
The change calendar is now available to all agents of this project from the sidebar.
Show other issues on the change calendar
Though change requests are plotted on the calendar based on the fields configured by the project admin, you can always modify the calendar view to see the timeline of other issues.
To view issues of a different type:
- From the sidebar, select the Change calendar icon.
- On the Change calendar page, select the View settings icon.
- In the Start date time and End date time fields, select the fields associated with the issue type you want to view.
Create a change request
You can create a change request directly from the change calendar.
- From the sidebar, select the Change calendar icon.
- On the Change calendar page, find the date and time that you want to schedule the change request for.
- Select the area in the calendar (you can drag the event to adjust the time).
- In the dialog that appears, fill in the details of the change request.
- Select Create.
Reschedule a change request from the change calendar
You can reschedule an existing request when the timeline of a change request conflicts with other important events.
To reschedule or edit the details an existing request:
- From the sidebar, select the Change calendar icon.
- On the Change calendar page, find the event you wish to reschedule.
- Select the request.
- In the dialog that appears, select Edit (you can drag the event to adjust the time).
Changes will be saved automatically.
Delete a change request
To delete a change request:
- Select the request.
- In the dialog that appears, select Edit.
- On the change request page, select More and then select Delete.
Types of change windows
Change windows are visual indicators that show when change requests should (or shouldn’t) be scheduled. In the change calendar, you can create two types of change windows:
- Maintenance windows, these are generally used to show times during which changes should be scheduled. Maintenance windows can help you:
- reduce disruption by ensuring changes happen outside of peak usage
- minimize risk, for example ensuring enough staff are working to monitor changes
- let customers know in advance of any possible disruptions to service
- Freeze windows, (sometimes referred to as deployment blackout windows), are generally used to show times during which changes should not be scheduled. Freeze windows can help you:
- block out times when less staff are available to monitor changes, like holiday periods
- minimize risk by preventing changes being scheduled right after maintenance windows or major changes
- reduce disruption during times of peak usage and during business-critical events
Create a change window
To create a new change window:
- Log in to your service project.
- From the sidebar, select the Change calendar icon.
- Find the date and time that you want to schedule the change window for.
- Select (and drag) until your desired time is highlighted.
- Select Change window.
- Select either Freeze window or Maintenance window.
- Give your change window a name.
- Select a service project.
- If required, update the description and the values in the Start date and End date fields of the change window.
- Select Create.
Modify or delete a change window
To edit a change window:
- From the sidebar, select the Change calendar icon.
- In the dialog that appears, select Edit.
- Edit the details you wish to modify and select Save.
You can also drag the change window to the desired date and time.
To delete a change window, select the window and in the dialog that appears, select Delete.
You're good to go
These are all the steps needed to adjust your project to new change management. If you haven’t checked it already, see Sample lifecycle of a change for an overview of how your changes will behave.
