Editing and collaborating on issues
Resolve your customer requests more efficiently with these tips and tricks for editing and collaborating on Jira Service Management issues.
In addition to learning about the basics of editing and commenting on an issue, you can refer to this page for help with:
- Using the wiki toolbar to make your comments and descriptions pop
- Sharing issues with your team and adding request participants
- Keeping track of issues with labels and issue watchers
Attaching files and screenshots
If your administrator has enabled file attachments, you and your customers can attach files and screenshots to issues you're working on. See Attaching files and screenshots to issues for more information.
Collaborating on issues
Sharing issues with other users
You can easily keep your team informed by sharing issues with them via email.
To share the issue:
In the upper-right corner of the screen, select the Share button.
Enter usernames or emails of users that you want to share the issue with.
Select Share.
If your administrator has enabled anonymous access to your project, you can also share issues by entering the email address of a non-Jira user.
You can easily keep your team informed by using the Share () button to share an issue with other Jira users. If your administrator has enabled anonymous access, you can also share issues by entering the email address of a non-Jira user.In Jira Service Management, your administrator can also enable Request participants, which will appear as another issue field. You can add other agents and customers from your service desk project to help you resolve the original customer's request.
Mentioning users on issues
If you want to invite members of your team to help you work on an issue, you can mention them by typing @ and their usernames in the issue description or comment.
People already involved in the issue, like the reporter or a commenter, will be listed first in the user list so you can select them faster. Note that the users you mention will be notified once you save the issue description or comment.
Editing issue details
What permissions do you need?
To edit an issue, you need the Edit Issue project permission for the issue's relevant project. If you do not have this permission, please contact your administrator.
To edit an existing issue, select Edit to open the Edit Issue dialog box and modify the issue details. If you want to change the fields you need to edit, select Configure fields > Custom and choose the fields you want to show or hide. Select Update to save your changes.
Commenting on issues
What permissions do you need?
To add comments to an issue, you must have the following permissions for the relevant project:
Browse project permission to view the issue you want to comment on.
Add comments permission to add a comment to the issue. Without this permission, you won’t see the Comment button.
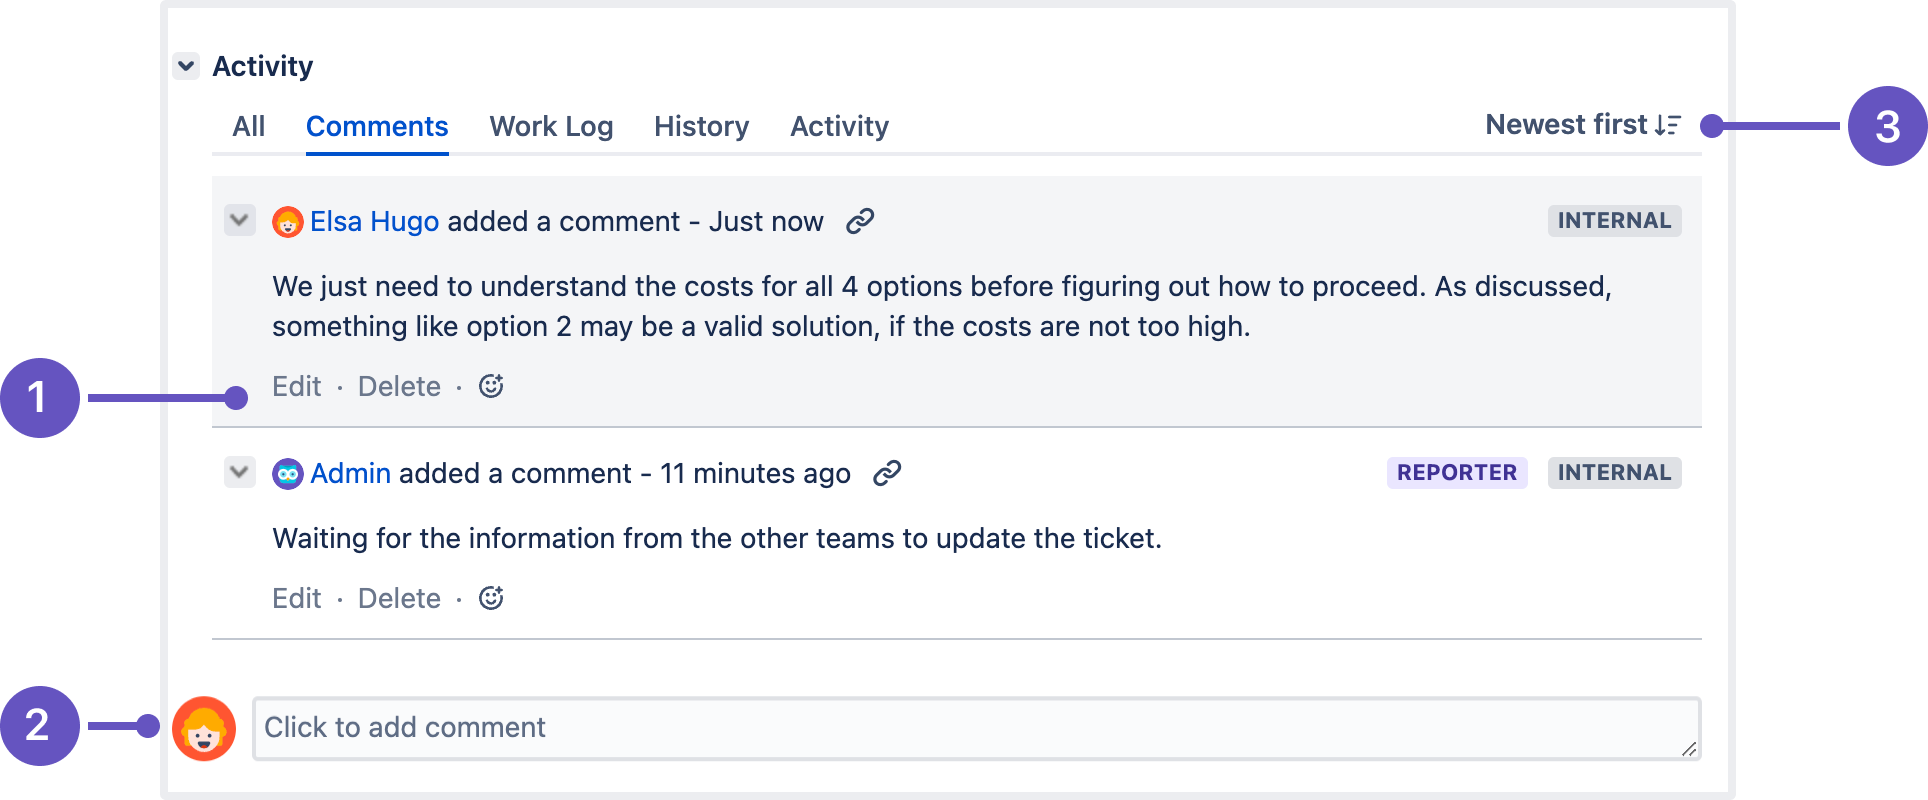
You can add and manage comments in the issue view:
- Edit or delete comments.
- Sticky comment footer: Add a new comment to an issue.
- Sort comments: display comments from newest or oldest first, or vice versa.
Add a comment
Open the issue you want to comment on and start typing your message in the sticky comment footer.
In Jira, you automatically become a watcher of the issues that you’ve commented on. To disable this:
- Select your user name in the upper right corner of the screen, then select Profile.
- In the Preferences section, set Autowatch to Disabled.
Delete a comment
Open the issue you’ve commented on, find the comment you want to remove, and then select Delete at the bottom of the comment. Confirm that you want to remove this comment from the issue by selecting Delete when prompted.
You can’t delete comments added by other users.
Edit a comment
Open the issue, select Edit at the bottom of your comment, and edit the text or restrictions (Viewable by...) as needed. When you save your revised comment, you’ll see the text “edited” next to the comment date, indicating that the commment has been edited.
You can hover over “edited” to see who edited the comment and when.
Link to a comment
Right-click on the comment timestamp, and then copy the link address. Paste the copied permanent link into your email or chat message.
Clicking the permanent link takes you to that particular comment in the Jira issue. If your Jira issue contains an extensive list of comments, the issue page will automatically be scrolled down so that the linked comment is visible.
Restrict a comment
Select Comment internally (for other internal agents and collaborators) or Share with customer (for customers) tab.
Canned responses for comments
Canned responses allow you to create, edit and manage responses that you can then use at any time, directly from the view issue screen. All agents in your project have access to the canned responses saved, so your colleagues can take advantage of your saved responses, and you can take advantage of theirs. Some typical examples of canned responses could be:
- a request for more information from the customer,
- an short message confirming work in ongoing and the next update will be in 24 hours, or
- a lengthy response asking a customer to accept terms and agreements before you continue with the work.
You can access your canned responses when adding a comment by selecting the canned responses icon . You can add a response directly from the Popular or Frequently used menu, or you can search for your response by typing the name in the search field, and selecting it. The canned response will be added to the comment field. Feel free to further edit your comment, it won't be added to the issue until you add the comment.
To edit a canned response, select > Edit responses, select the response you'd like to change and click Edit.
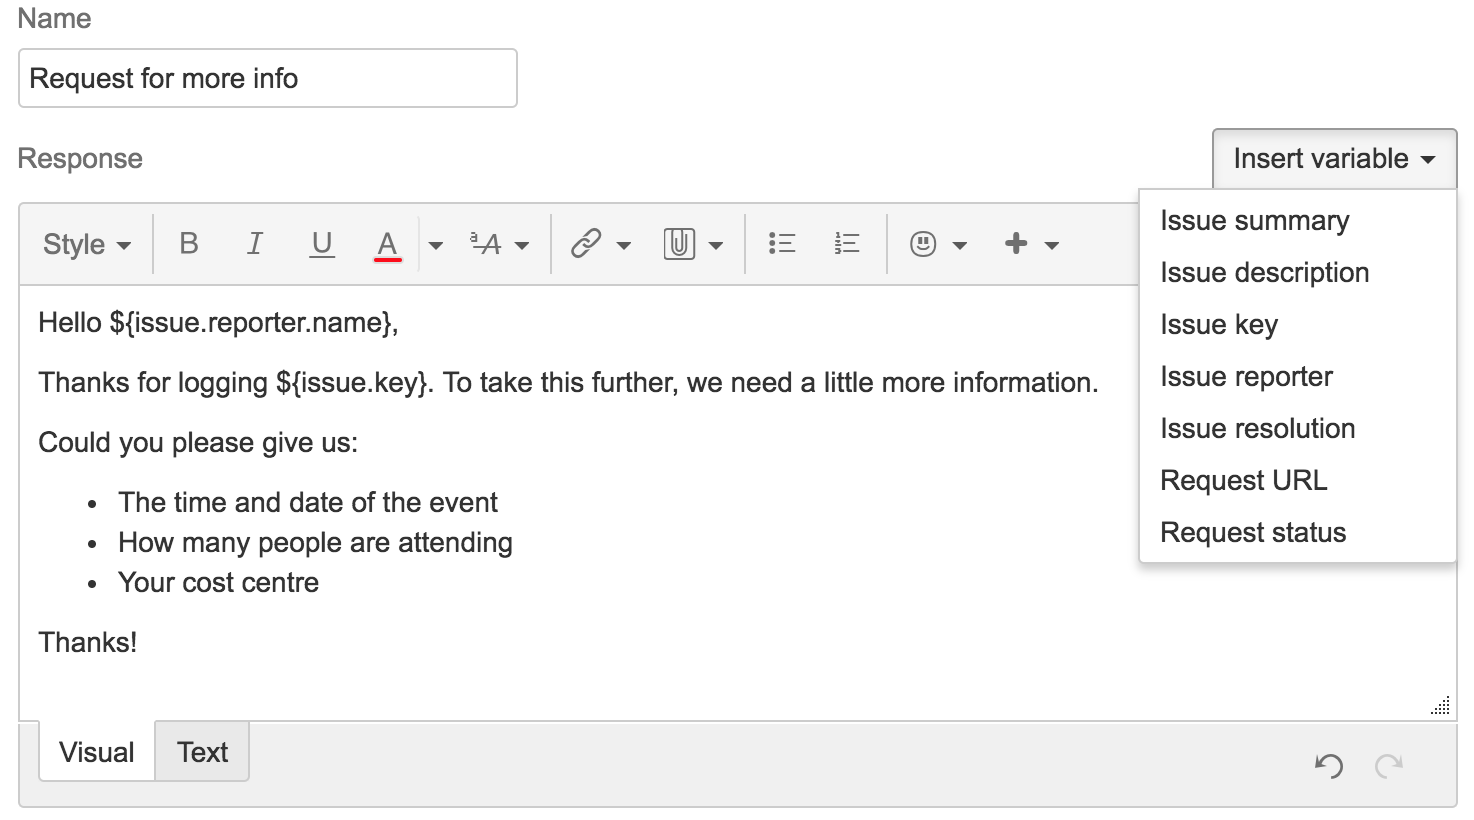
To add a canned response, you can either start with the text you've already added to the comment field, or with a a blank comment field. Select > Save as a response, and complete the form with a name for your response, the response, and then select Save.
Using variables in canned responses
A variable is a powerful way to customize your response. Using a variable in your response allows the response to automatically contain information related to the issue. For example, you may want to personalize your response by adding the reporter's name, or by adding the issue key. The current list of variables are shown on the image below:
Formatting text with wiki markdown
Jira application Text Formatting Notation allows you to use rich-text features, such as:
- Italic, bold, underlined text
- Multiple levels of headings
- Bullets, numbered lists, tables, and quotations
- Images
- Macros
When you edit an issue description, comment, or any rich-text field, you can expand the simple wiki editor toolbar to format your text and select preview to see how your formatted text will appear. Note that your Jira administrator can enable, disable and configure the renderer which allows you to use wiki markdown, so your options may vary slightly.
HTML macro
When using the HTML macro, which allow you to add HTML code to an issue, you should only use formatting as if you are including something inside the {{<body>}} directly. This prevents you from accidentally breaking the page formatting, or overriding Jira's CSS.
Note that if you're administrator has enabled the rich text editor, you'll still be able to format your content using wiki markdown, but if you select the visual editor, you'll see the markdown applied directly.
Tracking issues with labels
Labeling helps you categorize and search for an issue. When viewing an issue, select More > Labels to add or remove labels, which will appear in the Details section:
You can click a label (e.g. doc in the above screenshot) to jump to the Issue Navigator and see a list of all issues that have this label. You can also add the Labels Gadget to your dashboard to quickly find issues with labels relevant to you and your team.
Watching and voting for issues
What permissions do you need?
To view other users watching or voting for an issue, you need the View Voters and Watchers and Manage Watcher List project permissions.
If your administrator has set up the needed notification scheme, you can select Start watching this issue to be automatically notified of issue updates. You can also click the number of watchers on the issue to add other Jira users as watchers.
If your administrator has enabled the voting on issues, you can select Vote for this issue to encourage the responsible team to resolve or complete the issue.
Reordering sub-tasks on an issue
If you've added sub-tasks to an issue, and need to reorder them, you can drag and drop them on the issue navigator view of the parent issue. If you're using a board in Jira Software, you can also reorder the sub-tasks on the board view. However, these two methods are independent of each other. Reordering sub-tasks on the parent issue will not reorder tasks on an existing board, and vice-versa.


