Creating service project request types
- Setting up your service project
- Creating service project request types
- Making queues for your service project teams
- Adding service project agents
- Customize your service project channels
- Bring your service project to the next level
- Introduce customers to your service project
- Explore a sample project
Request types let you define and organize incoming issues so your service project team can more efficiently help your customers. If you're moving from an existing help desk application, you can add your existing request categories during this step.
If you're setting up service project request types for the first time:
- Think about how your customer would write a request, for example 'Order a new monitor' over 'Submit a hardware request'.
- Break things down into smaller chunks, such as 'Get help with printers' or 'Get wi-fi access'.
- Avoid specialist terminology; think 'I need access' more than 'Deploy SSH key'.
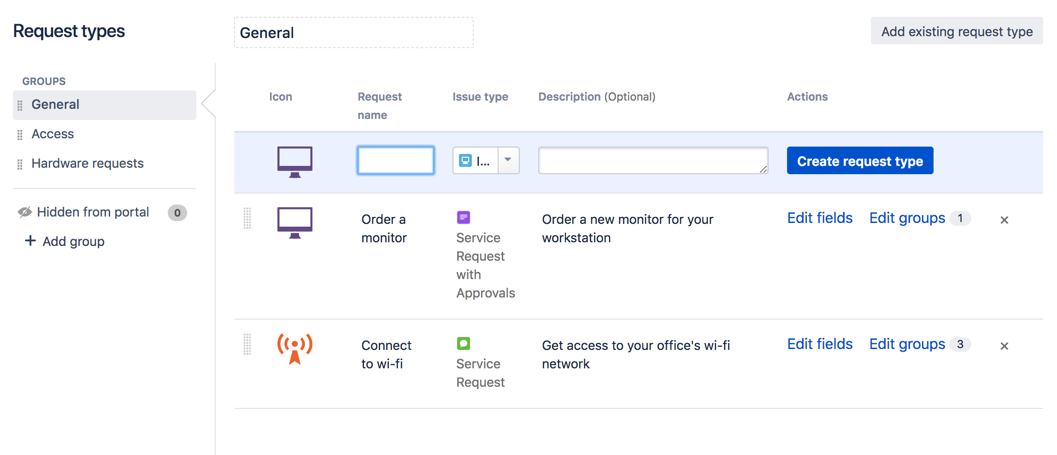
By the end of this step, your project's request type page should look something like this:
Requests vs. Issues
Remember that customers submit requests to your service project and your team picks up the corresponding issues to work on.
Create new request types
Let's go ahead and add two new request types, so you can familiarize yourself with the request type configuration options.
- In your new service project, select Project settings > Request types.
- In the new request type form at the top of the page, change the request type icon and enter the following details for a new "Connect to wi-fi" request type.
Select Create request type when you've finished entering your request type details. - Create a second request type called "Order a monitor" with the following details:
Select Create request type when finished.
Edit the fields your customers see
Now that you have requests in the customer portal, you can prompt your customers to give you the information you need to help them quickly. These simplified fields help customers understand what information they need to provide when submitting a request.
Let's add some fields to your request types, so you can collect some additional information.
- For the "Connect to wi-fi" request type, select Edit fields.
- Under Visible fields, click the "Summary" display name and rename it to "What do you need?". Add some placeholder text to the Field help to gather useful details from your customers. For example:
Select Update when finished. - Select Add a field to add the "Priority" field to the request form and select Apply.
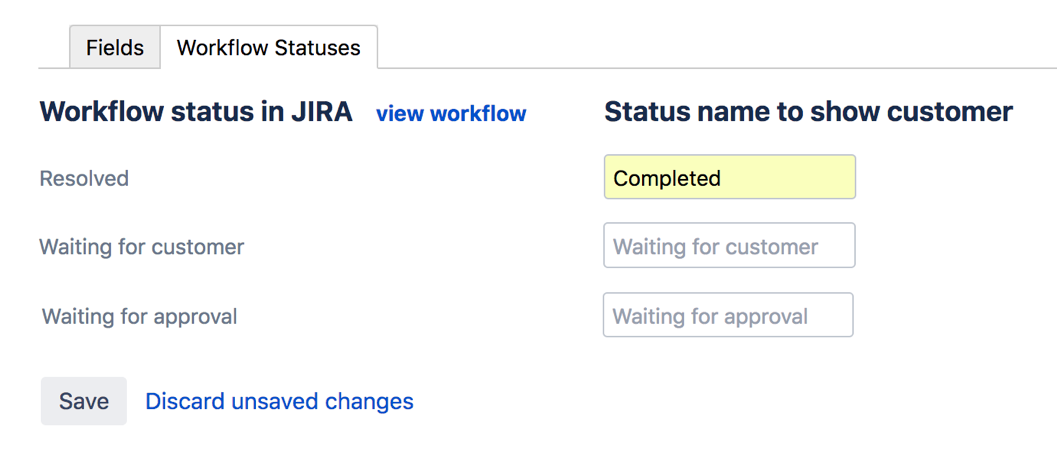
On the Workflow Statuses tab, you will see the default Jira workflow status names displayed on the left hand side. You can change how these statuses appear to customers by editing the Status name to show customer fields as shown:
Select View this request form to see how your changes appear in the customer portal.
Organize your requests with groups
A group is simply a category you can assign to each request type. In the customer portal, your request types are organized vertical tabs based on your groups.
We think groups are helpful if you have seven or more request types.
Go to Project settings > Request types. You should see your groups in the sidebar:
Let's add a few groups to help your customers find the request they need:
- To add request groups, select + Add group. Add two groups for your new request types, "Hardware requests" and "Access".
- When viewing your "Access" request group, select Add existing request type and choose your "Connect to wi-fi" request type:
- Switch to your "Hardware requests" group in the sidebar.
- Select Add existing request type and choose your "Order a monitor" request type.
- Open the customer portal link from your project sidebar to see your requests organized into groups.
- To rearrange the order of how your groups appear in the customer portal, go back to your project settings and drag and drop the groups in the request types sidebar.
Create a request from the customer portal
- Keep the customer portal preview open, so you can create test requests from a customer's perspective.
- Select the "Connect to wi-fi" request type.
- Enter "Test wi-fi request" in the open field and select Medium priority.
- Click Create to complete your request and view the open request in the customer portal.
- Click Close to exit the customer view and return to your service desk project.
Excellent work! You now have four request types and a new issue in your project. Next, you will learn how to sort these issues into queues, which will allow you to manage your team's workload.


