Upgrade a Bitbucket cluster manually without downtime
Step 1: Download upgrade files
https://www.atlassian.com/software/bitbucket/download
Alternatively, you can also use the Pre-upgrade planning tool to help you download a compatible bug fix version. Choose > Administration > Plan your upgrade to open the tool.
Step 2: Enable upgrade mode
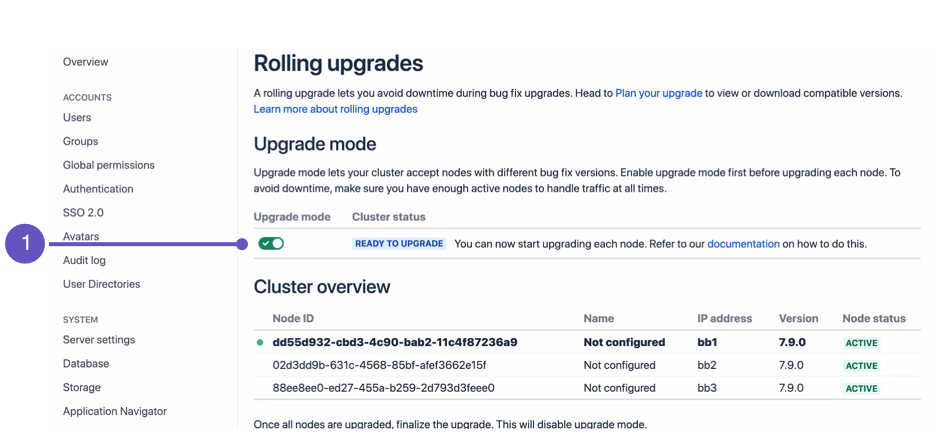
- Go to > Administration > Rolling upgrades.
Select the Upgrade mode toggle (1).
You can disable Upgrade mode as long as you haven’t upgraded any nodes yet.
Step 3: Upgrade the first node
For most environments, upgrading a node during a rolling upgrade consists of four phases:
Step 4: Upgrade all other nodes individually
After starting the upgraded node, wait for it to show up on the Cluster overview with an Active status. When it does, you can start upgrading another node using the instructions from the previous step. Do this for each remaining node – as always, we recommend that you upgrade the node with the lowest level of CPU activity.
Step 5: Finalize the upgrade
- Update your apps accordingly
- Perform UAT and other tests as needed
Troubleshooting
Node errors during rolling upgrade
There are several ways to address this:
Shut down Bitbucket gracefully on the node. This should disconnect the node from the cluster, allowing the node to transition to an Offline status.
If you can’t shut down Bitbucket gracefully, shut down the node altogether.
Once all active nodes are upgraded with no nodes in Error, you can finalize the rolling upgrade. You can investigate any problems with the problematic node afterwards and re-connect it to the cluster once you address the error.
Disabling upgrade mode
- haven't been upgraded yet
- aren't in an Error state
The cluster's status will transition to Mixed if an upgraded node joins the cluster or a node enters an error state.
Mixed status with Upgrade mode disabled
If a node is in an Error state with Upgrade mode disabled, you can't enable Upgrade mode. Fix the problem or remove the node from the cluster to enable Upgrade mode.
Rolling back to the original version
To roll back upgraded nodes to their original version:
Access the node through a command line or SSH.
Shut down Bitbucket gracefully on the node.
Wait for the node to go offline. You can monitor its status on the Node status column of the Rolling upgrade page’s Cluster overview section.
- Start Bitbucket on the node from your old installation directory. You should not see the setup wizard.
If you configured Bitbucket to run as a Linux service, don't forget to update its service configuration as well. Learn more about running Bitbucket as a Linux service.
Once all nodes are running the same version, the cluster’s status will revert back to Ready to upgrade. This will also allow you to disable Upgrade mode.
Traffic is disproportionately distributed during or after upgrade
To address this, you can also temporarily disconnect the node from the cluster. This will force the load balancer to re-distribute active users between all other available nodes. Afterwards, you can add the node again to the cluster.
