Using the Confluence REST API to upload an attachment to one or more pages
Platform notice: Server and Data Center only. This article only applies to Atlassian products on the Server and Data Center platforms.
Support for Server* products ended on February 15th 2024. If you are running a Server product, you can visit the Atlassian Server end of support announcement to review your migration options.
*Except Fisheye and Crucible
Purpose
Using the REST API can be helpful in automating certain operations within Confluence.
For instance, a Confluence user or administrator may need to upload an attachment to a page. However, going through the User Interface (UI) could be rather impractical depending on the number of target attachment files or target pages.
This document provides a step-by-step procedure on how to use the Confluence REST API to upload an attachment, provided you have the target page ID.
The suggested solution is provided as a set of bash commands using curl and jq to run the REST API call and manipulate json output.
You may use this example to create an automation tool on your preferred coding language.
This document is provided as-is, what means that Atlassian Support won't provide assistance on modifying this example to fit your use case.
However, we will definitely support you if a REST API call isn't working as it should.
See Atlassian Support Offerings for additional information.
Solution
The solution is broken down into individual steps that we will then join together in a single shell script.
Define environment variables
These variables will be used along with the subsequent commands.
Some notes about these variables:
- Make sure the user performing these changes has the appropriate Space Permissions and, if applicable, Page Restrictions. Note that Confluence REST API follows the same permissions/restrictions when the user is performing similar operations from the UI (browser).
- The attachment type should be either
imageorfile. This is used to determine the macro to preview the attachment that will be added to the page. - The ID of the target page should be known. See How to get Confluence page ID for how to get this value.
USER_NAME=<username> # the user must have the necessary permissions on the target page and space
USER_PASSWORD=<user password>
CONFLUENCE_BASE_URL=<Confluence Base URL>
ATTACHMENT_TYPE=<image | file>
ATTACHMENT_FILE_NAME=<full path to the attachment file>
PAGE_ID=<target pageid>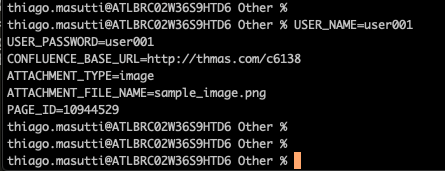
Upload attachment to the target page
First, we will upload the attachment file to the target page. This is accomplished by sending a POST request to the /rest/api/content/<pageID>/child/attachment API method. The results of this API call are filtered to get the attachment title which should be name of the file. This indicates that the operation succeeded.
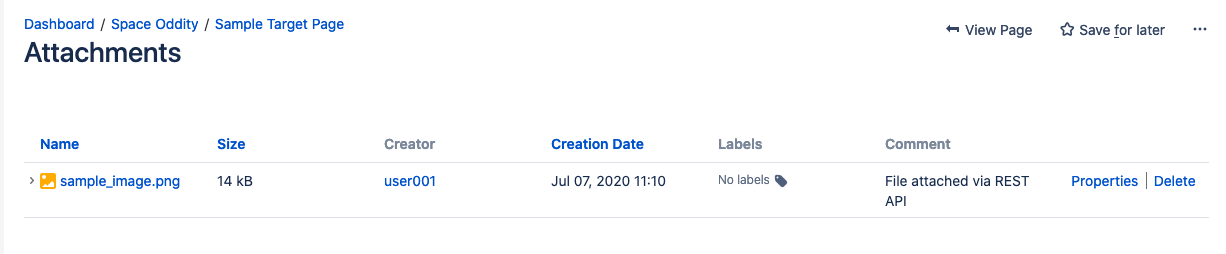
Please note that at this point, the attachment will not yet be added to the page content as this would be the equivalent of uploading the attachment using the UI as shown below:

curl -u $USER_NAME:$USER_PASSWORD \
 -X POST \
 -H "X-Atlassian-Token: nocheck" -F "file=@${ATTACHMENT_FILE_NAME}" -F "comment=File attached via REST API" \
 ${CONFLUENCE_BASE_URL}/rest/api/content/${PAGE_ID}/child/attachment 2>/dev/null \
 | jq -r '.results[].title'
Using the Personal access tokens method to upload attachments.
We use the same above method but instead of passing the username or password. We can upload attachments using personal access tokens. In case you need info on how to create personal access tokens refer to our documentation Using Personal Access Tokens.
curl -X POST \
  -H "Authorization: Bearer PAT_key" \
  -H "X-Atlassian-Token: no-check" \
  -H "Content-Type: multipart/form-data" \
  -F "file=@FILE_PATH" \
  "$CONFLUENCE_URL/rest/api/content/$PAGE_ID/child/attachment"
Get current content and metadata from the target page
In this step, we'll get the page content and metadata (Title, Space, version, author, etc) and save them to a temporary environment variable. This information will then be used in the next steps. To do this, we'll make a GET request to the /rest/api/content/<pageID>?expand=body.storage,version,space API method.
REST_CONTENT_FULL_OUTPUT=$(curl -u ${USER_NAME}:${USER_PASSWORD} \
${CONFLUENCE_BASE_URL}'/rest/api/content/'${PAGE_ID}'?expand=body.storage,version,space' 2>/dev/null)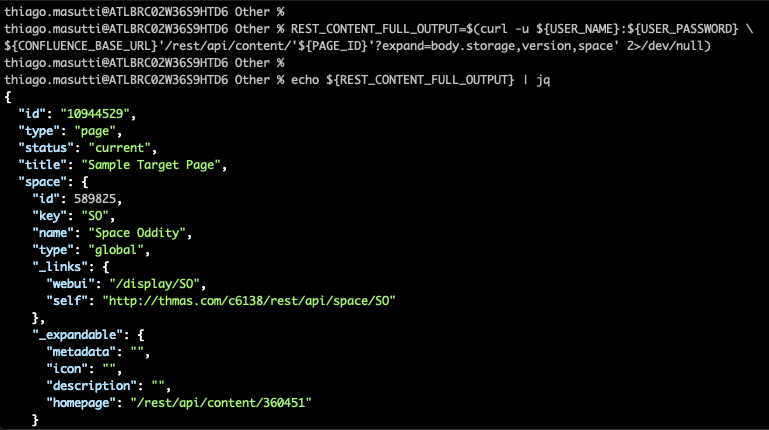
Edit the page content and metadata
Next, we'll filter the necessary information from the previous output so that we can update the page content and its metadata.
Two modifications are performed in this step:
- Page version (
version.number): an increment of the page version. - Page content (
body.storage.value): we'll include a macro to display the attachment at the bottom of the page. We'll use the attachment type to determine which macro should be used.
At this point, we are just modifying the information without sending it to Confluence. The modifications are saved in a temporary file named modified-page-data.json.
if [ ${ATTACHMENT_TYPE} = "image" ]; then
    echo ${REST_CONTENT_FULL_OUTPUT} | \
    jq  '{body: {storage: {value: (.body.storage.value + "<p><ac:image ac:height=\"250\"><ri:attachment ri:filename=\"'${ATTACHMENT_FILE_NAME}'\" /></ac:image></p>"), representation: .body.storage.representation}}, id: .id, type: .type, title: .title, space: {key: .space.key}, version: {number: (.version.number + 1)}}' \
    > modified-page-data.json
else
    echo ${REST_CONTENT_FULL_OUTPUT} | \
    jq  '{body: {storage: {value: (.body.storage.value + "<ac:structured-macro ac:name=\"view-file\" ac:schema-version=\"1\" ac:macro-id=\"'${MACRO_UUID}'\"><ac:parameter ac:name=\"name\"><ri:attachment ri:filename=\"'${ATTACHMENT_FILE_NAME}'\" /></ac:parameter><ac:parameter ac:name=\"height\">250</ac:parameter></ac:structured-macro>"), representation: .body.storage.representation}}, id: .id, type: .type, title: .title, space: {key: .space.key}, version: {number: (.version.number + 1)}}' \
    > modified-page-data.json
fi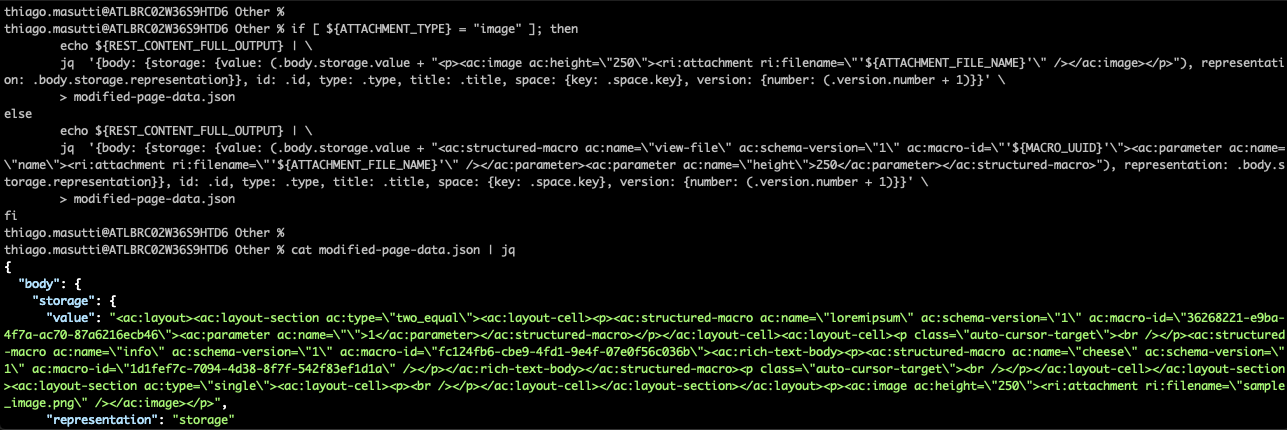
Upload the modified page
Now, we'll read the temporary file with the modifications and update the target page by sending a PUT request to the /rest/api/content/<pageID> API method.
At the end of the execution, the pageID is filtered from the output so that we can confirm that it worked as expected.
curl -u ${USER_NAME}:${USER_PASSWORD} \
-X PUT \
-H 'Content-Type: application/json' \
--data @modified-page-data.json \
${CONFLUENCE_BASE_URL}'/rest/api/content/'${PAGE_ID} 2>/dev/null \
| jq -r '.id'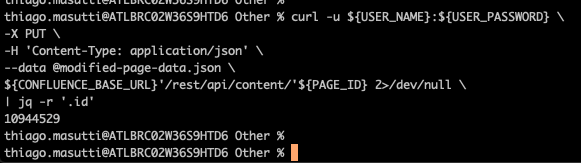
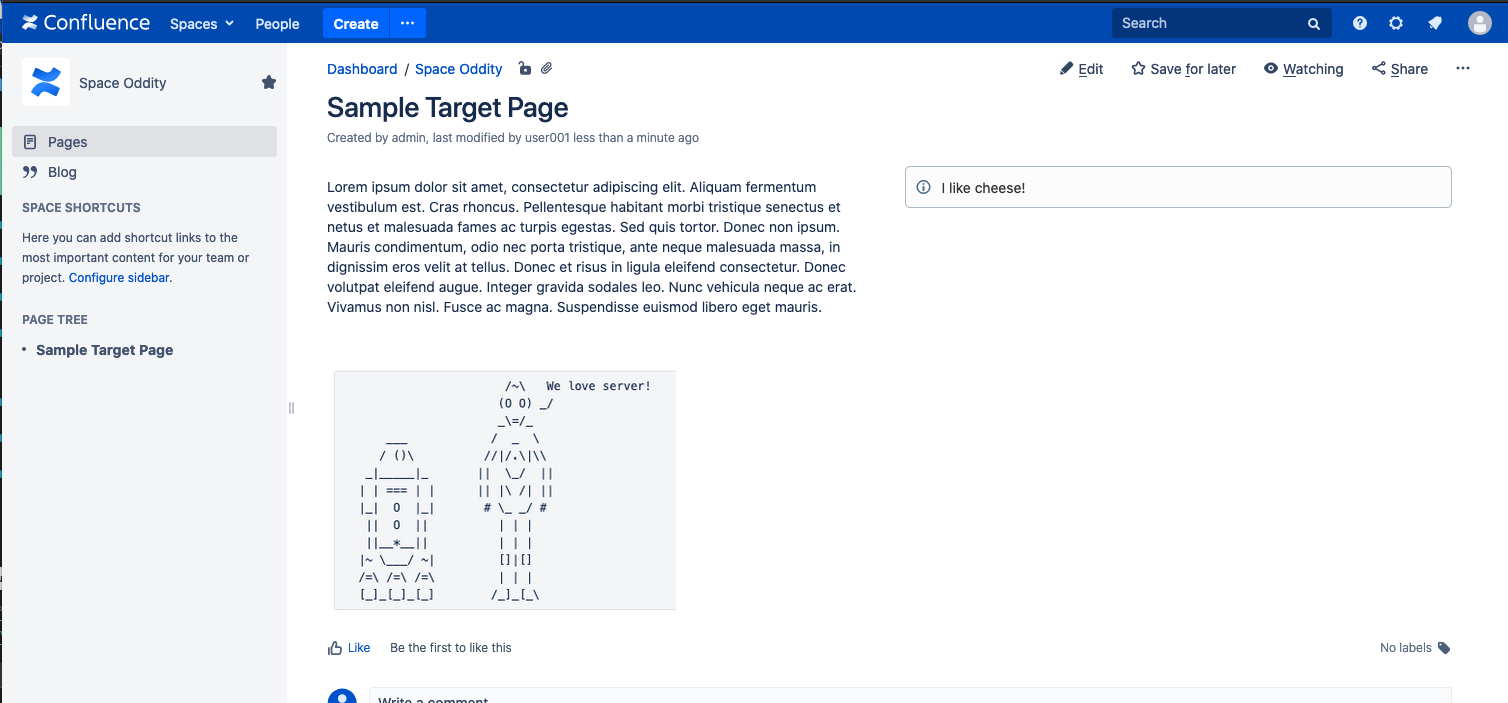
If we take a look at the page after this has been performed, then we'll see the image in the page content.
Combined Shell Script
The shell script below includes all of the steps highlighted above.
By creating a text file named target_page_id.txt and loading it with a list of page IDs, you can bulk upload a specific attachment to multiple pages.
You may use this as an example to create an automation tool that fits your requirements and in your preferred coding language.
USER_NAME=user001
USER_PASSWORD=user001
CONFLUENCE_BASE_URL=http://confluence.my.company.com/confluence
ATTACHMENT_TYPE=image
ATTACHMENT_FILE_NAME=new_sample_image.png


for PAGE_ID in $(cat target_page_id.txt); do

 #######
 # upload attachment to the target page and capture the attachment title/name
 #######
 ATTACHMENT_TITLE=$(curl -u $USER_NAME:$USER_PASSWORD \
 -X POST \
 -H "X-Atlassian-Token: nocheck" -F "file=@${ATTACHMENT_FILE_NAME}" -F "comment=File attached via REST API" \
 ${CONFLUENCE_BASE_URL}/rest/api/content/${PAGE_ID}/child/attachment 2>/dev/null \
 | jq -r '.results[].title')

 if [ ${ATTACHMENT_TITLE} = ${ATTACHMENT_FILE_NAME} ]; then
     echo "File ${ATTACHMENT_TITLE} uploaded to page ${PAGE_ID}"

     echo >modified-page-data.json
     MACRO_UUID=$(uuidgen 2>/dev/null)

     #######
    # get the page content and metadata
    #######
    REST_CONTENT_FULL_OUTPUT=$(curl -u ${USER_NAME}:${USER_PASSWORD} \
    ${CONFLUENCE_BASE_URL}'/rest/api/content/'${PAGE_ID}'?expand=body.storage,version,space' 2>/dev/null)


    #######
    # get the page content and metadata; add 1 to the version number; add the attachment to the bottom of the page; save the output to a temporary file
    #######
    if [ ${ATTACHMENT_TYPE} = "image" ]; then
        echo ${REST_CONTENT_FULL_OUTPUT} | \
        jq  '{body: {storage: {value: (.body.storage.value + "<p><ac:image ac:height=\"250\"><ri:attachment ri:filename=\"'${ATTACHMENT_FILE_NAME}'\" /></ac:image></p>"), representation: .body.storage.representation}}, id: .id, type: .type, title: .title, space: {key: .space.key}, version: {number: (.version.number + 1)}}' \
        > modified-page-data.json
    else
        echo ${REST_CONTENT_FULL_OUTPUT} | \
        jq  '{body: {storage: {value: (.body.storage.value + "<ac:structured-macro ac:name=\"view-file\" ac:schema-version=\"1\" ac:macro-id=\"'${MACRO_UUID}'\"><ac:parameter ac:name=\"name\"><ri:attachment ri:filename=\"'${ATTACHMENT_FILE_NAME}'\" /></ac:parameter><ac:parameter ac:name=\"height\">250</ac:parameter></ac:structured-macro>"), representation: .body.storage.representation}}, id: .id, type: .type, title: .title, space: {key: .space.key}, version: {number: (.version.number + 1)}}' \
        > modified-page-data.json
    fi

    #######
    # update the page
    #######
    MODIFIED_PAGE_ID=$(curl -u ${USER_NAME}:${USER_PASSWORD} \
    -X PUT \
    -H 'Content-Type: application/json' \
    --data @modified-page-data.json \
    ${CONFLUENCE_BASE_URL}'/rest/api/content/'${PAGE_ID} 2>/dev/null \
    | jq -r '.id' )

    if [ ${MODIFIED_PAGE_ID} -eq ${PAGE_ID} ]; then
        echo "Page ${PAGE_ID} successfully updated."
    else
        echo "Failed to updated page ${PAGE_ID}."
    fi

 else
    echo "Failed to upload file to page ${PAGE_ID}"
 fi

done
See Also
Confluence REST API Documentation