Configuring workflow triggers

You must have Jira Software to start using workflow triggers.

Triggers are a powerful tool for keeping your Jira issues synchronized with the information in your development tools (Fisheye/Crucible, Bitbucket and GitHub). Instead of relying upon developers to manually update the status of issues after committing code, completing reviews, creating branches, etc, you can configure triggers in your workflow to automatically transition issues when these events occur in your development tools. For example, you could configure a trigger to automatically transition an issue from 'To Do' to 'In Progress' when a branch is created.

On this page:

This page will help you get started using triggers. We will show you how to set up triggers in a workflow and demonstrate how an automatic transition works. We will also provide some guidelines on how to best configure a trigger and help you troubleshoot your triggers.

Before you begin

Before you can start using triggers, you need to connect your development tools to Jira Software. At a minimum, you will need a Jira Server instance, plus at least one of the following:

For instructions on how to connect these tools to Jira, see Integrating with development tools. This page also includes details on other functionality you can enable by connecting the various development tools Atlassian offer.

Guide: Setting up triggers

In this example, you will be configuring a Jira workflow with triggers. By the end of this section, you will have an understanding of how to configure triggers and what a typical development workflow with triggers looks like.

Introduction

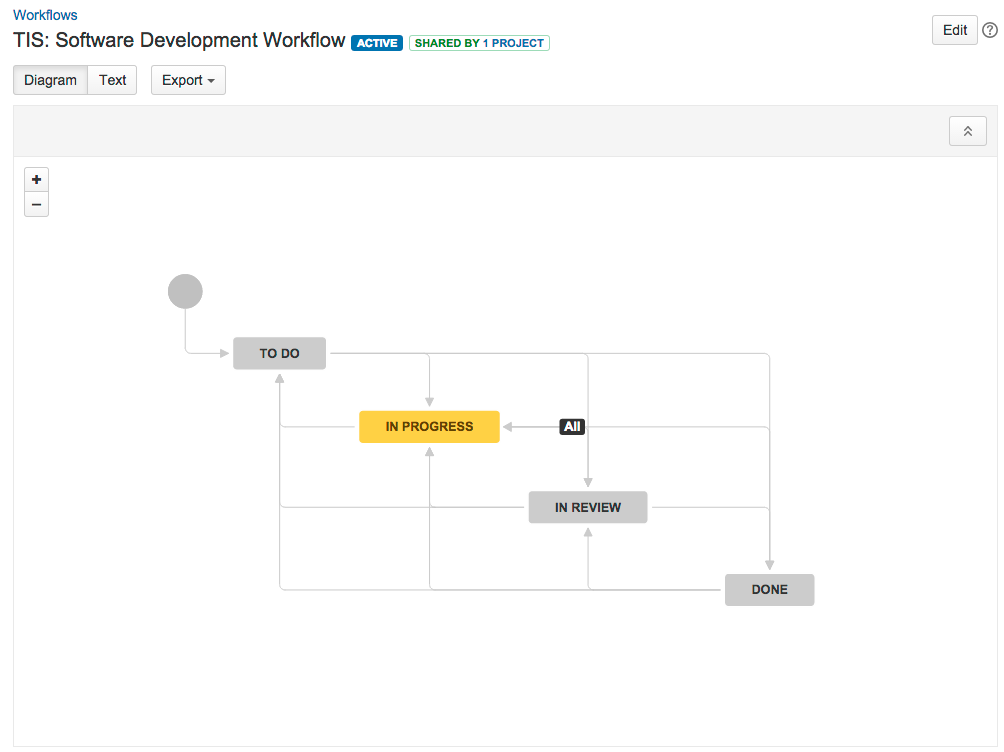
The screenshot and table below show a workflow and triggers similar to what you will be configuring. They reflect the typical interactions between Jira and development tools in a software development lifecycle. Jira Software , Bitbucket Server and Fisheye/Crucible (3.5.2) are used for this example, but you can configure something similar using any of the supported development tools.

TransitionTriggers

Start progress
(To DoIn Progress)

Branch created (Bitbucket Server)
Commit created (Bitbucket Server)

Start review
(In ProgressIn Review)

Pull request created (Bitbucket Server)
Pull request reopened ((Bitbucket Server)
Review started (Crucible)

Restart progress
(In ReviewIn Progress)

Pull request declined (Bitbucket Server)
Review rejected (Crucible)
Review abandoned (Crucible)

Done
(In ReviewDone)

Pull request merged (Bitbucket Server)
Review closed (Crucible)

Step 1. Create/Edit a workflow

The easiest way to create a software development workflow is to create a new project, choosing a relevant project type. This will set up your new project with the software development workflow, which is identical to the one shown above.

If you already have a similar workflow, navigate to it and edit it: Jira administration console > Issues > WorkflowsEdit

Step 2. Add a trigger to a transition

We'll start by adding a 'Commit created' trigger to the 'Start progress' transition. Ensure that you are editing (not viewing) the workflow.

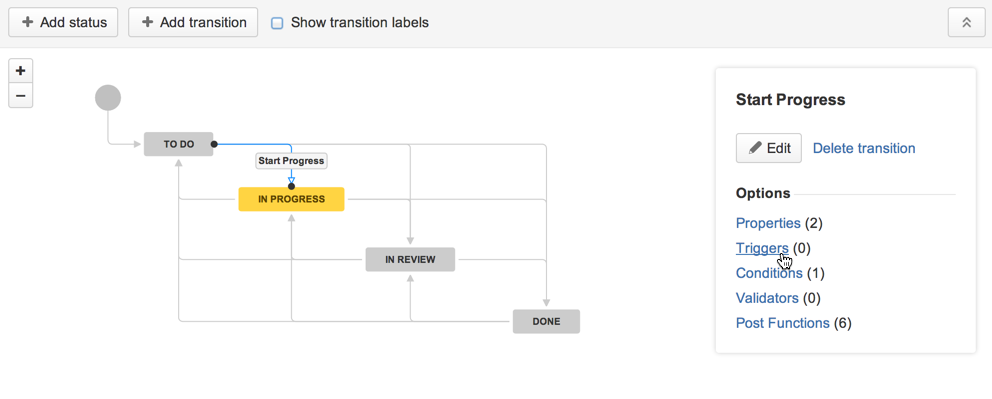
1. Select the Start progress transition in the workflow, i.e. the line from 'To Do' to 'In Progress'. A panel will display on the right, showing the details of the transition.

Related topic: Why you shouldn't configure triggers on global transitions

2. Click Triggers in the panel. The 'Transition: Start Progress' screen will display with the 'Triggers' tab showing.

3. Click Add trigger , then select Commit created in the dialog that appears. A diagnostics window will display — you'll notice that the trigger will be added for all development tools that Jira is connected to.

Related topic: How to enable different events for triggers


4. Click Add trigger to add the trigger. It will appear in a list at the bottom of the 'Triggers' tab. You can check whether it is working by clicking View Details .

That's it! Don't forget to publish your draft workflow.

Step 3. Test the trigger

Now that you have added the 'Commit created' trigger to the 'Start progress' transition, let's test it by making a commit.

1. Create an issue in your Jira project. This project needs to be using the workflow that you just edited.
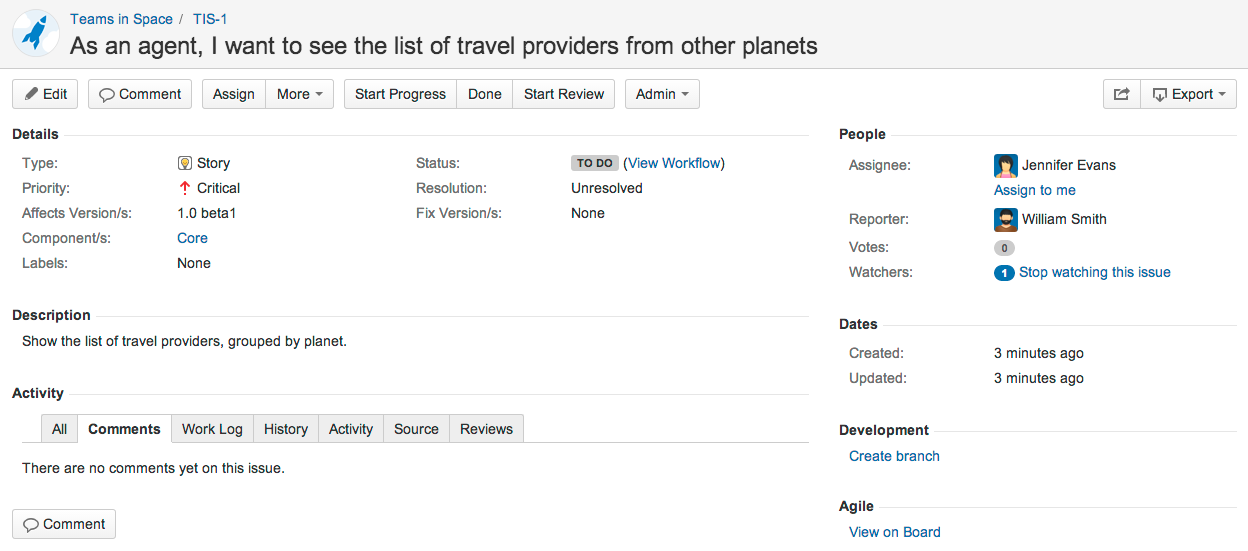
The status of your new issue should be 'To Do'. Take note of the issue key, as you'll need it for the next step.

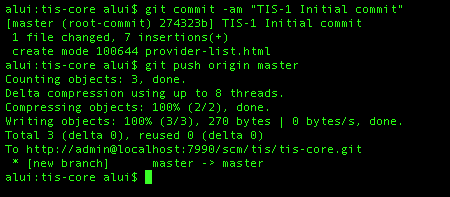
2. Commit some code to your Bitbucket repository. You can commit anything, however you will need to include the issue key in your commit message.
In this example, the issue key is TIS-1, which is referenced in the commit message shown in the screenshot. 

Related topic: Referencing a Jira issue in a commit, branch, pull request, or review

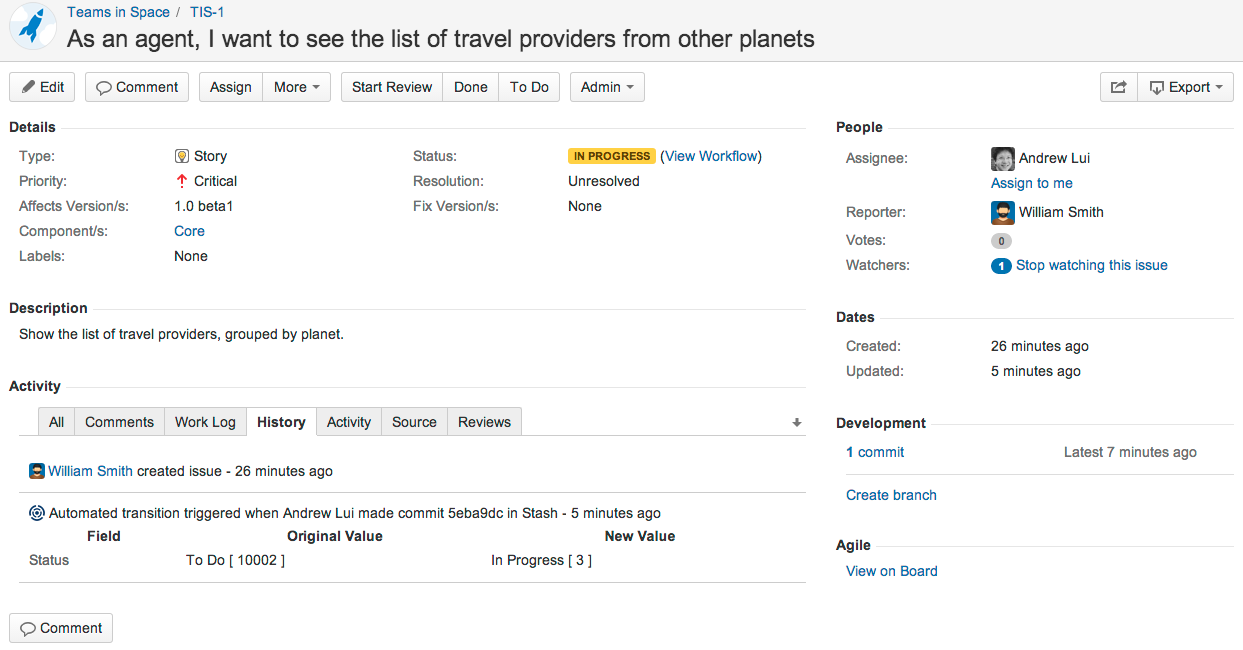
3. Check your issue in Jira again. The status should have changed from 'To Do' to 'In Progress'. If you click the History tab or Activity tab, you can see the automatic transition that changed the issue's status.

Related topics: How the user is mapped from the development tool to Jira;
Event handling and event limits;
How triggers relate to other workflow operations/constraints 

Step 4. Add the rest of the triggers

Now that you've added and tested a trigger, follow the same process to add the rest of the triggers in the list above.

Don't want to set all of this up? Good news! You can download a similar workflow (pre-configured with triggers) from the Atlassian Marketplace: download 'Development Workflow with Triggers'.
 

(tick) Congratulations! You have now set up a workflow with triggers.

Understanding triggers

The following topics explain how triggers work in more detail, so you can use them more effectively.

Trigger events

Events (e.g. Commit created) are made available for triggers by integrating Jira with particular development tools. The table below lists the events that are enabled for each development tool.

Dev toolBitbucket, GitHub, GitHub EnterpriseCrucibleFisheye
Events
  • Pull request created
  • Pull request merged
  • Pull request declined (Bitbucket only)
  • Pull request reopened (Bitbucket Server only)
  • Commit created
  • Branch created
  • Review started
  • Submitted for approval
  • Review rejected
  • Review abandoned
  • Review closed
  • Review summarized
  • Commit created
  • Branch created

There is a known issue where the 'Branch created' event isn't supported for GitHub, which is being tracked under DCON-432 - Getting issue details... STATUS — please keep this in mind when configuring trigger events.

Triggers and global transitions

We recommend that you do not configure triggers for global transitions , unless you are confident that you understand exactly how the trigger will affect the behavior of the issue.

A global transition allows any status in a workflow to transition to a particular status. This is represented in the workflow viewer/editor by a black All lozenge pointing to the status that the global transition targets. For more information about global transitions, see Advanced workflow configuration.

Configuring triggers for global transitions can often result in an issue unexpectedly transitioning to the target status for the global transition. For example, consider if you configured a 'Commit created' trigger for the global transition to the 'In Progress' status. Committing code can happen at many stages during an issue's lifecycle (e.g. writing the initial code, changing code after a review, etc). This could result in the issue incorrectly transitioning to 'In Progress' out of a number of statuses, like 'In Review' or 'Done'.

Tip: If you do use global transitions in your workflow, you will probably have multiple transitions into a status. This means that users will have multiple workflow options on an issue (e.g. both 'Start Progress' and 'In Progress'). To hide options, add the 'Hide transition from user' condition to the relevant transitions.

Referencing a Jira issue in a commit, branch, pull request, or review

The table below describes how to reference a Jira issue in a commit, branch, pull request, or review, so that these events will trigger transitions for the issue (provided that you have set up triggers on the transitions).

EventInstructions
Create commit

Include the issue key in the commit message.

For example, a commit message like this "TIS-1 Initial commit" will automatically transition the TIS-1 issue from 'To Do' to 'In Progress'.

Create branch

Include the issue key in the branch name, when you create the branch.

For example, if you name your branch "TIS-2-feature", it will automatically transition the TIS-2 issue from 'To Do' to 'In Progress'.

Create/Reopen/Decline Merge pull request

Ensure that the pull request includes commits that reference the issue (in their commit messages).

For example, if you create a pull request that has "TIS-3" in the title, it will automatically transition the "TIS-3" issue from 'In Progress' to 'In Review'. If you reopen, decline or merge the pull request, it will also transition the "TIS-3" issue accordingly.

Start/Reject/Abandon/Close review

Include the issue key in the review title, when you create the review.

For example, if you name your review "TIS-4 New story" and start the review, it will automatically transition the TIS-4 issue from 'In Progress' to 'In Review'. If you reject, abandon or close the review, it will also transition the "TIS-4" issue accordingly.

User mapping from the development tools to Jira

The following process describes how a development tool user is mapped to a Jira user for workflow triggers. It applies to all events, however each development tool uses a different email address and username for the mapping (see the bullet point following the process description below).

  • Process: The user initiating the event in the development tool is mapped to a Jira user by matching the email address, then the username, i.e.
    • Single Jira user with a matching email address — Transition the issue as the Jira user.
    • No Jira users with a matching email address — Transition the issue as an anonymous user.
    • Multiple users with a matching email address in Jira — Try to find a matching username in that group of users. If there is a Jira user with a matching username, transition the issue as the Jira user. If there is no matching username, transition the issue as an anonymous user.
  • Email address and username used for user mapping:

    Stash
    Event(s)Email address and username used for user mapping
    All pull request eventsThe Bitbucket Server email address and username of the user who actioned the pull request.
    Commit createdThe email address associated with the commit and the Bitbucket Server username that the email address maps to. If the email address does not map to a username, the authors "name" from the commit will be used.
    Branch createdThe Bitbucket Server email address and username of the authenticated user that pushed the branch to Bitbucket Server.
    FishEye/Crucible
    Event(s)Email address and username used for user mapping
    Commit createdThe email address associated with the commit and the Fisheye username that the email address maps to. If the email address does not map to a username, the authors "name" from the commit will be used.
    Branch createdThis event is not mapped to a Jira user. This means that the issue will be transitioned as an anonymous user. 
    All review eventsThe Crucible email address and username of the authenticated user that actioned the review.
    Bitbucket
    Event(s)Email address and username used for user mapping
    All pull request eventsThe Bitbucket email address and username of the user who actioned the pull request. Note, the Bitbucket user needs to have made at least one commit (with that email address configured for their profile), otherwise the pull request cannot be mapped to a Jira user. This means that the issue will be transitioned as an anonymous user. 
    Commit createdEmail address associated with the commit and the Bitbucket username that the email address maps to. If the email address does not map to a username, the authors "name" from the commit will be used.
    Branch created This event is not mapped to a Jira user. This means that the issue will be transitioned as an anonymous user. 
    GitHub / GitHub Enterprise
    Event(s)Email address and username used for user mapping
    Pull request created / Pull request merged GitHub email address and username of the user who actioned the pull request. Note, the GitHub user needs to have made at least one commit (with that email address configured for their profile), otherwise the pull request cannot be mapped to a Jira user. This means that the issue will be transitioned as an anonymous user.  
    Commit createdEmail address associated with the commit and the GitHub username that the email address maps to. If the email address does not map to a username, the authors "name" from the commit will be used.
    Branch created  This event is not mapped to a Jira user. This means that the issue will be transitioned as an anonymous user.  

Event handling and event limits

In most cases, the processing of events from your development tools into automatic issue transitions should be seamless. However, sometimes there may be delays in issues transitioning or issues not transitioning at all, due to how events are handled or event limits.

  • Event handling — Events are handled differently depending on whether the development tool connects to Jira via the DVCS connector or an application link. This can affect whether events are delayed or lost when Jira is unavailable:

    Bitbucket and GitHub

    Events from Bitbucket and GitHub are processed via the DVCS connector in Jira. The DVCS connector processes events from Bitbucket and GitHub via two synchronization mechanisms: a webhook-triggered synchronization and a scheduled synchronization.

    • Webhook-triggered synchronization: the DVCS connector uses webhooks in Bitbucket and GitHub to post data to Jira when an event occurs. This is the standard mechanism for processing events, which means that issues should be automatically transitioned almost immediately after a Bitbucket/GitHub event.
    • Scheduled synchronization: if Jira cannot be contacted when a Bitbucket/GitHub event occurs, the event is stored by the DVCS connector and sent at the next scheduled synchronization (every 60 minutes, by default). This is a backup mechanism in case the webhook-triggered synchronization fails.
    Stash and FishEye/Crucible

     Events from Bitbucket Server and Fisheye/Crucible are processed via the application link. However, Bitbucket Server and Fisheye/Crucible are responsible for ensuring that events are sent, and they send them once at the time that the event occurs. This means that if Jira is unavailable when the events are sent, the events will be lost.

  • Event limits — Event limits are imposed on all of the development tools so that Jira is not overloaded with too many events. Any events sent after the event limit is exceeded are lost. Event limits for each development tool are listed below:

    Bitbucket and GitHub
    • Webhook-triggered synchronization: 10 branches; 100 commits
    • Scheduled synchronization: 600 branches (sync interval in minutes x 10); 6000 commits (sync interval in minutes x 100)
      The event limits for scheduled synchronizations can be less than 600 branches and 6000 commits, if the synchronization interval is reduced, but never greater.
    Stash

    10 branches; 100 commits per synchronization
    A further constraint that applies on top of the 10 branches and 100 commits limits is a 100,000 issue changed event limit. For example, if 100 commits each reference more than 1000 issue keys, the issue changed limit would be exceeded.

    FishEye/Crucible

    6000 events per synchronization

How triggers relate to other workflow operations/constraints

When a transition is triggered automatically, it ignores any conditions, validators or permissions configured on the transition.

However, post functions are still executed. You need to be careful that if your post function requires a user, that your transition will not be executed by an anonymous user (see user mapping section above).

Troubleshooting

If you are having problems setting up a trigger or getting a trigger to work, follow the steps below to troubleshoot your problem.

1. Use the trigger diagnostics

Your first step in troubleshooting a trigger is to check the diagnostics for it in Jira. The diagnostics can tell you if there is a problem with the connection to your development tools or whether an issue did not automatically transition as expected.

  1. Navigate to the Jira administration console > Issues > Workflows > Find your workflow and click View (Operations column)
  2. In Text mode (not Diagram mode), click the desired transition.
  3. On the transition screen (Triggers tab will be showing), click View details for the desired trigger to show the diagnostics information. 
    • The 'Trigger sources' section lists problems related to the integration between Jira and your development tools. For example, whether you have the correct type of authentication configured.
    • The 'Transition failures' section lists issues that have failed to automatically transition despite the trigger firing. For example, an anonymous user was mapped to the transition but the transition has a post function that requires a non-anonymous user.

2. Check for common problems

If you cannot resolve your problem with the information from the trigger diagnostics, check the list of common problems below for possible causes and solutions.

I cannot add a trigger to a transition:

Possible causes...
CauseSolution
Jira or your development tools are not the correct versionInstall/Upgrade to the correct version. You must have Jira 6.3.3+ and one of the following development tools to enable workflow triggers: Bitbucket Server (Stash 3.2.0+), Fisheye/Crucible 3.5.2+, Bitbucket, GitHub
Your development tools are not connected to Jira correctly

Check the configuration of your connection:

  • Jira + Bitbucket Server/Fisheye/Crucible: You need to configure a two-way application link using Oauth with 2LO and 3LO.
  • Jira + Bitbucket/GitHub: You need to configure the DVCS connector correctly.

For more details, see Integrating with development tools .

The trigger that you are trying to add has already been added to the transition

Do nothing.

All triggers are unique per transition, that is, you can only add a trigger to a transition once.

The issue does not transition:

Possible causes...
CauseSolution
Your project is not using the workflow that has been configured with triggersNavigate to your project's summary > Administration > Workflows, and check that your project is using the workflow that you have configured with triggers.
You have not saved your workflow changes where the triggers were addedNavigate to the workflow that you added triggers to. Check that it has been published by viewing the workflow transitions and confirming that your triggers are present.
Jira cannot be reached by your DVCS

Wait an hour. If it still cannot be reached after an hour, check that the connection to your DVCS is configured correctly, see Integrating with development tools .

If triggers are not configured or Jira is not reachable from Bitbucket/GitHub, then the delay might be up to one hour, as there is still an hourly synchronization of commits/branches/pull requests happening regardless of the triggers configuration. For more information, see the Event handling and event limits section above.

Your DVCS repository is not linked to the synchronized DVCS account

Navigate to the Jira administration console > Add-ons > DVCS Accounts and enable your repository.

If you have not configured Bitbucket or GitHub to autolink new repositories, you may have repositories that are not enabled (i.e. linked to your DVCS account). This means that events from the unlinked repository will not be sent to Jira, hence the issue will not transition automatically, even if you have configured a trigger.

Your commits are too old

Only commits less than 21 days old will cause a transition. This is to prevent bulk uploads from causing bulk transitions. 

If you want to work around this, you can change the 21 day constraint by editing the jira-config.properties file (in your Jira home directory) and adding the following property:

jira.devstatus.commitcreated.age.timeout=P2D

where P2D is an example ISO-8601 duration representing 2 days.

The operation is not permitted for anonymous users

Check that each user in your development tools maps to a Jira user.

Certain issue operations will throw exceptions when the transition is performed by an anonymous user. These are:

  • The CreateIssue event (this probably relates to 'Create' or 'Create Issue' transition in your workflow)
  • Post functions that assume a user is performing the transition

A triggered transition is performed by an anonymous user if the event in the development tool cannot be mapped to a Jira user. For more information, see the section on user mapping above.

The maximum number of automatic transitions permitted for an issue has been exceeded

Check that your workflow transitions do not end in an infinite loop.

By default, only 50 automatic transitions are permitted per issue. This is to prevent issues from becoming stuck in infinite loops. If your workflow actually requires more than 50 automatic transitions per issue, you can override this constraint by editing the jira-config.properties file (in your Jira home directory) and adding/updating the following property:

jira.automatic.transitioning.issue.limit

Automatic issue transition events are incorrectly suppressed by the development tool

Change the repository/project settings to allow events to be sent.

You may have configured Bitbucket Server ( Stash 3.3 - 3.5) or Fisheye (3.5+) repositories to suppress events sent to Jira for workflow triggers, if duplicate events were being sent. Duplicate repository events may be sent to Jira when you have the same repository indexed by multiple development tools. Note, Jira will automatically remove duplicate commit events (Jira 6.3.3+) and branch creation events (Jira 6.3.11+) when processing workflow triggers.

You shouldn't suppress repository events from Bitbucket Server or Fisheye, unless duplicate events are causing issues to transition incorrectly.

The issue transitions but not as expected:

Possible causes...
CauseSolution
You have configured a trigger on a global transition

Investigate how the trigger event affects issues in different statuses. Consider removing the trigger from the global transition.

We recommend that you do not configure triggers for global transitions, unless you are confident that you understand exactly how the trigger will affect the behavior of the issue. See Triggers and global transitions above for more information.

Workflow conditions, validators and permissions are intentionally ignored for automatic issue transitions

Do nothing.

If you were expecting workflow conditions, validators or permissions to be applied to an automatic issue transition, then please note that none of these apply. Related to this, post functions do apply to automatic issue transitions.

Your workflow is shared across multiple projects

You may need to copy your workflow, if you want triggers to apply to the workflow for some projects but not others.

Triggers apply to the workflow. If a workflow is shared across multiple projects, it will include all triggers that have been configured for it.

Duplicate automatic issue transition events are being sent by multiple development tools

Change the repository/project settings in one (or more) of your development tools to prevent events from being sent.

Duplicate repository events may be sent to Jira when you have the same repository indexed by multiple development tools. Jira will automatically remove duplicate commit events (Jira 6.3.3 and later) and branch creation events (Jira 6.3.11 and later).

If you are not using the latest Jira version and have duplicate repository events causing incorrect issue transitions, y ou can configure Bitbucket Server ( Stash 3.3 - 3.5) and Fisheye (3.5+) repositories to suppress events sent to Jira for workflow triggers.

The information recorded for the transition is not correct:

Possible causes...
CauseSolution
The users in your development tools do not map to users in Jira

Check that each user in your development tools maps to a Jira user.

If users are not mapped correctly, then the user for the issue transition will be anonymous. For more information, see the section on user mapping above.


Known issue: The correct user is only shown on the 'History' and 'Activity' tabs for issues in Jira, and in notification emails. In other notifications, e.g. 'Transitions' tab for issues, HipChat notifications, etc, an anonymous user is shown.

Do nothing.

This is a known issue that will be fixed in a future release.

3. Get help

If you still cannot resolve your problem, there are a number of other help resources available, including our applications forums, Atlassian Answers, and our support team.

tip/resting Created with Sketch.

Do more with Jira

Take your workflows to the next level with these apps from the Atlassian Marketplace:  

Last modified on Aug 16, 2018

Was this helpful?

Yes
No
Provide feedback about this article
Powered by Confluence and Scroll Viewport.