Proxying Atlassian server applications with Apache HTTP Server (mod_proxy_http)
Platform notice: Server and Data Center only. This article only applies to Atlassian products on the Server and Data Center platforms.
Support for Server* products ended on February 15th 2024. If you are running a Server product, you can visit the Atlassian Server end of support announcement to review your migration options.
*Except Fisheye and Crucible
Atlassian applications allow the use of reverse-proxies with our products; however, Atlassian Support does not provide assistance for configuring them. Consequently, Atlassian cannot guarantee providing any support for them.
If assistance with configuration is required, please raise a question on Atlassian Community.
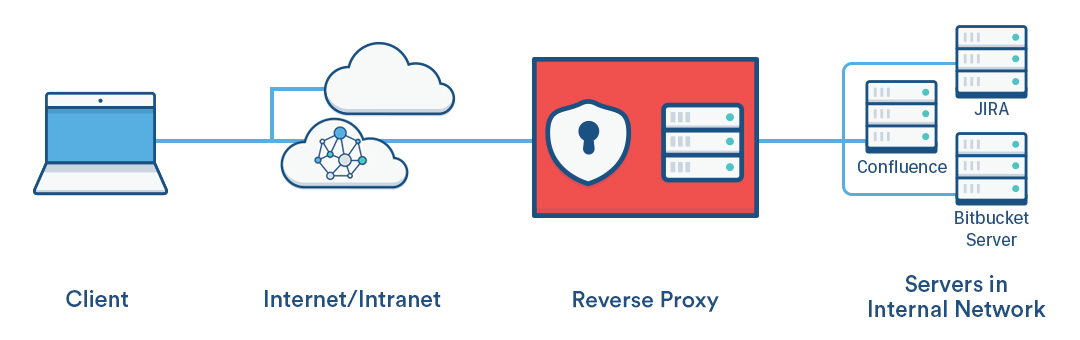
This page explains how to establish a network topology in which Apache HTTP Server acts as a reverse proxy for Atlassian server applications. The page has been written as a recipe for success – we recommend you follow it step by step.
You might consider using a reverse proxy when you want users to access the Atlassian applications:
- at their own domains, such as
http://my<atlassianapp>.com/ - at subdomains of another domain, such as
http://my<atlassianapp>.ourcompany.com/ - at context paths on either a domain or subdomain, such as
http://ourcompany.com/my<atlassianapp> - on different HTTP ports, such as 9800, 9850, etc.
For more complex scenarios, you can refer to the Apache HTTP Server documentation, consult with an Apache specialist in your organisation, ask a question on Atlassian Answers or contact one of our Atlassian Experts.
The instructions on this page apply to the following Atlassian server applications:
- JIRA server applications (JIRA Software Server, JIRA Core, JIRA Service Desk)
- Confluence Server (there are some additional steps and examples in this guide for Confluence 6.0 and later)
- Bamboo Server
- Bitbucket Server
- Fisheye
- Crucible
- Crowd
In the examples that follow on this page, <atlassianapp> refers to the name of any of the Atlassian server applications above.
Atlassian server applications bundle a web server, which allows them to run without needing a proxy server. For most Atlassian applications, the bundled web server is Apache Tomcat (Fisheye and Crucible use Jetty ). Consequently, you need to configure both Tomcat (or Jetty if using Fisheye or Crucible) and Apache HTTP Server when proxying an Atlassian application.
For HTTPS conections, refer to Securing your Atlassian applications with Apache using SSL.
Prerequisites
You'll need the following:
Apache version 2.2 or 2.4 installed
You may find it helpful to refer to the Apache HTTP Server Documentation, which describes how you can control Apache HTTP Server by editing the httpd.conf file. The section on Apache Module mod_proxy is particularly relevant. Note that any changes you make to the httpd.conf file will only be effective after restarting Apache HTTP Server. (Applications that use Synchrony, e.g. Confluence 6.0, must use Apache 2.4.10 and up.)
DNS entries in place and configured for your domains
You should check, perhaps with your system or network administrator, whether the current DNS configuration for your organization will need changes to support the proxy topology you wish to set up.
The Atlassian applications installed, and accessible through a web browser
Install the Atlassian applications in the usual way.
Part A. Configure the Atlassian applications
This section describes how to configure the Tomcat (or Jetty) web server bundled with each Atlassian application to run behind a reverse proxy.
1. Stop the Atlassian applications
Stopping the application also stops Tomcat.
2. Set the context path
This step is only required if you want an application to be accessed on a context path, such as http://ourcompany.com/<contextpath>. If this is not required, you can skip this step.
Fisheye and Crucible
If you're proxying Fisheye or Crucible, configure the web context path for Jetty from the admin area. See Configuring the Fisheye web server.
JIRA applications, Confluence, Bitbucket Server, Bamboo
If you're proxying any of these Atlassian server applications, configure the context path in the Tomcat server.xml file as follows.
server.xml file depends on your application, operating system, and installation location. Common default installation locations for Atlassian applications are:
- Linux:
/opt/atlassian/<application-name> - Windows:
C:\Program Files\Atlassian\<application-name> - Windows:
C:\Atlassian\<application-name>
Locations in Atlassian application's folder structure:
| Application | server.xml location |
|---|---|
| Bamboo | <install-path>/conf/ |
| Confluence | <install-path>/conf/ |
| Crowd | <install-path>/apache-tomcat/conf/ |
| Crucible | As for Fisheye. |
| Fisheye | The Fisheye configuration file is config.xml, see Configuring the Fisheye web server and How to enable Fisheye/Crucible to listen to web requests on additional ports. |
| JIRA applications | <install-path>/conf/ |
| Bitbucket Server 5.0 | N/A, replaced by <Bitbucket home directory>/shared/bitbucket.properties Please read through Migrate server.xml customizations to bitbucket.properties |
| Bitbucket Server 4.0 – 4.14 | <Bitbucket home directory> /shared/server.xml |
| Stash 3.8 – 3.11 | <Stash home directory>/shared/ We recommend that you copy <install-path>/conf/server.xml into <Stash home directory>/shared/ that way you won't need to worry about this when you upgrade your instance. |
| Stash 3.7 and earlier | <install-path>/conf/ |
<install-path> refers to where the application was installed on your system.
If you are configuring Bitbucket Server 5.0
As of Bitbucket Server 5.0, you can't configure any Tomcat connectors directly, therefore the configurations in this section only apply for Bitbucket server 4.14 or earlier.
server.xml configurations have been replaced by <Bitbucket home directory>/shared/bitbucket.properties
Please read through Change Bitbucket's context path for Bitbucket Server 5.0 and later specific instructions.
In the Tomcat server.xml configuration file for all applications except Crowd, locate the Context directive that looks like this:
<Context path="" docBase="${catalina.home}/atlassian-<atlassianapp>" reloadable="false" useHttpOnly="true">Change the directive to add the new context path:
<Context path="/<contextpath>" docBase="${catalina.home}/atlassian-<atlassianapp>" reloadable="false" useHttpOnly="true">Use your own value for <contextpath>. Typically, each application would use a different context path.
It is important that the path value has a leading forward slash (/) like path="/<contextpath>" rather than path="<contextpath>".
Use these instructions to Removing the 'crowd' Context from the Application URL.
3. Configure the Connector directive
If you're using Fisheye or Crucible, configure the proxy host, proxy scheme and the proxy port from the Admin area. See Configuring the Fisheye web server.
If you are configuring Bitbucket Server 5.0
As of Bitbucket Server 5.0, you can't configure any Tomcat connectors directly, therefore the configurations in this section only apply for Bitbucket server 4.14 or earlier.
server.xml configurations have been replaced by <Bitbucket home directory>/shared/bitbucket.properties
Please read through Migrate server.xml customizations to bitbucket.properties to check the corresponding properties and and to translate the configuration below. After finishing the mapping to bitbucket.properties go to Part B. Configure Apache HTTP Server.
If you're using any of the other Atlassian server applications, configure the Connector directive as follows.
For each application, find the normal (non-SSL) Connector directive in the Tomcat <jira-install>/conf/server.xml file, and add the scheme, proxyName, and proxyPort attributes inside the Connector directive, as below. Use the default values for the other attributes, including for port , unless you have a particular reason to change them, and use your own domain name for the proxyName value:
<Connector port=<default>
	maxThreads=<default>
    minSpareThreads=<default>
    connectionTimeout=<default>
    enableLookups=<default>
    maxHttpHeaderSize=<default>
    protocol=<default>
    useBodyEncodingForURI=<default>
    redirectPort=<default>
    acceptCount=<default>
    disableUploadTimeout=<default>
	proxyName="<subdomain>.<domain>.com"
	proxyPort="80"
	scheme="http"/>
Note that the proxyName parameter should be set to the FQDN that Apache HTTP Server will be configured to serve. This is the address a user would type into their browser to access the application. For example:
- use
<atlassianapp>.ourcompany.comto access the application at a sub-domain likehttp://<atlassianapp>.ourcompany.com - use
ourcompany.comto access the application at a context path likehttp://ourcompany.com/<atlassianapp>. In this case, the context path should not be included in theproxyNameparameter, and you would have already set theContextdirective in step 2 above.
For more information about configuring the Tomcat Connector, refer to the Apache Tomcat 7.0 HTTP Connector Reference.
Part B. Configure Apache HTTP Server
Atlassian recommends that you use the mod_proxy module, which implements a proxy, gateway or cache for Apache while also allowing multiple virtual hosts on a single client.
For more information about mod_proxy see:
- The mod_proxy_html site has documentation and examples.
- The Apache Week tutorial that describes a complex situation involving two applications and ProxyHTMLURLMap.
1. Enable the mod_proxy modules in Apache
If necessary, enable the required modules in Apache as follows:
2. Configure virtual hosts using mod_proxy
If you are running a single Atlassian application behind an Apache reverse proxy, use a virtual host block with the following directives:
<VirtualHost *:80>
    ServerName <subdomain>.<domain>.com

    ProxyRequests Off
    ProxyVia Off

    <Proxy *>
         Require all granted
    </Proxy>

    ProxyPass /<contextpath> http://<internal_domain>:<port>/<contextpath>
    ProxyPassReverse /<contextpath> http://<internal_domain>:<port>/<contextpath>
</VirtualHost>- Note that for CentOS, the preferred approach is to add the virtual host block to a separate configuration file for each application in
/etc/httpd/conf.d/, for example namedconfluence-vhost.confandjira-vhost.conf. - Note that for Debian, the preferred approach is to add the virtual host block to a separate configuration file for each application in
/etc/apache2/sites-available/<site>, for example namedconfluence.confand/orjira.conf. These should be based on the default template,000-default.conf.
In some cases, you may need to add a trailing slash to your ProxyPass and ProxyPassReverse directives. For example:
ProxyPass /<contextpath> http://<internal_domain>:<port>/<contextpath>/
ProxyPassReverse /<contextpath> http://<internal_domain>:<port>/<contextpath>/
You should only use a trailing slash if you see problems with DNS failures (due to a missing slash) in your Apache Log files. This 3rd party blog explains the problem in more detail, and provides additional information on how to resolve it. For most cases, it should not be required
If you have multiple applications running behind the same proxy, you can use name-based virtual hosts:
Use a single name-based virtual host if the Atlassian applications are under the same domain but have different context paths. For example:
<VirtualHost *:80>
    ServerName mycompany.com

    ProxyRequests Off
    ProxyVia Off

    <Proxy "*">
         Require all granted
    </Proxy>

    ProxyPass /jira http://<internal_domain>:8080/jira
    ProxyPassReverse /jira http://<internal_domain>:8080/jira

    ProxyPass /bitbucket http://<internal_domain>:7990/bitbucket
    ProxyPassReverse /bitbucket http://<internal_domain>:7990/bitbucket
</VirtualHost>
Use multiple name-based virtual hosts if each application is on a different domain. For example:
<VirtualHost *:80>
    ServerName myjira.com

    ProxyRequests Off
    ProxyVia Off

    <Proxy *>
         Require all granted
    </Proxy>

    ProxyPass /jira http://<internal_domain>:8080/jira
    ProxyPassReverse /jira http://<internal_domain>:8080/jira
</VirtualHost>

<VirtualHost *:80>
    ServerName mybitbucket.com

    ProxyRequests Off
    ProxyVia Off

    <Proxy *>
         Require all granted
    </Proxy>

    ProxyPass /bitbucket http://<internal_domain>:7990/bitbucket
    ProxyPassReverse /bitbucket http://<internal_domain>:7990/bitbucket
</VirtualHost>
If you're using Confluence 6.0 or later with Synchrony (which is required for collaborative editing), you'll need to use Apache 2.4.10 or later...
Use the following directives and location blocks in the virtual host block:
![]() Use the directives/locations in the exact order listed below. Do not change the order.
Use the directives/locations in the exact order listed below. Do not change the order.
<VirtualHost *:80>
    ServerName myconfluence.com
	ProxyRequests Off

	# Auth changes in 2.4 - see http://httpd.apache.org/docs/2.4/upgrading.html#run-time
	<Proxy *>
		Require all granted
	</Proxy>

	ProxyPass /synchrony http://<internal_domain>:8091/synchrony
	<Location /synchrony>
		Require all granted
		RewriteEngine on
		RewriteCond %{HTTP:UPGRADE} ^WebSocket$ [NC]
		RewriteCond %{HTTP:CONNECTION} Upgrade$ [NC]
		RewriteRule .* ws://<internal_domain>:8091%{REQUEST_URI} [P]
	</Location>

	ProxyPass / http://<internal_domain>:8090/
	ProxyPassReverse / http://<internal_domain>:8090/
	<Location />
		Require all granted
	</Location>
</VirtualHost>
This is a basic example, where Confluence is accessed without a context path and does not use Confluence's internal proxy. See Administering Collaborative Editing for other proxy configuration options.
For full details about configuring virtual hosts and how to use each directive see https://httpd.apache.org/docs/2.4/vhosts/.
3. Restart Apache
Debian and Ubuntu
Restart Apache from the command line using:
$ sudo service apache2 restartFedora and CentOS
Restart Apache from the command line using:
$ sudo apachectl gracefulYou can also use systemd to restart Apache. On CentOS, for example, use:
$ sudo systemctl restart httpd.serviceWindows
You can stop and start the Apache service by going to Control Panel > Administrative Tools > Services , look for "Apache2" and select it. Now, on the menu bar select the stop button (square) and wait for the status of the service to change to 'Stopped'. Once the service has stopped select the start button (triangle) and wait for the status to change to 'Started'.
4. Modify the CentOS SELinux policy
For CentOS, the SELinux policy blocks httpd from connecting with the network by default. In this case you'll see a "permission denied" message in the httpd error_log similar to this:
[Sat Mar 19 00:29:45.722758 2016] [proxy:error] [pid 5958] (13)Permission denied: AH00957: HTTP: attempt to connect to 127.0.0.1:8090 (localhost) failedYou need to manually modify the SELinux policy for the httpd process using the following command:
$ sudo /usr/sbin/setsebool -P httpd_can_network_connect 1
5. Enable the X-Forwarded-For header
This is an optional step that ensures the origin IP (ie the user connecting to the proxy) is sent to the Atlassian application rather than the proxy IP. This is useful for trying to track down who is submitting requests, as otherwise the reverse-proxy can mask their IP. If this change is done, access logs will record the IP of the client, and also the proxy, rather than just the proxy. To do so:
- Enable the
mod_remoteipmodule. Add the below to the appropriate virtual host:
RemoteIPHeader X-Forwarded-For- Restart / Reload Apache.
Part C. Final configuration
Restart each application
Now, restart each application and ensure you can access them using new URLs. See the stopping and starting instructions above.
Set the application Base URL
For each Atlassian application, set the Base URL to the address you configured in the proxy, which is the URL that Apache HTTP Server will be serving (such as http://www.example.com/<atlassianapp > ).
Disable HTTP compression
Running compression on both the proxy and Tomcat can cause problems when integrating one Atlassian application with another. We recommend disabling HTTP compression for JIRA applications and Confluence:
- JIRA applications – see Configuring Jira application options.
- Confluence – see Compressing an HTTP Response within Confluence.