Linking issues
Issue links within an issue look like this:
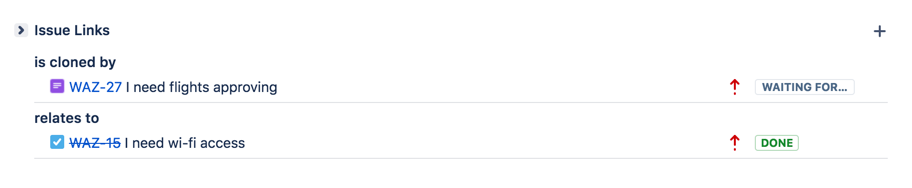
Note: Resolved issues (i.e. issues with a Resolution set) are displayed in strike-through font, e.g. DEMO-1.
To create links on issues, you need to have the Link Issues permission in the project(s) to which the issues belong.
Creating a link to another issue on the same Jira site
- Open the issue you wish to link to another issue in the same Jira site.
- Select More > Link to display the Link dialog box.
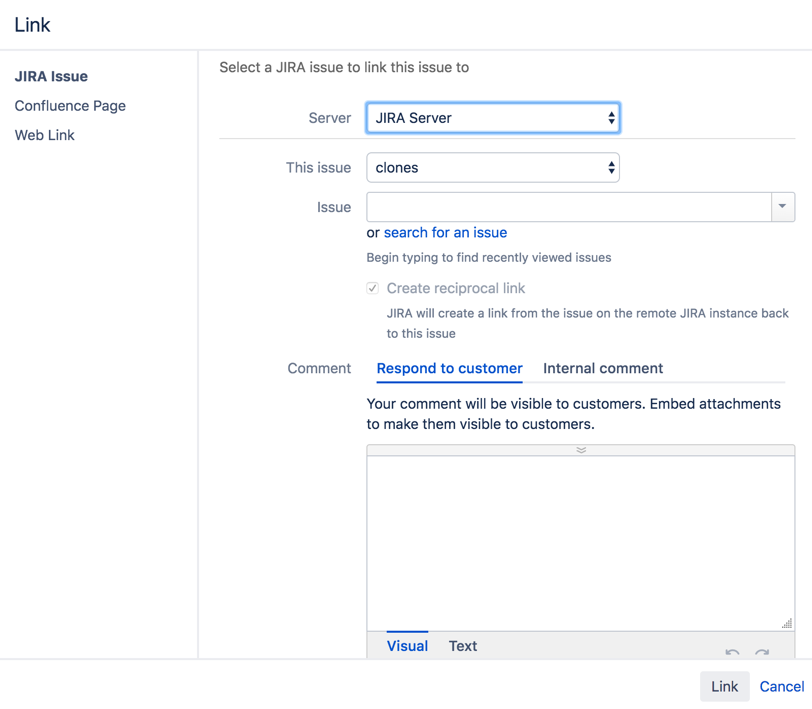
- Ensure that the Jira Issue item is selected at the left of the dialog box and then choose the type of link to be created from the This issue drop-down list.
 If your Jira system administrator has configured fully reciprocal application links between your Jira site and another one, a Server drop-down list may appear above the This issue list. If this is the case, ensure your Jira site appears or has been selected from the Server list.
 - In the Issues field, specify the issue(s) to be linked to your currently viewed/selected issue. There are two ways to do this:
- Type the full issue key (e.g. ABC-123) — or to link to multiple issues, press the 'Enter' key between each typed issue key. If you have previously browsed an issue, you can quickly find the issue by typing the first few letters of the issue key (or part of the Summary), which will appear in an 'autocomplete' drop-down list for selection:
OR: - Click the search for an issue link to use the Find Jira issues popup, which allows you to perform either a simple text search or an advanced search for issues.
- Type the full issue key (e.g. ABC-123) — or to link to multiple issues, press the 'Enter' key between each typed issue key.
- Optional: Add a Comment to describe why you are linking these issues.
- Click the Link button at the bottom of the dialog.
Creating a link to an issue on another Jira site
![]() To create this type of link, your Jira system administrator should have configured fully reciprocal application links between your Jira site and the other Jira site containing the issue(s) you want to link to.
To create this type of link, your Jira system administrator should have configured fully reciprocal application links between your Jira site and the other Jira site containing the issue(s) you want to link to.
- Open the issue you wish to link to another issue.
- Select More > Link to display the Link dialog box.
- Ensure that the Jira Issue item is selected at the left of the dialog box. Note:
- This option will not be available if your Jira system administrator has not configured an application link between your Jira site and the remote Jira site.
- If, after selecting this option, you are prompted for authorization, you may be required to log in to the remote Jira site, which will allow your Jira site to access the remote Jira site on behalf of your account on the remote Jira site. This behavior means the application links configured between your Jira site and the remote Jira site use OAuth authentication.
- If your Jira site is connected to multiple remote Jira sites, choose the relevant Jira site from the Server drop-down list.
- Choose the type of link to be created from the This issue drop-down list.
- Type the Issue key of the issue on the remote Jira site that you want to link to. Alternatively, you can search for issues on the remote Jira site by clicking the search for an issue link, which opens the Find Jira issues popup. You can link to any issue on the remote Jira site to which you have access on that site.
- Select the Create reciprocal link checkbox to create the complementary link on the remote issue you are linking to, back to your issue. For example, if you create a blocks link type to a remote issue, the reciprocal link generated on the remote issue will be a is blocked by link type back to your local issue.
- Optional: Add a Comment to describe why you are linking these issues.
- Click the Link button at the bottom of the dialog.
Troubleshooting
![]() Problem: If you selected the Create reciprocal link checkbox, but after clicking the Link button, you discover that a reciprocal link from the remote issue back to your issue has not been created, then your Jira system administrator has most likely created only a one-way link from your Jira site to the remote Jira site.
Problem: If you selected the Create reciprocal link checkbox, but after clicking the Link button, you discover that a reciprocal link from the remote issue back to your issue has not been created, then your Jira system administrator has most likely created only a one-way link from your Jira site to the remote Jira site.
![]() Solution: Ask your Jira system administrator to configure fully reciprocal application links between your Jira site and the remote Jira site.
Solution: Ask your Jira system administrator to configure fully reciprocal application links between your Jira site and the remote Jira site.
![]() Problem: If you attempted to create a reciprocal link but received the following message:
Problem: If you attempted to create a reciprocal link but received the following message:
'A reciprocal link from issue 'XYZ-123' back to this issue was not created as the remote Jira server returned the following error: No Link Issue Permission for issue 'XYZ-123'.' (where 'XYZ-123' is the issue key on the remote Jira site),
then a reciprocal link on the remote Jira site will not have been created, because the user account through which you authenticated on the remote Jira site (at step 3 above) does not have the Link Issues project permission.
![]() Solution:
Solution:
- Ask the Jira project administrator(s) on the remote Jira site to grant your user account the Link Issues project permission for the relevant project(s) to which you need to create issue links.
- Alternatively, if the application link between your Jira site and the remote Jira site use OAuth authentication and you suspect you may have authenticated on the remote site with another user account that does not have the Link Issues project permission, repeat the procedure above but during the authorization step (at step 3), authenticate on the remote site with a user account which has this permission. If you are not prompted for authentication during authorization, try clearing your browser's cookies first and repeat the procedure again.
Create a new linked issue from an existing issue in a service desk or business project
To create a linked issue, you need to have Create issue and Linked Issues permissions in the destination project(s).
To create a linked issue:
- Open the issue from which you wish to create the linked Jira issue.
- In the Issue screen, select More > Create linked issue to display the Create Linked Issue dialog box
The newly created linked issue contains the same Project, Issue Type, and Summary information stored in the original issue. It is also linked to the service desk issue, in this case CTF-2.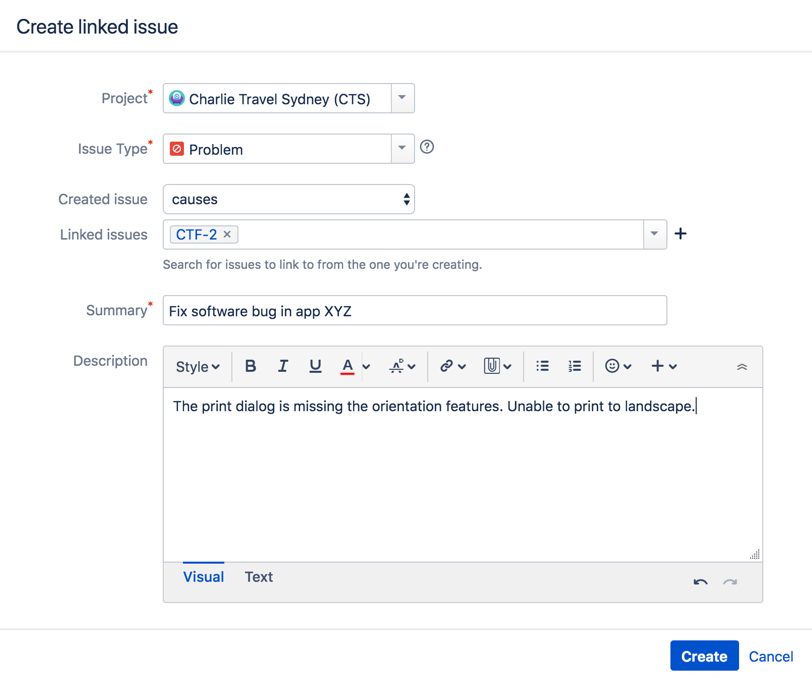
- Select the destination Project in which the new linked issue is to be created.
- Select the correct Issue Type for the new linked issue.
- In the Linked issues field, specify issue(s) to be linked to your new linked issue.
- Edit the linked issue Summary.
- Edit the Description and describe why you are linking these issues.
- Select the Copy attachments checkbox to include any attachments from the original issue.
- Select the Copy links checkbox to include any URLs from the original issue.
- Click the Create button at the bottom of the dialog.
Your linked issue has now been created.
Creating a link to a Confluence page
This feature is only supported in Confluence versions 4.0 or later.
![]() To create this type of link, your Jira system administrator needs to have configured an application link between your Jira site and the Confluence site containing the pages you want to link to.
To create this type of link, your Jira system administrator needs to have configured an application link between your Jira site and the Confluence site containing the pages you want to link to.
- Open the issue you wish to link to another issue.
- Select More > Link to display the Link dialog box.
- Click the Confluence Page option at the left of the dialog box. This option is not available if your Jira system administrator has not configured an application link between your Jira site and Confluence site.
- If more than one application link has been configured between your Jira site and other Confluence sites, then choose the appropriate Confluence site from the Server drop-down list.
- Specify the Confluence page to be linked to your currently viewed issue. There are two ways to do this:
In the Page URL field, enter the URL of a page on the Confluence site you want to link to. For example:
http://<confluence-server>/display/ds/Welcome+to+the+Confluence+Demonstration+Space- Click the search for a page link. The Link dialog box is replaced by the Find a Confluence page dialog box. If you are prompted for authorization, you may be required to log in to the Confluence site, which will allow your Jira site to access the Confluence site on behalf of your account on the Confluence site.
This behavior means the application links configured between your Jira site and the remote Confluence site use OAuth authentication.- In the first Search field, specify one or more search terms that appear in the page you want to link to. This field is mandatory.
- Optional: In the second Search field, select the Confluence space to further narrow down the search.
- Click the Search button and then the title of the page you want to link to.
- Optional: Add a Comment to describe why you are linking these issues.
- Click the Link button at the bottom of the dialog.
Troubleshooting
![]() Problem: If Confluence page links you create show Failed to load on the issue or if you attempted to search for a Confluence page but received the following message:
Problem: If Confluence page links you create show Failed to load on the issue or if you attempted to search for a Confluence page but received the following message:
'Content on the Confluence site could not be accessed because the Confluence server's 'Remote API' feature is disabled. The Confluence system administrator must enable this 'Remote API' feature for Jira to successfully access this content.'
then Jira was unable to communicate with the Confluence server to either:
- retrieve information about the link or
- conduct a Confluence page search in the Find a Confluence page dialog box.
![]() Solution:
Solution:
Ask the Confluence system administrator to enable the Remote API (XML-RPC & SOAP) feature, since this Confluence feature is disabled by default. See Enabling the Remote API in the Confluence documentation for details.
Creating a link to any web page URL
- Open the issue you wish to link to another issue.
- Select More > Link to display the Link dialog box.
- Click the Web Link option at the left of the dialog box.
- Specify the URL of the web page you want to link to.
- Specify the Link Text that will appear in the Issue Links section of the 'view issue' page and will be hyperlinked to your URL.
- Optional: Add a Comment to describe why you are linking these issues.
- Click the Link button at the bottom of the dialog.
Deleting a link
- Go to an issue that contains links, and locate the Issue Links section.
- Hover your mouse over the link you wish to delete, and click the Delete (trashcan) icon that appears.
Searching for linked issues
You can search for issues that are linked to a particular issue. See Advanced searching for more information.
![]() Be aware that this functionality does not extend to issues on a remote Jira server.
Be aware that this functionality does not extend to issues on a remote Jira server.