Set up Assets Discovery Agent
Set up Assets Discovery Agent
To set up:
- Install Agent on the machine and make sure that the firewall will accept connections from the inbound port 51337. You can configure the firewall rule by using the Agent installer.

- To collect the data, configure the agent settings of the Discovery tool.
- Configure the agent token to make sure that Discovery can communicate with the agent.
The file transfer between the Discovery-Tool and the Windows agent is secured by AES 128 encryption. For each transfer, both tools are exchanging a session key for the encryption.
Collecting data from agents
Now that you have agents, you must enable Assets Discovery as a service to collect the data from them.
We recommend that you deploy agents and run them without changing any of the default setting. However, if you want to, you can manually edit the advanced settings in the agent.cfg file.
Configuring a dedicated account for running Agent service
Assets Discovery Agents now support the option to install the agent service under a custom user account via CLI commands.
To install the Agent service under the System Account, run the following command: Discovery_Agent.exe -i.
Install the Agent service under a Custom Account using CLI
To install the Agent service under a Custom Account directly by using the command-line interface:
Go to the Assets Discovery directory.
Open a command-line interpreter with administrator permissions and navigate to your Discovery Agent installation folder.
Install the service under a custom user account by using the following command:
Discovery_Agent.exe -i -user=<login> -password=<password>.Enter the username in the format
Domain\Loginand the password for the account. This user must be a member of the default Administrator group.Verify the installation by checking the service status in the Services application (
services.msc).
Running your first local scan
You can test the installation by running your first local scan manually. By default, patterns are sourced from the agent's assemblies. If custom patterns are transferred to the agent via Discovery pattern transfer, an agent_patterns.bpat file is created. All patterns from this file are executed during the scan.
To run the scan:
Open Command Prompt in Windows.
Navigate to the Discovery agent installation directory.
Execute
Discovery_Agent.exe -sto start a manual scan.
A binary .dat file with the scan results is generated and stored in the scans directory. For example:
30/11/2022 10:21:13 : saving file: C:\Program Files (x86)\Atlassian\Discovery Agent Installer_314\scans\713D3_Hosts_2022-11-30_1021_0748.dat to folder C:\Program Files (x86)\Atlassian\Discovery Agent Installer_314\scans | binary = TrueThe name of the scan file has the following convention:
<Service agent name>_Hosts_<Creation date and time>_<random integers>.dat.
For example:
713D3_Hosts_2022-11-30_1021_0748.dat.
When the .dat file is generated, you can transfer it to an external location. During the transfer process, the file will be converted into an XML format. To achieve this, you can:
use the Discovery tool to collect data from an Agent, or
modify the Agent.cfg file to transfer the results to another location.
Manually configuring a dedicated account for running the Agent service
We recommend that you also use a dedicated SSH account for Linux machines.
By default, all Agent services that run in the background under the NT AUTHORITY\SYSTEM
account, grant extensive permissions, including unlimited access to the local machine. As this can pose a security risk if the Discovery Tool is compromised, we recommend that you use a dedicated administrator account to run this service on the agent and grant the minimum required privileges. Learn which commands are executed by Assets Discovery
To change the account used by the service manually on each machine where Agent is installed:
- Search for and open services.msc from the Start menu.
- Locate the Agent service and then right-click the service and select Properties.
- From the Log on tab, in the Log on as section, select the This account option and enter the credentials of the dedicated administrator account.

Manage agents
You can manage all your configured agents from here and view details including the version number and status of your agents (such as running, not available).
You can select one or more agents and perform the following actions.
Trigger scan
Assets Discovery will trigger the selected agents at the configured range to start a local scan.
Collect results
Select this to get data collected by agents to Discovery host.
Update Agents
You can update all connected agents (that are on version 7.0.0 or later) to the latest version directly from here, instead of navigating to each agent and updating it individually.
Revoke token
Revokes the unique token generated by the Discovery Agent. The token will be removed from the Discovery storage, and you'll need to use a pairing token (Agent Token) to re-establish communication with the Discovery. To revoke a token:
- Select agents for which you want to revoke the token.
- Select Revoke token. The selected agents will display an
Unhealthy: invalid signaturestatus. Log into every machine where an agent runs and set a new agent token by running the
discovery_agent.exe -token <AGENT_TOKEN>file.- Check that the agents show a healthy status.
Exporting Agents scan results
Discovery Agents can export local scan results to Discovery Collector or Discovery tool. Here's how it works:
If the Discovery tool can access the IP addresses and ports, and the TCP port specified in the Agents Tab is open, the Discovery tool will collect the agents' results.
If the IP addresses or ports are not accessible or open, you can configure the agent to export its file using methods like File Copy or SFTP transfer to a shared location. From there, the Discovery tool or Collector can pick it up separately.
Learn more about exporting Agents scan result
How to force agents to transfer data to a target path
If you want to transfer the result data as an XML file to the configured target path, you can add an SFTP transfer setting.
Add the following code to the agents.cfg file, inside of the <Settings> node:
<SFTPSettings>
    <ExportPath>192.168.2.2/discovery/import</ExportPath>
    <UserName>yourUser</UserName>
    <Password>mysecurepassword</Password>
    <TransferReties>5</TransferReties>
    <TranserRetryInterval>30</TranserRetryInterval>
</SFTPSettings>
or use Discovery_Agent.exe -setupsftp (this will execute a small console configuration for the sftp transfer). Note that the password will be encrypted during the first startup.
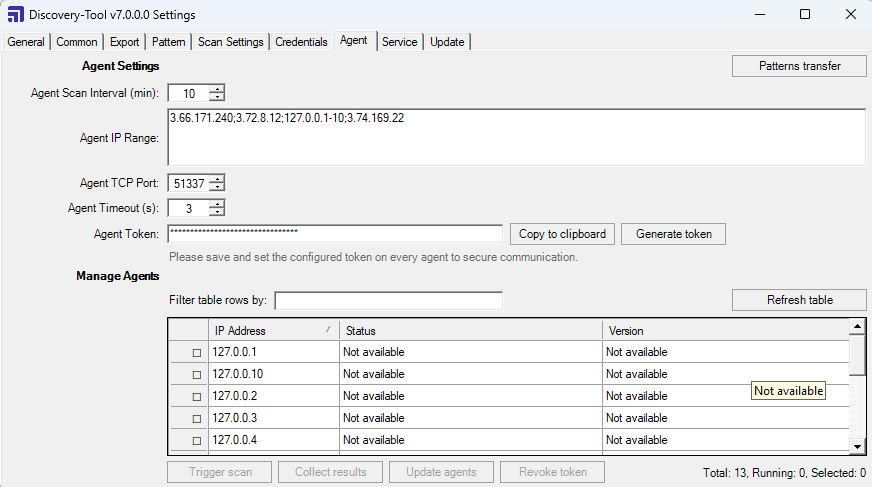
Agent settings
Here’s some of the basic agent settings you’ll need to configure in the Agent tab.
Setting | Description |
|---|---|
Files transfer | Here you can configure XML files that will be synchronized with all available agents at the configured range. For example, you can transfer pattern files from This will also work if you made changes to your source files. |
Patterns transfer | Here you can configure the list of patterns from the Pattern tab that will be synchronized with all available agents at the configured range. By default, only agent inherent patterns are selected. The selected patterns will be sent to the agents in the data collection flow and securely saved using a unique token generated by the Discovery Agent. |
Agent Scan Interval | The interval, in minutes, before the Assets Discovery service checks with agents for new data. When the interval is reached, the service will perform a self restart to release the allocated memory that can not release during the service process is running. It will not affect a running scan, the restart will only be executed when there is a free time slot between the configured scan settings. When it is configured to 0 the function is disabled. |
Agent IP Range | Here you can define the IP Range(s) that will be checked for available Discovery-Agents. Like the IP-Range at the Common-Setting you can define multiple IP ranges. If you are adding IP ranges for the first time, select View configured agents in the Manage Agents section to view the list of your configured agents. |
Agent TCP Port | The TCP Port of the available agents in the configured IP Range. |
Agent Timeout | The default timeout for each connection to a remote agent. The default period is 3 seconds. |
Agent Token | Add a secure token in this field or select Generate token and then select Save token. Copy this token and navigate to the machine or node where Agent is installed. Run the agent with When you upgrade to Assets Discovery 7.0.3 or later, the agent token configured previously on each agent will be replaced by a unique token generated by the agent and stored on the Discovery side. This token will be used for all further communications between the Discovery tool and the agent. The original agent token is used just to initiate the connection for the first time. Starting from Assets Discovery 7.1.4, the installer supports configuring the secure token and firewall rule through the installer GUI or by using the command line parameter:
In case you want to revoke existing agent tokens, select Generate token and then select Save token . After that, Discovery will not be able to trigger scans or collect data and a new Discovery token should be configured for the agents manually as described above. |

Agent parameters
You can use parameters to configure the settings of the Discovery Agent, display the current version, and enable or disable the Discovery Agent as a service. To view all available commands, type Discovery_Agent -?.
Command | Description |
|---|---|
| Start a manual local scan. |
| Show the version number of the agent. |
| Start the SFTP configuration to export data. |
| Install Discovery Agents as a service. |
| Install Discovery Agents as a service under custom account. |
| Uninstall the Discovery Agents service. |
| Download and install the latest Discovery Agent from the Atlassian Marketplace. The agent should have internet access configured. |
| Set secure agent token (Discovery pairing token). |
| Back up Discovery Agent configuration. |
Optional: | Create a ZIP file that contains all the agent logs under the logs folder and configuration files. You can optionally set a password for the archive. |
Optional: | Run agent local scan in a debug mode and create a ZIP file that contains the latest agent logs and configuration files. You can optionally set a password for the archive. |
Advanced settings
You can configure the settings for a specific agent by modifying the Agent.cfg file.
The Discovery Agent service needs to be restarted to apply your changes.
| Setting | Description |
|---|---|
| ScanLogLevel | To log basic information, use the Normal-Setting. To log detailed information about each discovery scan, use the Extended-Setting. To log information so that support can assist you with a problem, use the Debug-Setting. |
| AgentPort | The default listener port is 51337. If you change this port, you must also change the agent port in the Discovery-Tool configuration file, discovery.cfg. |
| UseAllNetworkInterfaces | Set to true by default. To configure the agent to listen to first active network interface, set this to false. |
| UseIPMatching | By default, the agent listens on the first active IPv4 network interface. To configure the agent to listen to matching IPv4/IPv6 network masks, set a value. For example, If you configure both the above settings (UseAllNetworkInterfaces, UseIPMatching), the agent only uses the UseIPMatching setting. |
| DeleteLogsAfter | Here you can set the days after the logfiles will be deleted, the default is 7 days. |
| DisableTCPListener | This setting is useful when you use the direct copy option. If you set it to true, the agent will not start the TCP -Listener. |
| DirectCopyPath | If required, the agent can directly copy the scan result files to another system (for example, the Jira/Assets-System). You must use a full UNC-Path. For example, If these options are configured, the agent will transfer the result data as an |
| ScanInterval | Set the interval of performed scans in hours. The default is 24 hours. |
SaveTimeStamp | The last time settings were saved. Update this value to a future time if you intend to distribute the file copy to other machines with Agent installed. |
| AgentToken | Encrypted agent token value, which is saved automatically when the discovery_agent.exe -token command is executed. Alternatively, you can set copy the token from the Discovery app here and it will be automatically encrypted when the Agent service restarts. |
InstanceID | An auto-generated agent ID to identify the agent during communication between Discovery and the agent. This ID is also used when a unique AgentToken is saved on the Discovery side. |