Data pipeline
Requirements
To trigger data exports through the REST API, you’ll need:
A valid Bitbucket Data Center license
Bitbucket system admin global permissions
Considerations
There are a number of security and performance impacts you’ll need to consider before getting started.
Security
If you need to filter out data based on security and confidentiality, this must be done after the data is exported.
Exported files are saved in your shared home directory, so you’ll also want to check this is secured appropriately.
Export performance
When scheduling your exports, we recommend that you:
- Limit the amount of data exported using the
fromDateparameter, as a date further in the past will export more data, resulting in a longer data export. - Schedule exports during hours of low activity, or on a node with no activity, if you do observe any performance degradation during the export.
Access the data pipeline
To access the data pipeline select ![]() > Data pipeline.
> Data pipeline.
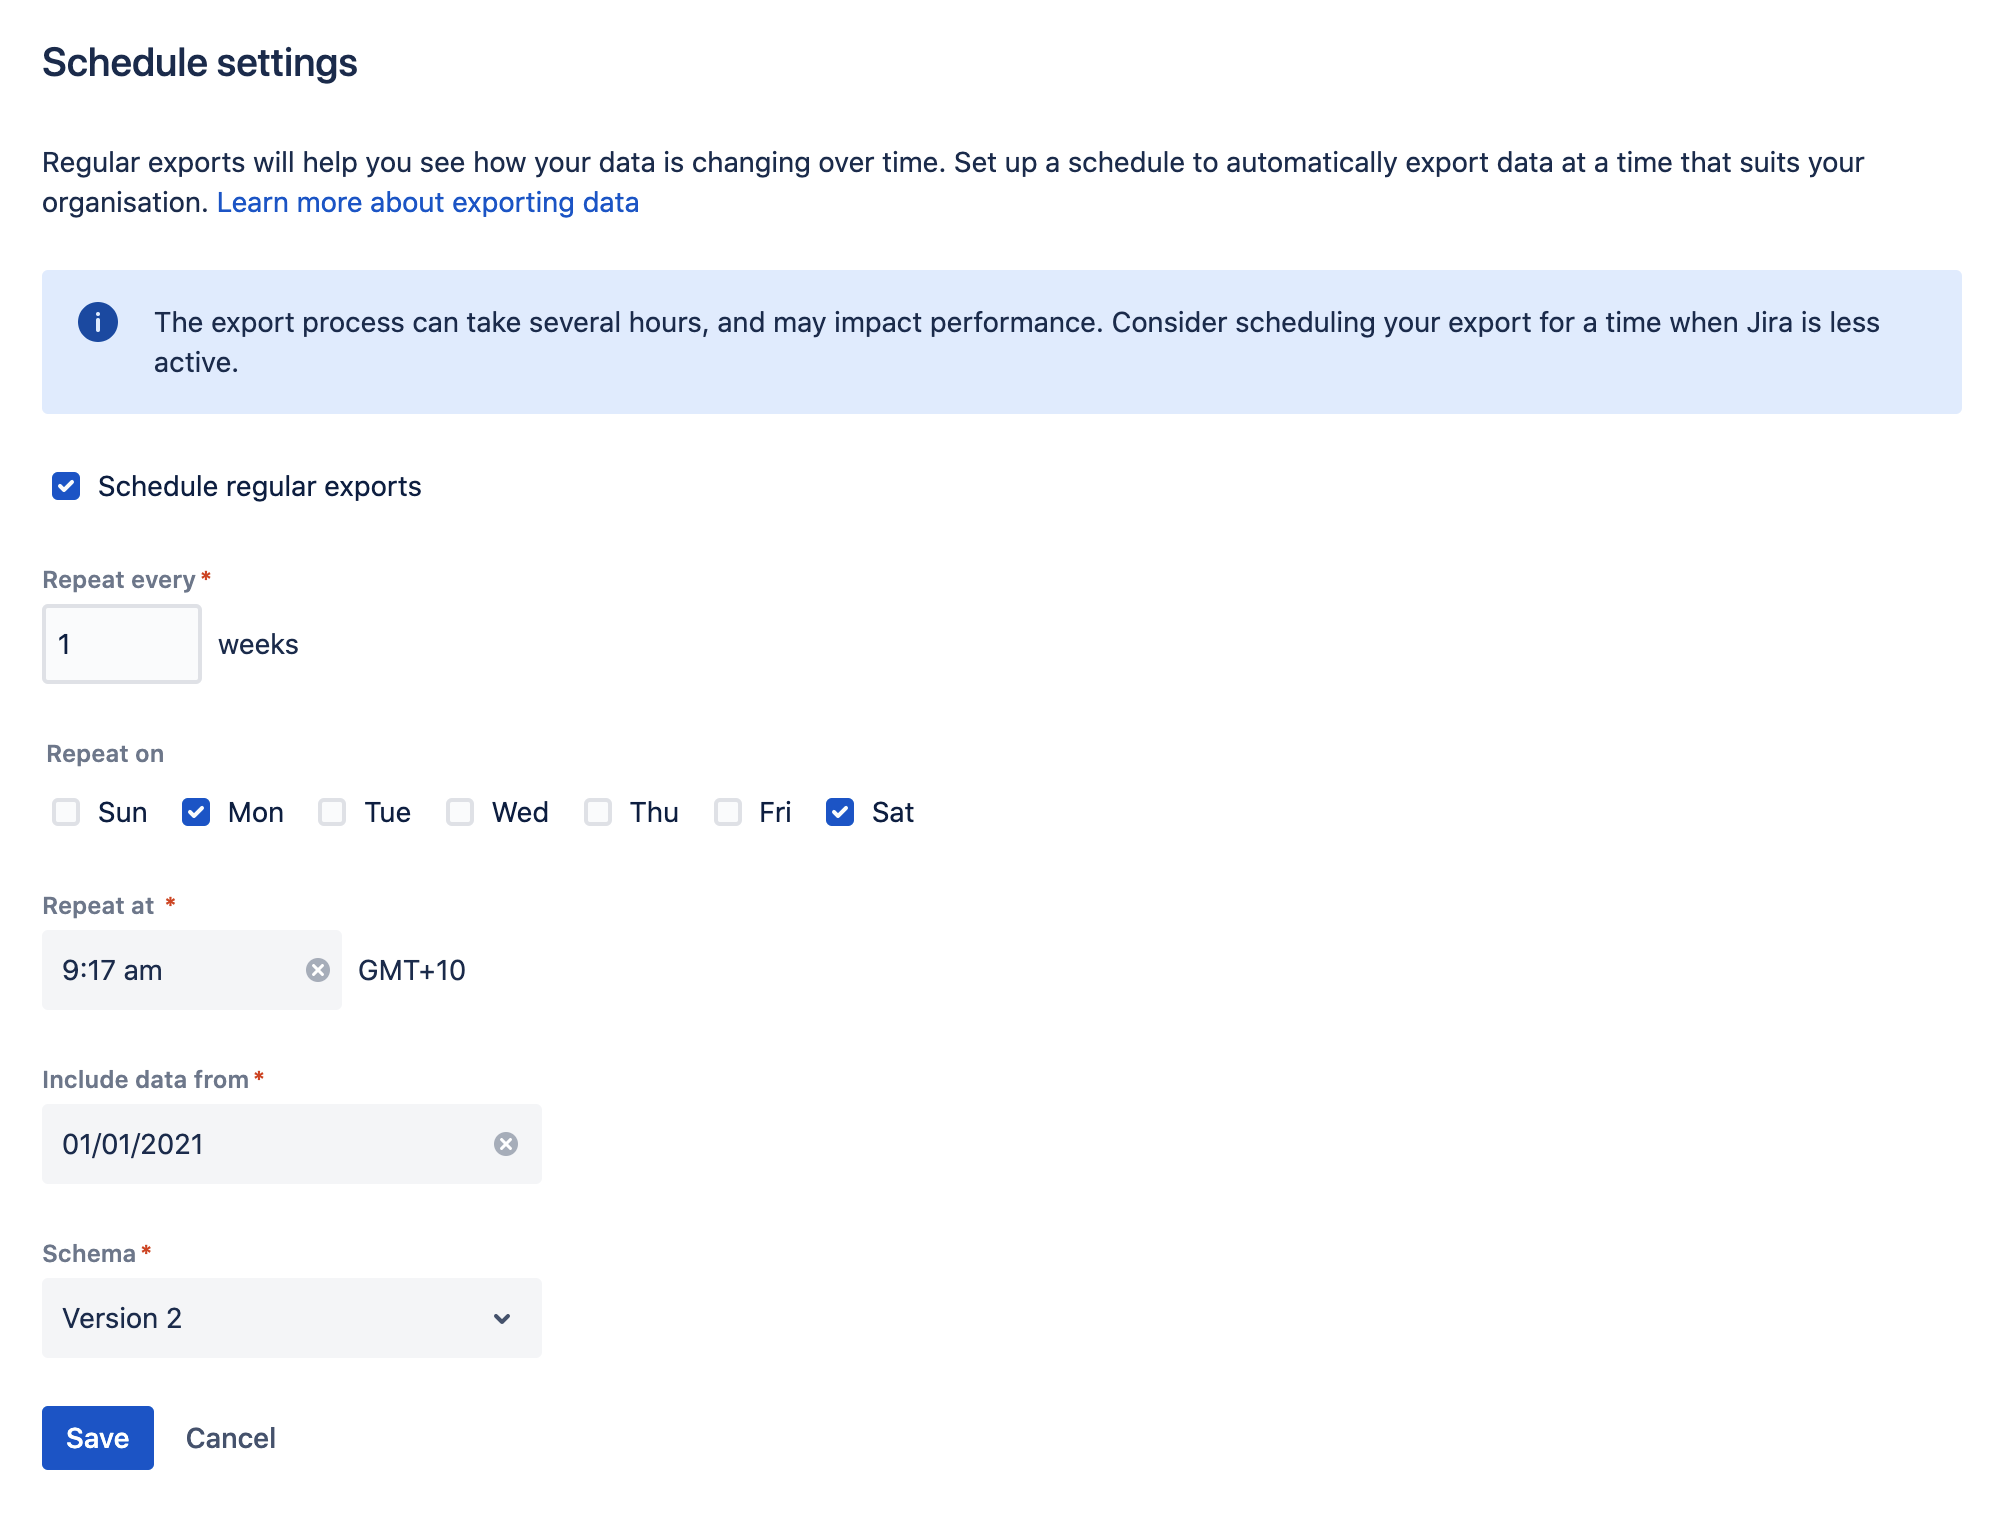
Schedule regular exports
To set the export schedule:
- From the Data pipeline screen, select Schedule settings.
- Select the Schedule regular exports checkbox.
- Select the date to include data from. Data from before this date won’t be included. This is usually set to 12 months or less.
- Choose how often to repeat the export.
- Select a time to start the export. You may want to schedule the export to happen outside working hours.
- Select the Schema version to use (if more than one schema is available).
- Save your schedule.
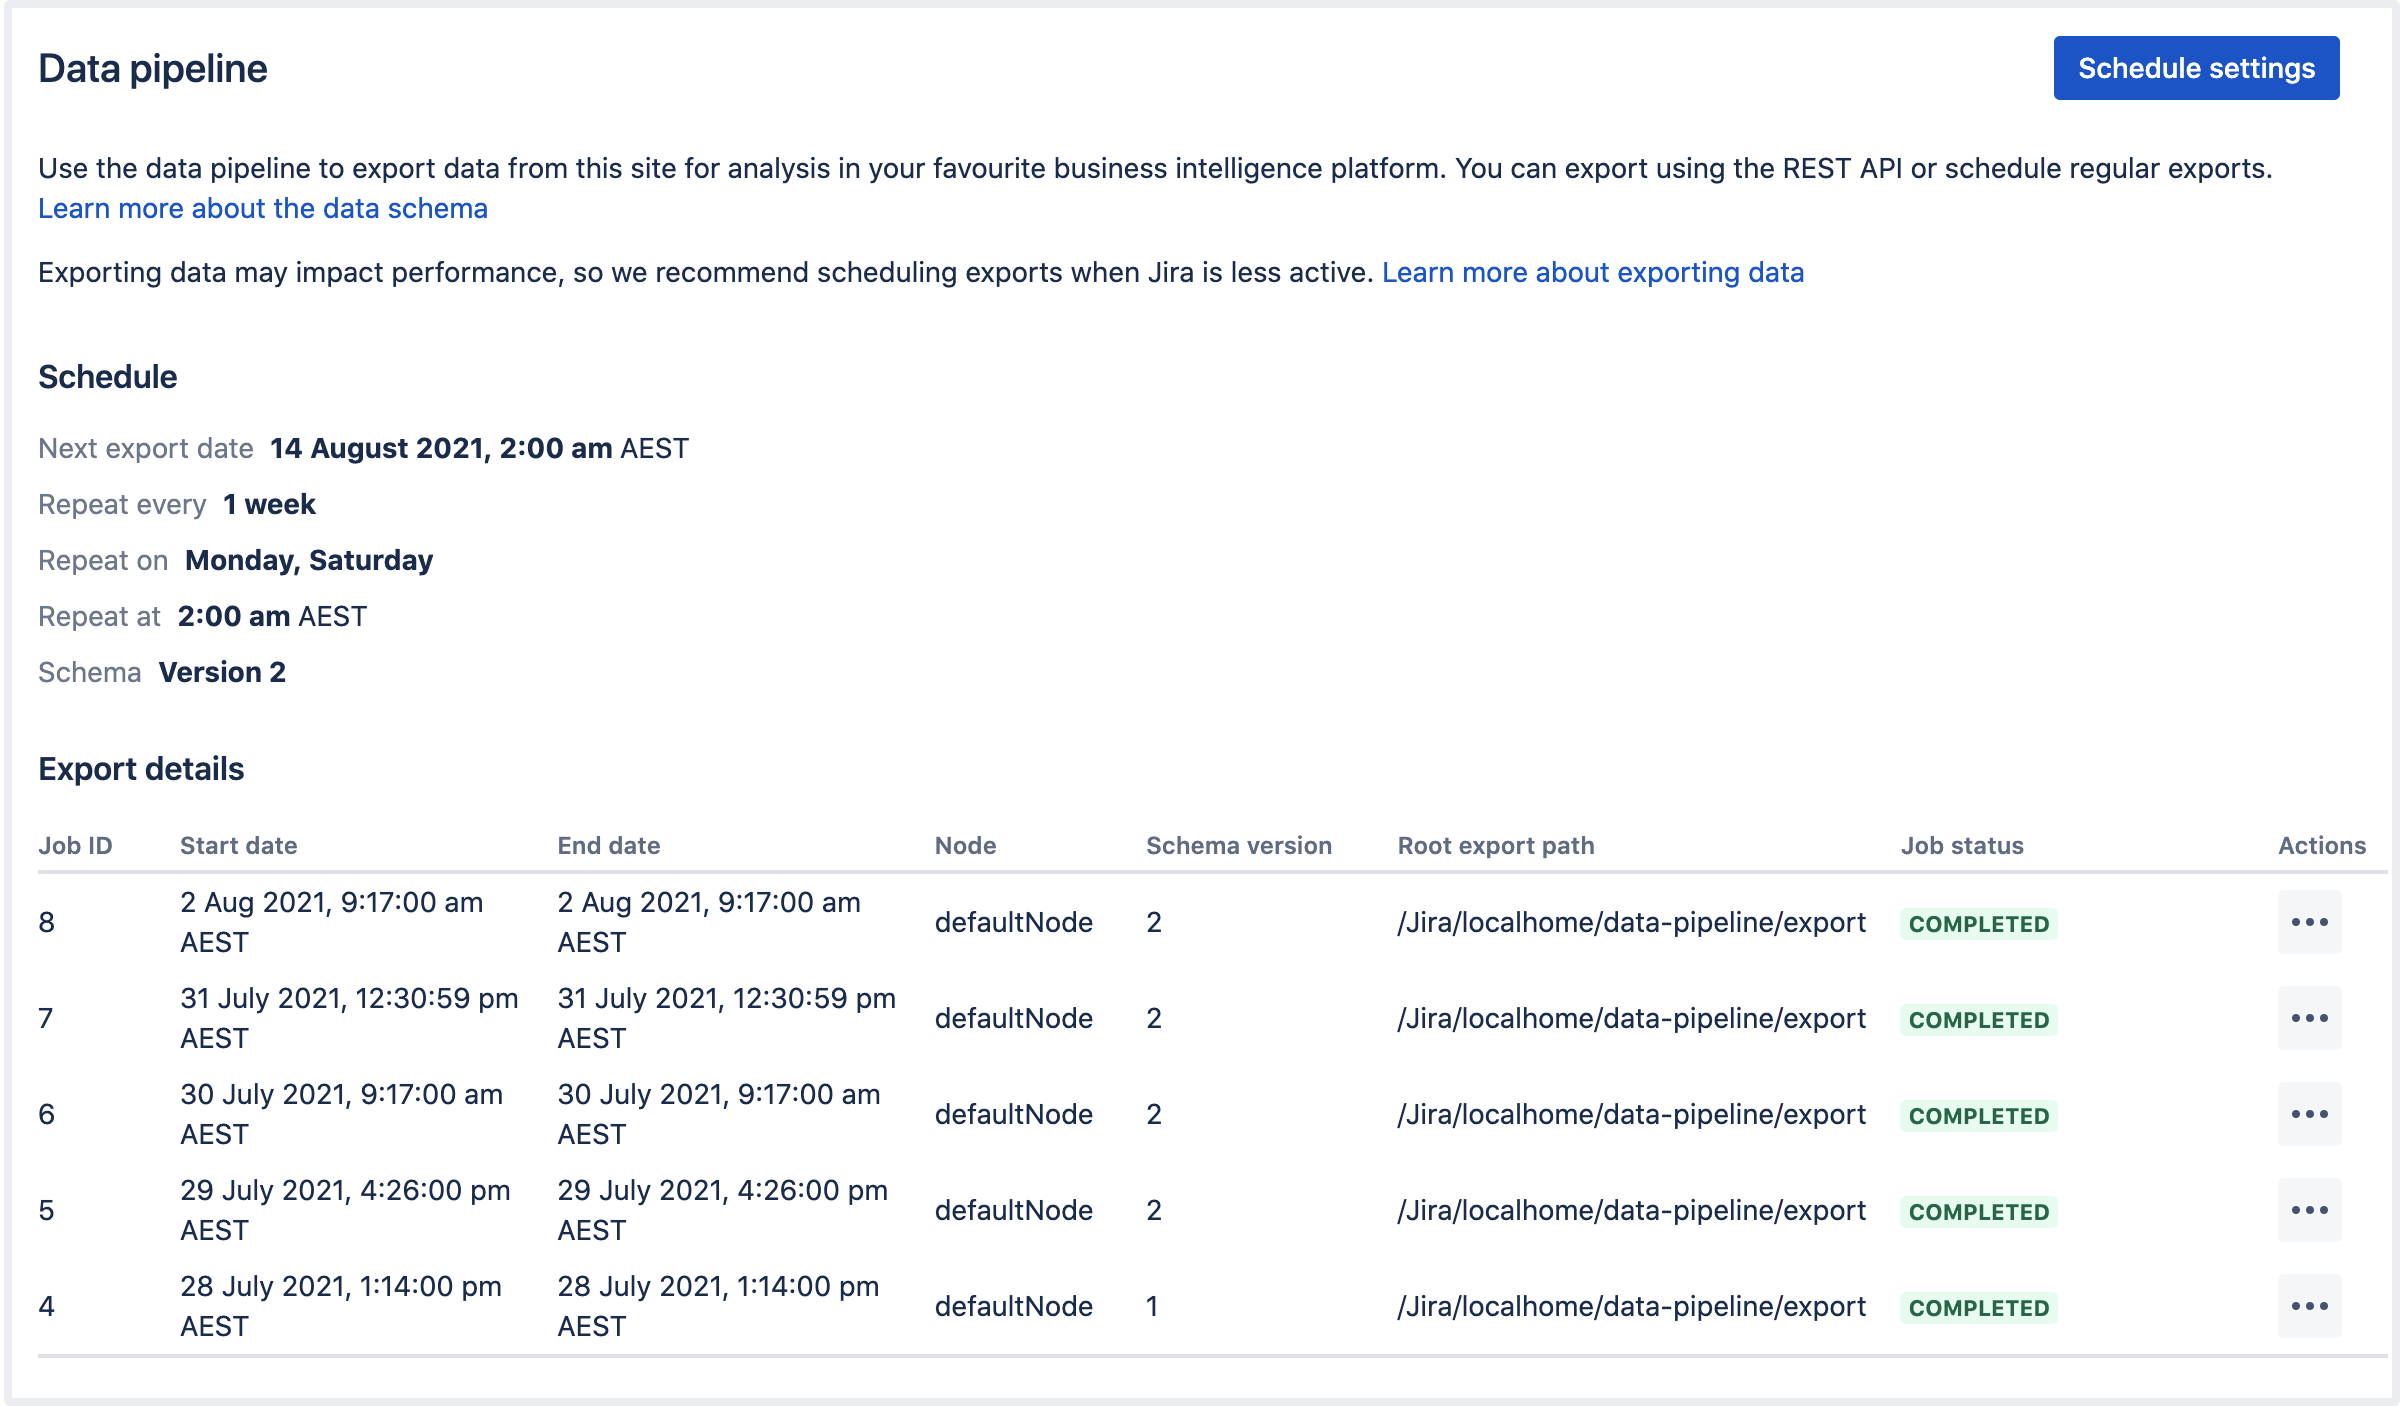
Timezones and recurring exports
We use your server timezone to schedule exports (or system timezone if you’ve overridden the server time in the application). The export schedule isn’t updated if you change your timezone. If you do need to change the timezone, you’ll need to edit the schedule and re-enter the export time.
You can schedule exports to happen as often as you need. If you choose to export on multiple days, the first export will occur on the nearest day after you save the schedule. Using the example in the screenshot above, if you set up your schedule on Thursday, the first export would occur on Saturday, and the second export on Monday. We don’t wait for the start of the week.
Export schema
The export schema defines the structure of the export. We version the schema so that you know your export will have the same structure as previous exports. This helps you avoid problems if you’ve built dashboards or reports based on this data.
We only introduce new schema versions for breaking changes, such as removing a field, or if the way the data is structured changes. New fields are simply added to the latest schema version.
Older schema versions will be marked as ‘deprecated’, and may be removed in future versions. You can still export using these versions, just be aware we won’t update them with any new fields.
Check the status of an export
The Export details table will show the most recent exports, and the current status.
Select ![]() > View details to see the full details of the export in JSON format. Details include the export parameters, status, and any errors returned if the export failed.
> View details to see the full details of the export in JSON format. Details include the export parameters, status, and any errors returned if the export failed.
For help resolving failed or cancelled exports, see Data pipeline troubleshooting.
Cancel an export
- Go to the Data pipeline screen.
- Select
 next to the export, and choose Cancel export.
 - Confirm you want to cancel the export.
It can take a few minutes for the processes to be terminated. Any files already written will remain in the export directory. You can delete these files if you don’t need them.
Automatic data export cancellations
DELETE request). This releases the process lock, allowing you to perform another data export.Exclude projects from the export
To add projects to the opt-out list, make a POST request to <base-url>/rest/datapipeline/1.0/config/optout and pass the project keys as follows.
{
 "type": "PROJECT",
 "keys": ["HR","TEST"]
}
These projects will be excluded from all future exports. Note that the opt-out feature was introduced in the Data Pipeline version 2.3.0+.
For full details, including how to remove projects from the opt-out list, refer to the Data pipeline REST API reference.
Configuring the data export
You can configure the format of the export data through the following configuration properties.
| Default value | Description |
|---|---|
plugin.data.pipeline.embedded.line.break.preserve | |
false | Specifies whether embedded line breaks should be preserved in the output files. Line breaks can be problematic for some tools such as Hadoop. This property is set to |
plugin.data.pipeline.embedded.line.break.escape.char | |
\\n | Escaping character for embedded line breaks. By default, we'll print |
plugin.data.pipeline.minimum.usable.disk.space.after.export | |
| 5GB | To prevent you from running out of disk space, the data pipeline will check before and during an export that there is at least 5GB free disk space. Set this property, in gigabytes, to increase or decrease the limit. To disable this check, set this property to |
| Default value | Description |
|---|---|
plugin.data.pipeline.bitbucket.export.personal.forked.repository.commits | |
false | Specifies whether commits from forked repositories in personal projects should be exported. Set this property to |
plugin.data.pipeline.bitbucket.export.build.statuses | |
false | Specifies whether build statuses should be included in the export. Exporting build statuses can take a significant amount of time if you have a lot of builds. Set this property to |
plugin.data.pipeline.bitbucket.commit.queue.polling.timeout.seconds | |
20 | Time, in seconds, it takes to receive the first commit from git process. You should only need to change this if you see a |
plugin.data.pipeline.bitbucket.commit.git.execution.timeout.seconds | |
3600 | Sets the idle and execution timeout for the git ref-list command. You should only need to change this if you see "an error occurred while executing an external process: process timed out" error. |
plugin.data.pipeline.bitbucket.export.pull.request.activities | |
true | Specifies whether historical data about pull request activity data should be included in the export. Exporting activity data will significantly increase your export duration. Set this property to |
Use the data pipeline REST API
To start a data pipeline export, make a POST request to <base-url>/rest/datapipeline/latest/export.
Here is an example request, using cURL and a personal access token for authentication:
curl -H "Authorization:Bearer ABCD1234" -H "X-Atlassian-Token: no-check"
-X POST https://myexamplesite.com/rest/datapipeline/latest/
export?fromDate=2020-10-22T01:30:11Z
You can also use the API to check the status, change the export location, and schedule or cancel an export.
For full details, refer to the Data pipeline REST API reference.
Output files
Each time you perform a data export, we assign a numerical job ID to the task (starting with 1 for your first ever data export). This job ID is used in the file name, and location of the files containing your exported data.
Location of exported files
Exported data is saved as separate CSV files. The files are saved to the following directory:
<shared-home>/data-pipeline/export/<job-id>if you run Bitbucket in a cluster<local-home>/shared/data-pipeline/export/<job-id>you are using non-clustered Bitbucket.
Within the <job-id> directory you will see the following files:
build_statuses_<job_id>_<schema_version>_<timestamp>.csvcommits_<job_id>_<schema_version>_<timestamp>.csvpull_request_activities_<job_id>_<schema_version>_<timestamp>.csvpull_requests_<job_id>_<schema_version>_<timestamp>.csvrepositories_<job_id>_<schema_version>_<timestamp>.csvusers_<job_id>_<schema_version>_<timestamp>.csv
To load and transform the data in these files, you'll need to understand the schema. See Data pipeline export schema.
Set a custom export path
To change the root export path, make a PUT request to <base-url>/rest/datapipeline/1.0/config/export-path.
In the body of the request pass the absolute path to your preferred directory.
For full details, including how to revert back to the default path, refer to the Data pipeline REST API reference.
Sample Spark and Hadoop import configurations
If you have an existing Spark or Hadoop instance, use the following references to configure how to import your data for further transformation: