Using the Application Browser
This page describes the Application Browser and gives an overview of the types of application you may find in Crowd.
On this page:
About the Application Browser
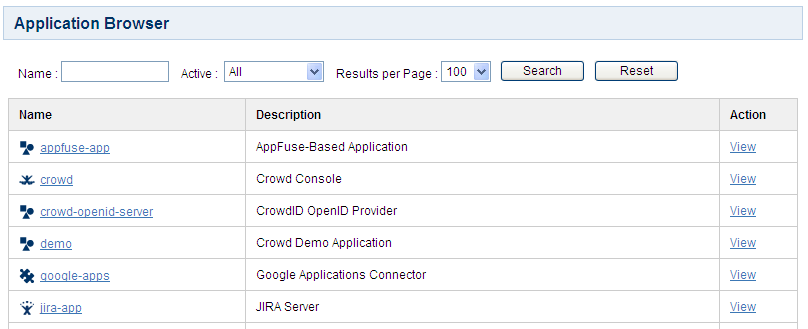
The Application Browser allows you to view and search for integrated applications.
To use the Application Browser,
- Log in to the Crowd Administration Console.
- Click the 'Applications' tab in the top navigation bar.
- This will display the Application Browser, showing all the applications that exist in your Crowd system. You can refine your search by specifying a 'Name' (note that this is case sensitive), or 'Active'/'Inactive' applications.
- To view or edit an application's details, click the application name or the 'View' link next to the specific application.
Screenshot: Application Browser
Screenshot: Example of an application's details
About Applications
Crowd integrates and provisions applications. Once defined, an application is mapped to a directory(s), whose users are then granted access to the application. Note that an application can only communicate with Crowd when the application uses a known host address.
Default Applications
When you first use the Application Browser, you will see a number of default applications, i.e. applications that are shipped with your Crowd installation:
- 'crowd' — This is the Crowd Administration Console. The Crowd Administration Console is itself a web application that is provisioned by Crowd. The 'crowd' application is mapped to the default directory which you defined during setup, and can be accessed by members of the
crowd-administratorsgroup. - 'crowd-openid-server' — This is the CrowdID application which you (optionally) configured during setup. It allows you to provide OpenID services to your users. For details please see the 2024-04-19_12-07-02_CrowdID Administration Guide and the 2024-04-19_12-07-13_CrowdID User Guide. To access CrowdID, go to
http://localhost:8095/openidserver. - 'demo' — This is the 'demo' application which you (optionally) configured during setup. Its main purpose is to provide an example of how to integrate custom applications with Crowd.
- 'google-apps' — This is the Crowd application connector which allows single sign-on (SSO) to Google Apps. To enable SSO between Crowd-connected applications and Google Apps, you will need to configure the Google Apps connector as described in Configuring the Google Apps Connector.
Application Types
Crowd supports the following application types, as indicated by the application-type icons on the Application Browser:
This icon marks the Crowd application.
| |
This marks a Bamboo server connected to Crowd. | |
This marks a Confluence server connected to Crowd. | |
This marks a Crucible server connected to Crowd. | |
This marks a Fisheye server connected to Crowd. | |
This marks a JIRA server connected to Crowd. | |
These are the 'remote' applications, which you can add to Crowd as described in Adding an Application. This application type does not include plugin applications. You can rename, deactivate or delete remote applications. | |
The 'plugin' applications are implemented as plugins to Crowd.
|
RELATED TOPICS
- Using the Application Browser
- Adding an Application
- Configuring the Google Apps Connector
- Mapping a Directory to an Application
- Effective memberships with multiple directories
- Specifying an Application's Address or Hostname
- Testing a User's Login to an Application
- Enforcing Lower-Case Usernames and Groups for an Application
- Managing an Application's Session
- Deleting or Deactivating an Application
- Configuring Caching for an Application
- Overview of SSO
- Configuring Options for an Application


