Getting started with Bitbucket Data Center in Azure
Bitbucket Data Center is an excellent fit for the Microsoft Azure environment. Azure provides a number of managed services that work out of the box with Bitbucket Data Center instances, and handle all their configuration and maintenance automatically. You can also choose the number and size of your nodes to suit your organization's needs, and if you need to scale up or down, Azure allows you to do this.
We've set up a reference template that lets you deploy Bitbucket Data Center in Microsoft Azure, and you can then configure it depending on your organization's Azure best practices. We strongly recommend you set up user management, central logging storage, a backup strategy, and monitoring, just as you would for a Bitbucket Data Center installation running on your own hardware.
How it works
Here's an architectural overview of what you'll get when deploying Bitbucket Data Center using the template:
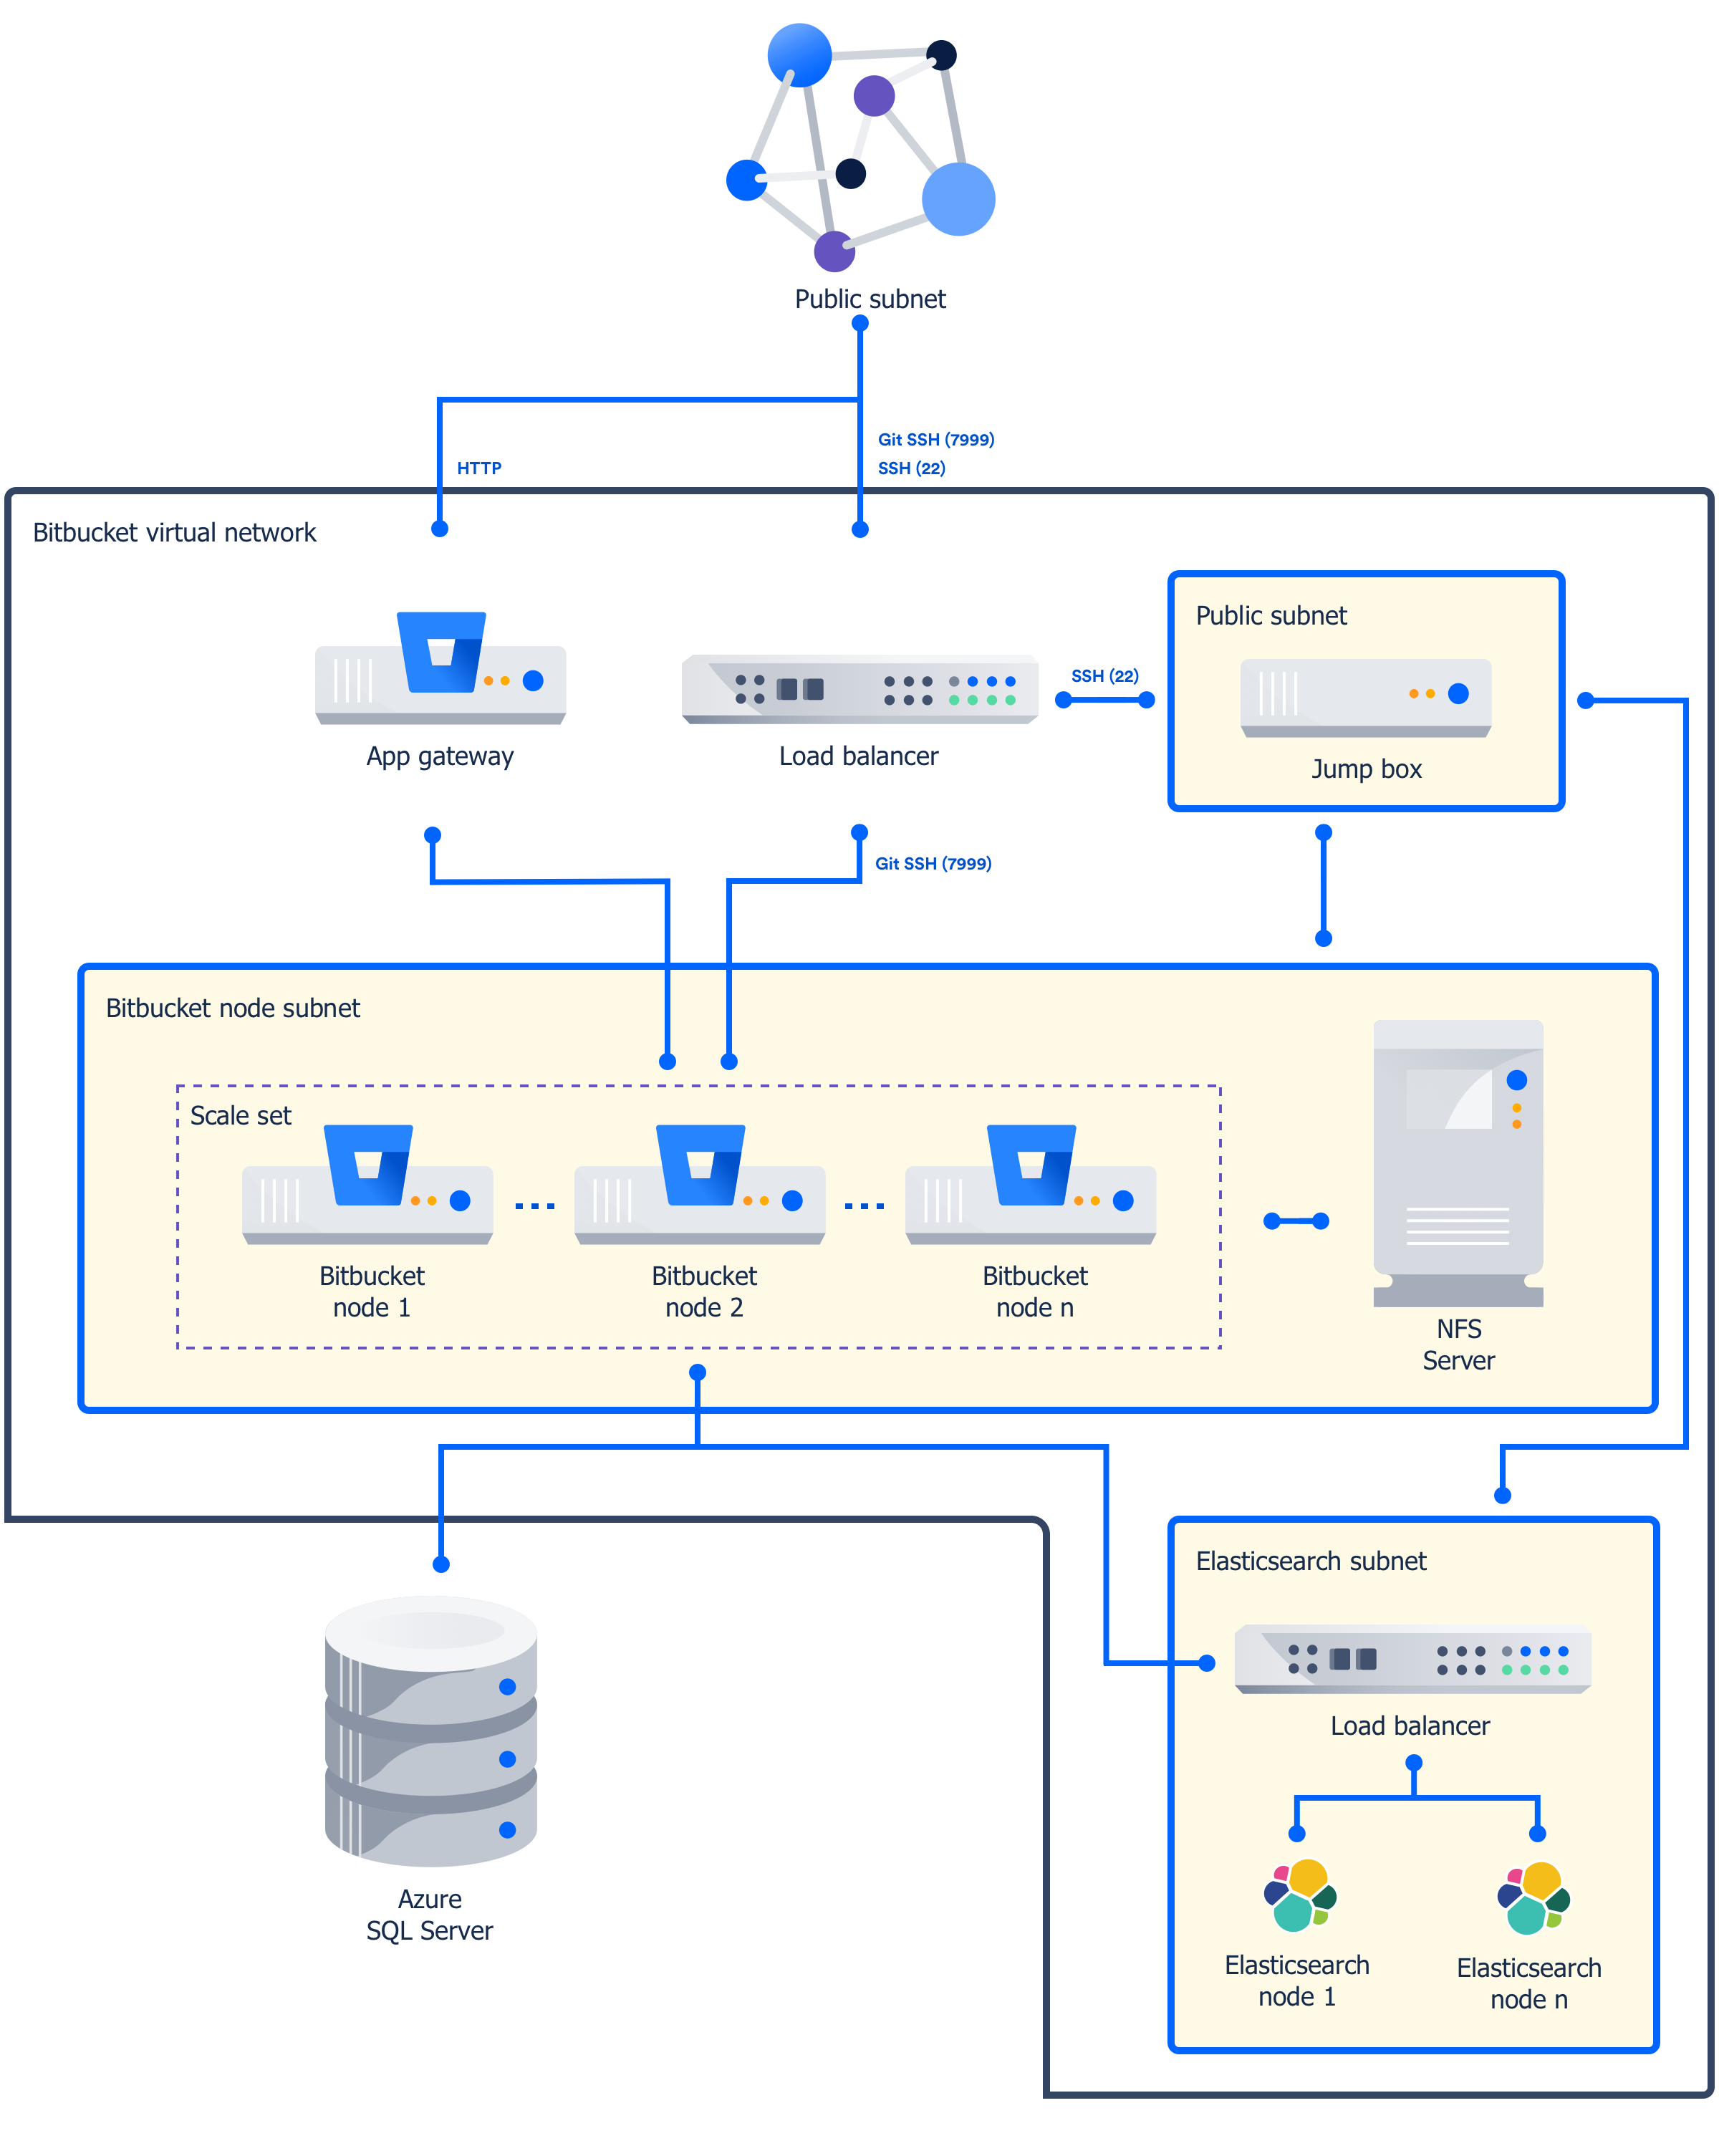
The deployment consists of the following components:
- One or more Azure standard Linux VM instances as cluster nodes, running Bitbucket, in a scale set.
- A NFS server deployed on a Linux VM, hosting the Bitbucket home directory.
- One or more Azure standard Linux VM instances as cluster nodes, running Elasticsearch.
- Azure SQL server database.
- A jumpbox.
- A load balancer and an application gateway.
The application gateway receives all the HTTP traffic, while the load balancer receives all of the SSH traffic and load balances them to the Bitbucket nodes.
Limitations
There are some limitations you should be aware of before deciding to deploy to Azure:
- We don't provide any additional node monitoring. Azure provides some basic monitoring, including CPU usage and network / disk rates.
- No log aggregation. Logs are only stored in the local home directory on the VMs provisioned during set up. If a VM is lost its logs will also be lost.
- You can't use the deployment template to upgrade an existing Bitbucket deployment, or to provision new nodes running a different version to the rest of your cluster.
- SSL is not enabled. You'll need to manually configure your application gateway. See the 'Additional steps required for SSL' section below for more information.
Deploying Bitbucket Data Center to Azure via Azure marketplace
This method uses the Azure Marketplace to deploy Bitbucket Data Center using our deployment templates as a reference.
You will need Owner permissions on the resource group into which the deployment is planned.
To deploy Confluence Data Center to Azure using our Marketplace app:
- Log in to Azure Portal.
- Choose Create a resource to start a new deployment from the New menu.
- In New, search for Atlassian then select Bitbucket Data Center from the list of Marketplace apps.
- Choose Create to start configuring the deployment.
- Follow the prompts in the wizard to configure your deployment. Refer to the parameters table below for more information.
- Confirm all the details are correct then click Create to purchase the subscription. Deployment will take about 30 minutes.
- Once deployment is complete, go to the Bitbucket URL listed in the deployment outputs to start using Bitbucket Data Center.
Parameters
| Parameters | Description |
|---|---|
| Subscription | Your Microsoft Azure subscription type. |
| Resource group | If you have an existing resource group, you can use it, or create a new one. |
| Location | This is the region where Azure will house your deployment. |
| Bitbucket administrator details | Provide administrator account details. |
| Number and size of Bitbucket nodes | Specify the initial number of nodes, and the size of each node. This can be reconfigured at a later date. |
| File server | Specify the size of the file server and the disk size |
| Database credentials and size | Specify a Azure SQL tier and optionally username and password for the database |
| Elasticsearch details | Elasticsearch node size and disk size |
| Jumpbox credentials | Provide a username and SSH public key for the jumpbox. |
A full and current list of parameters is available here.
Deploying Bitbucket Data Center to Azure using the CLI
This method uses the Azure command line interface to deploy Bitbucket Data Center using our deployment templates as a reference. You'll need to install the Azure CLI to do this.
To deploy Bitbucket Data Center to Azure using the command line interface:
Download the
azuredeploy.jsontemplate file andazuredeploy.parameters.jsonparameters file from the bitbucket directory on https://bitbucket.org/atlassian/atlassian-azure-deployment.- Edit the
azuredeploy.parameters.jsonparameters file, and insert values for the following required parameters:- Bitbucket admin password, the default username is bbsadmin
- SSH key used for the jumpbox
The template applies sensible defaults for a number of other parameters, including the size of your VMs and database instance. You can choose to override these defaults if you want to specify particular values. - Log in to Azure via the command line interface.
Create a resource group. This will be the container for the Confluence resources you deploy.
az group create --name BitbucketDataCenter --location "Central US"Create a new deployment, and specify the Confluence data center template file and parameters file.
az group deployment create \ --name BitbucketDataCenterDeployment \ --resource-group BitbucketDataCenter \ --template-file azuredeploy.json \ --parameters azuredeploy.parameters.json- Log in to the Azure Portal to see the deployment outputs. The Application URL is the URL for your new Bitbucket site.
- Go to the Application URL in your browser to start using Bitbucket.
Required parameters
The deployment template requires a number of values to be provided in order to deploy your Bitbucket Data Center instance.
| Parameter | Description |
|---|---|
sshKey | This is the SSH Key you'll use to access the jumpbox. The default username is bbsadmin |
bitbucketAdminPassword | This is the password for your Bitbucket administrator's account. The default username is bbsadmin |
A full and current list of parameters is available here.
Additional steps required for SSL
As noted in limitations above, you'll need to manually configure your application gateway. See Application Gateway with SSL termination in the Microsoft Azure documentation for more information.