Adding custom fields
Custom field types
When creating a new custom field, you should first set a type of this field. The type indicates how your custom field will display and function, as well as what values it can accept.
The following table lists a wide array of custom field types that Jira provides to cover various use cases of what information must be present in issues and how.
By default, you’re offered to select from standard field types when adding a new custom field. To open the full list of the custom field types, select All in the dialog window.
| Custom field type | Description |
|---|---|
JIRA CORE custom field types | |
Checkboxes STANDARD | Allows selecting multiple values from the list. Checkboxes is one of the custom field types for which you should create options. Tell me how |
Date picker STANDARD | Allows selecting a date |
Date time picker STANDARD | Allows selecting a date and time |
Labels STANDARD | Allows adding labels to issues to facilitate issue categorization and search |
Number field STANDARD | Stores and validates a floating point number |
Radio buttons STANDARD | Allows selecting on value from the list. Radio buttons is one of the custom field types for which you should create options. Tell me how |
Select list (cascading) STANDARD | Allows selecting values based on their parent-child relation. Select list (cascading) is one of the custom field types for which you should create options. Tell me how |
Select list (multiple choices) STANDARD | Allows selecting multiple values from the list. Select list (multiple choices) is one of the custom field types for which you should create options. Tell me how |
Select list (single choice) STANDARD | Allows selecting one value from the list |
Text field (multi-line) STANDARD | Creates an unlimited text area where a user can enter a long text with many lines |
Text field (single line) STANDARD | Creates a text box where a user can enter a one-line text, no longer than 255 characters including spaces |
URL field STANDARD | Allows entering one URL |
User picker (single user) STANDARD | Allows selecting one user |
Group picker (multiple groups) ADVANCED | Allows selecting multiple user groups |
Group picker (single group) ADVANCED | Allows selecting one user group |
Project picker (single project) ADVANCED | Allows selecting one project that the user can view in Jira |
Text field (read only) ADVANCED | Creates a read-only text label for setting values programmatically. A value can contain no more than 255 characters, including spaces. |
User picker (multiple users) ADVANCED | Allows selecting multiple users |
Version picker (multiple versions) ADVANCED | Allows selecting multiple versions |
Version picker (single version) ADVANCED | Allows selecting one version |
JIRA SOFTWARE ONLY custom field types | |
Global rank ADVANCED | Jira Software automatically creates the Rank custom field of this type. The Rank field allows you to assess the importance or urgency of your issues and prioritize them, move them across sprints, or group sub-tasks under particular parent issues. Learn more about ranking |
Hidden job switch ADVANCED | Sets a hidden switch programmatically to choose whether or not to create a Perforce job. |
Jira released version history ADVANCED | Allows setting a custom release version |
Job checkbox ADVANCED | Creates a checkbox to choose whether or not to create a Perforce job. |
Original story points ADVANCED | Stores the original number of story points assigned to an issue before the work on it is started |
JIRA SERVICE MANAGEMENT ONLY custom field types | |
Organizations ADVANCED | Groups customers so they can share service project access and tickets with others in their organization. When you sort this custom field, only the smallest value is used for comparison. For example, an issue YP-2 now uses the |
Creating a new custom field
To create a custom field:
- In the upper-right corner of the screen, select Administration
 > Issues.
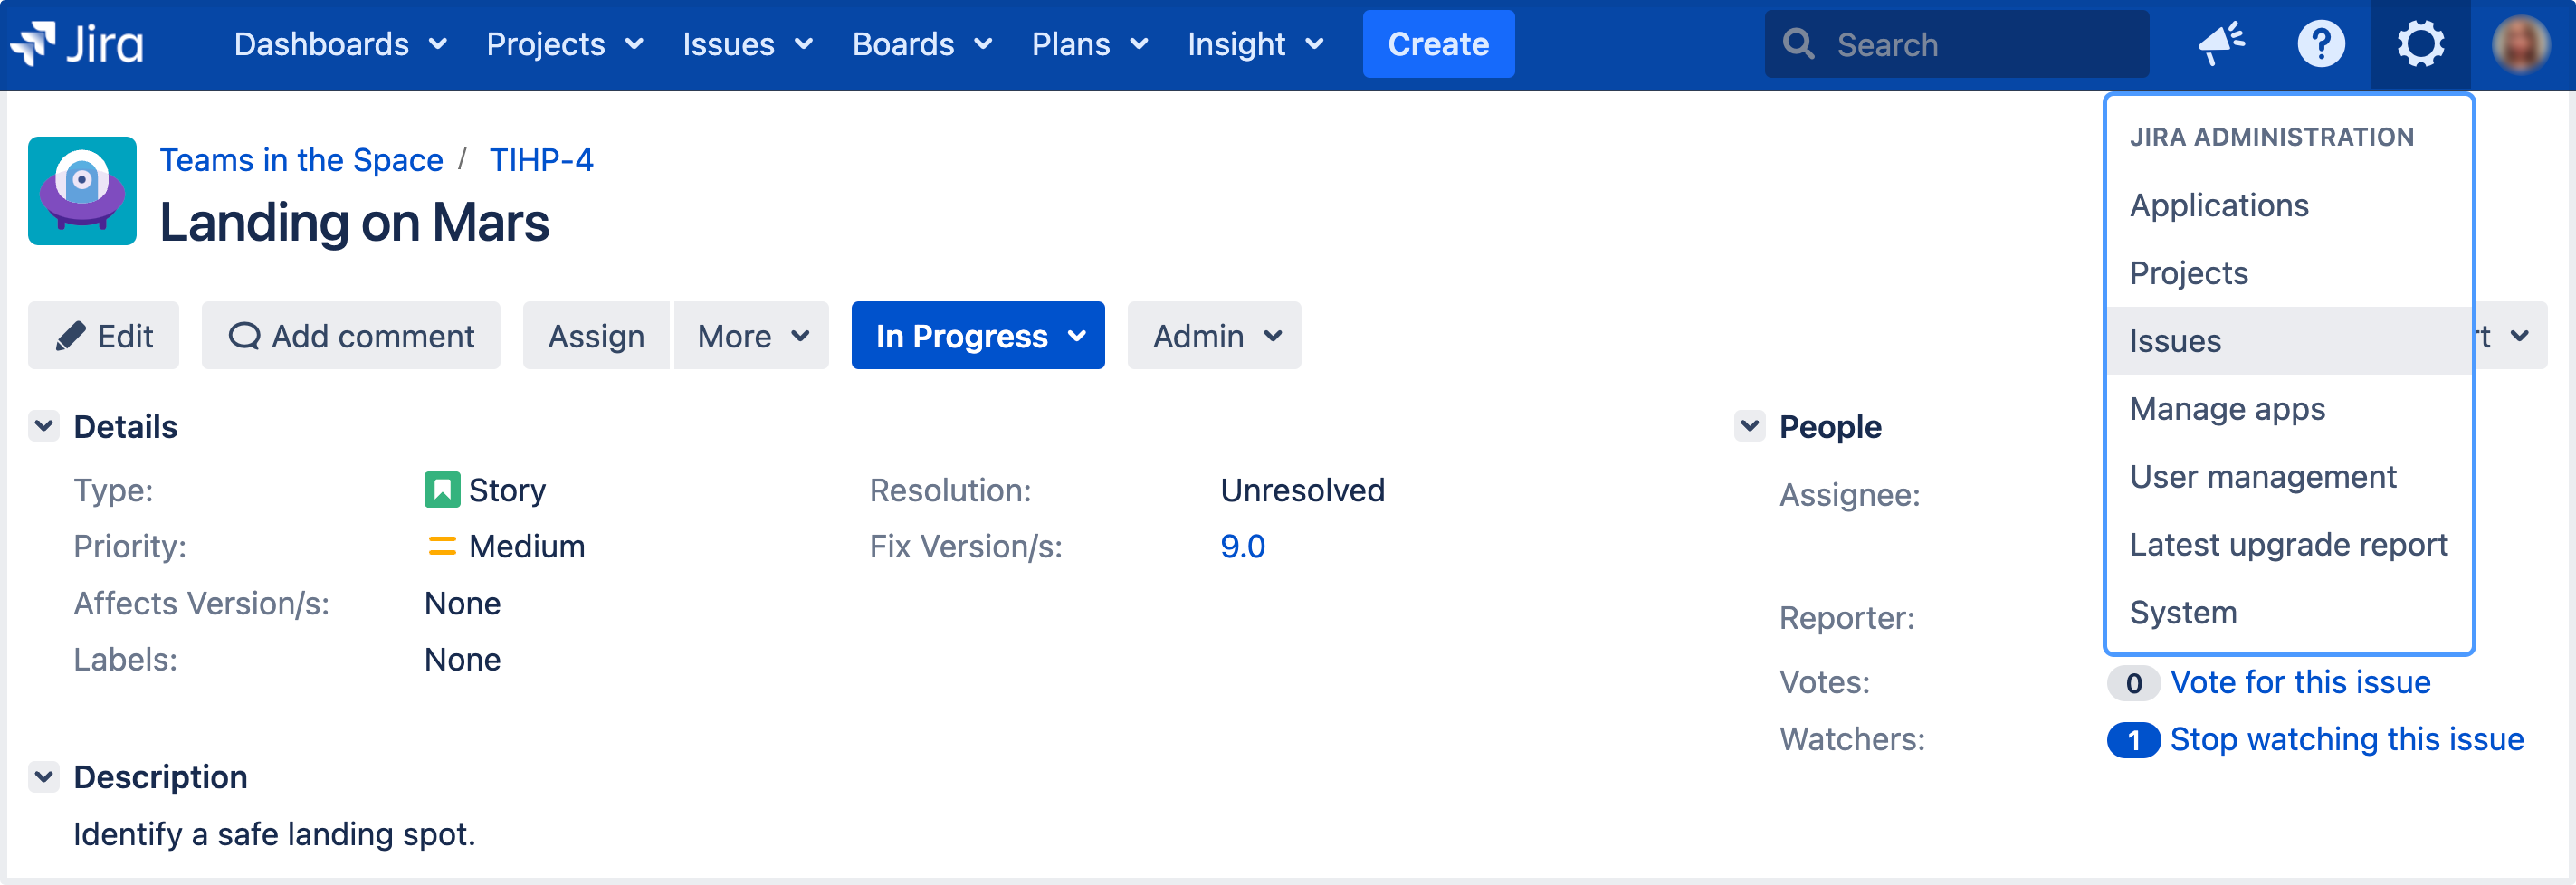
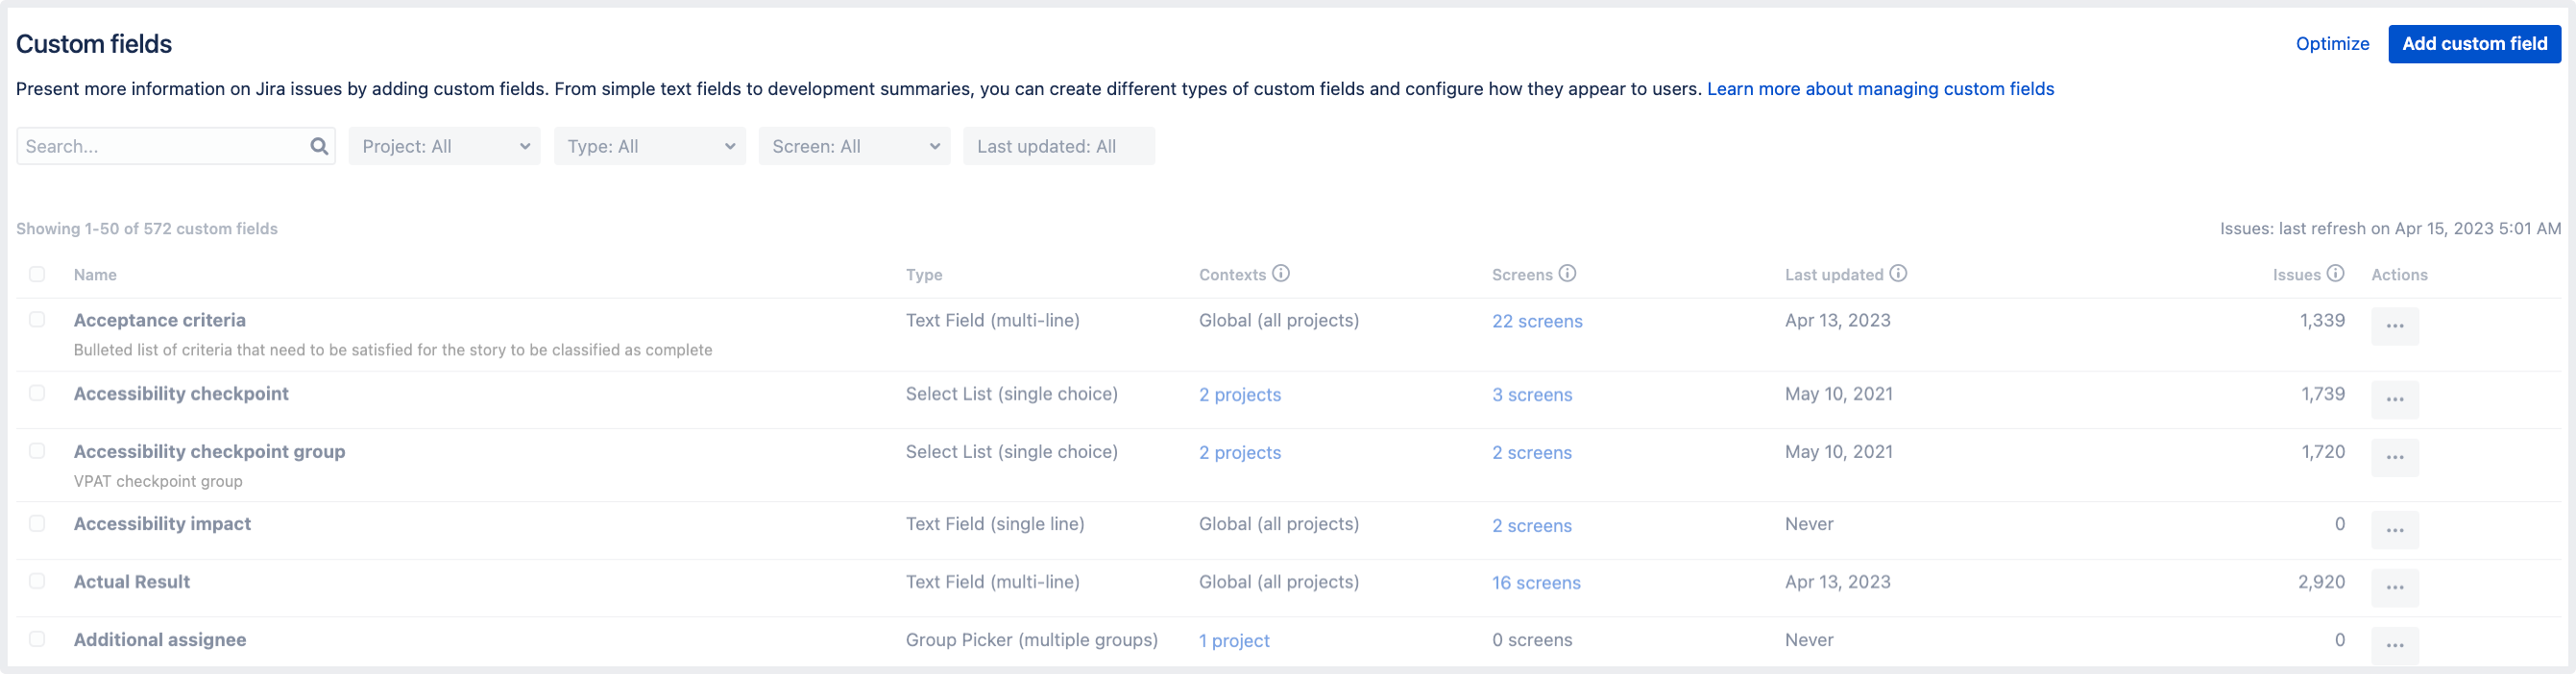
Under Fields (the left-side panel), select Custom fields.
Select Add custom field.
In the Select a field type modal dialog, select All to make sure you can see all available field types.
Select the field type and select Next. For example, let’s select the Checkboxes field type.
Configure the field by entering its name, description, and options if required. Select Next.
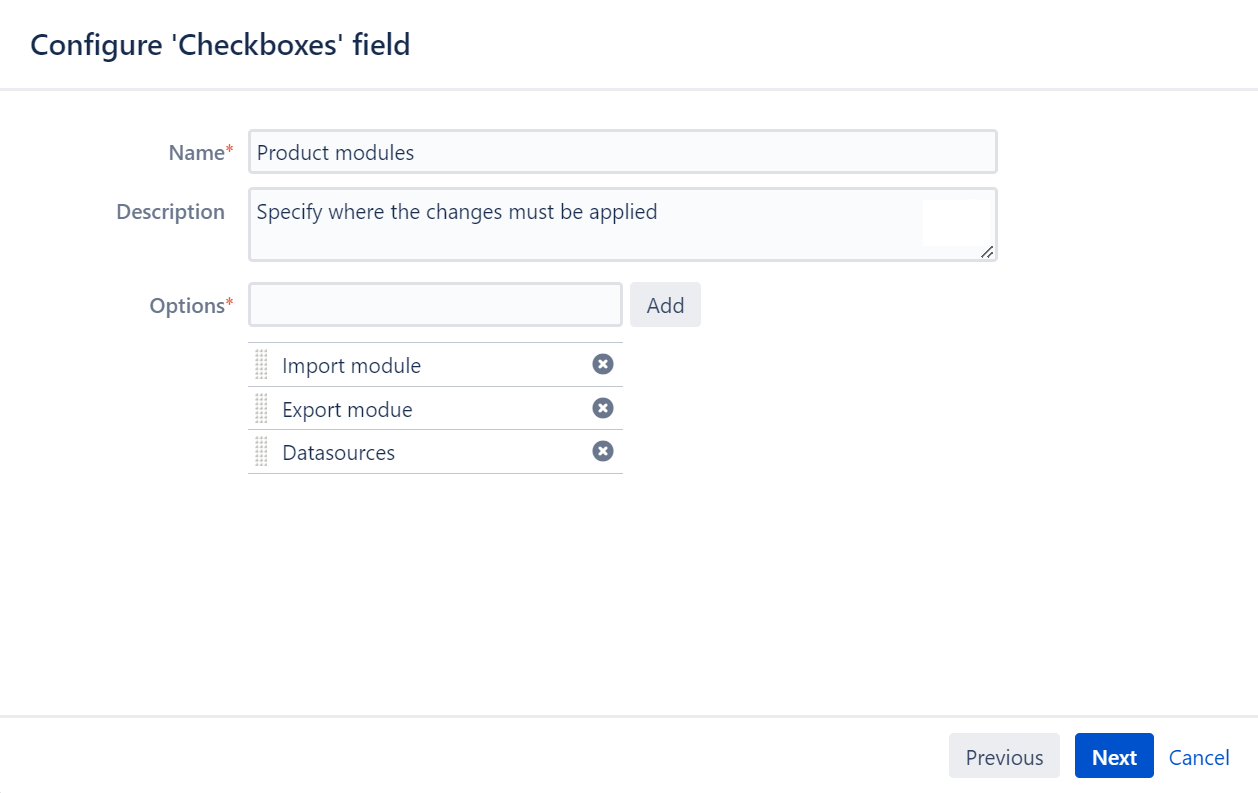
You’ll see the Name as the custom field's title when entering and retrieving information on issues. You’ll see the Description beneath the field when creating new issues and editing existing issues, but not when browsing issues.Configure the context for the field.
Select projects where the custom field must be applied.
- Select Create.
Now, you can associate the new custom field with issue screens and then add the field to your issues. Learn more
Associating a custom field with an issue screen
After you create a custom field, you’ll be brought to the Screens page. Learn more about screens
Here, you can choose on which issue screens your custom fields should be displayed. For example, on the Default screen or Resolve issue screen.
To associate the field with the screens, select the checkboxes next to the desired screens and select Update.

The custom field will be available on all issue screens for which you’ve enabled it. If you don’t select any screen here, you won’t see the custom field when creating or editing an issue.
You can also associate a field with issue screens on the context configuration page. Learn more about custom field contexts
Editing existing associations
You can always edit the associations between the custom field and selected screens. To do this:
- In the upper-right corner of the screen, select Administration > Issues.
Under Fields (the left-side panel), select Field configurations.
Select the field configuration.
Find your custom field in the list and select Screens.

- Change the associations and select Update.
You can also add custom fields into existing issues regardless of the associations with screens.
Adding a custom field directly to an issue
Even if your custom field isn’t associated with an issue screen, you can still add this field to existing issues of a particular type. Before doing this, ensure you’ve enabled the field for the desired issue type.
To add a field to an issue:
Open an issue.
Select Admin > Add field. In the dropdown, select the field you want to see in the issue view.
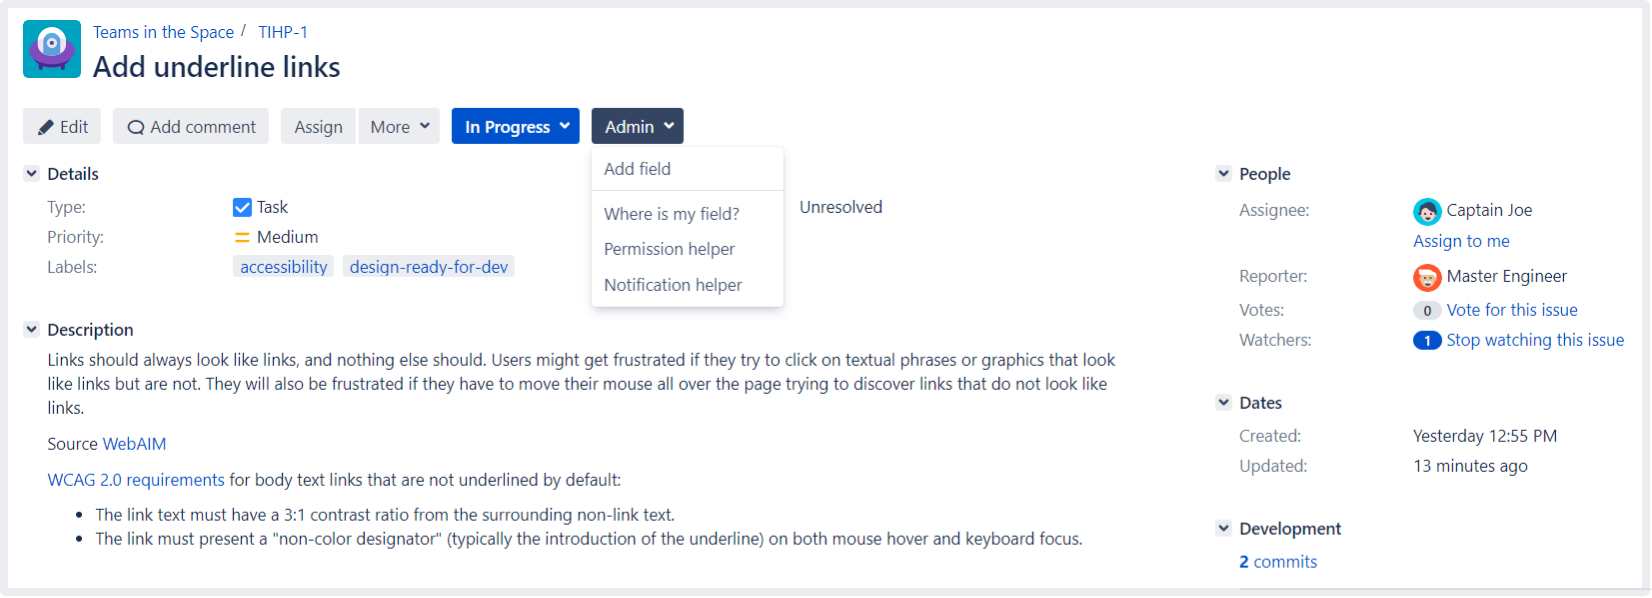
- Select Edit field to set a value for the field immediately.

- Select Submit.
For all of the following procedures, you must be logged in as a user with the Jira administrators global permission.
You’ll see the custom field either in the Details block or in the Edit issue screen. If the field isn’t editable, learn how to change that.
The association with the corresponding issue screens will be generated automatically.
The field will become available in all issues of all types for which you’ve enabled it. For example, your field is enabled only for bugs. So, as soon as you add it to one bug, the field will appear in all bugs either of specific projects or across your instance, depending on the context you’ve configured for the field.
Enabling the field in the board or backlog view
You can add the field from the Jira administration menu. See Configuring a screen's tabs and fields for instructions.
Alternatively, you can do this directly from the issue. As an example, let’s enable the “Issue labels” custom field that we added in the previous section:
Go to the board or backlog view and edit any existing issue.
In the upper-right corner, select Configure fields > Where is my field? to open the field helper.
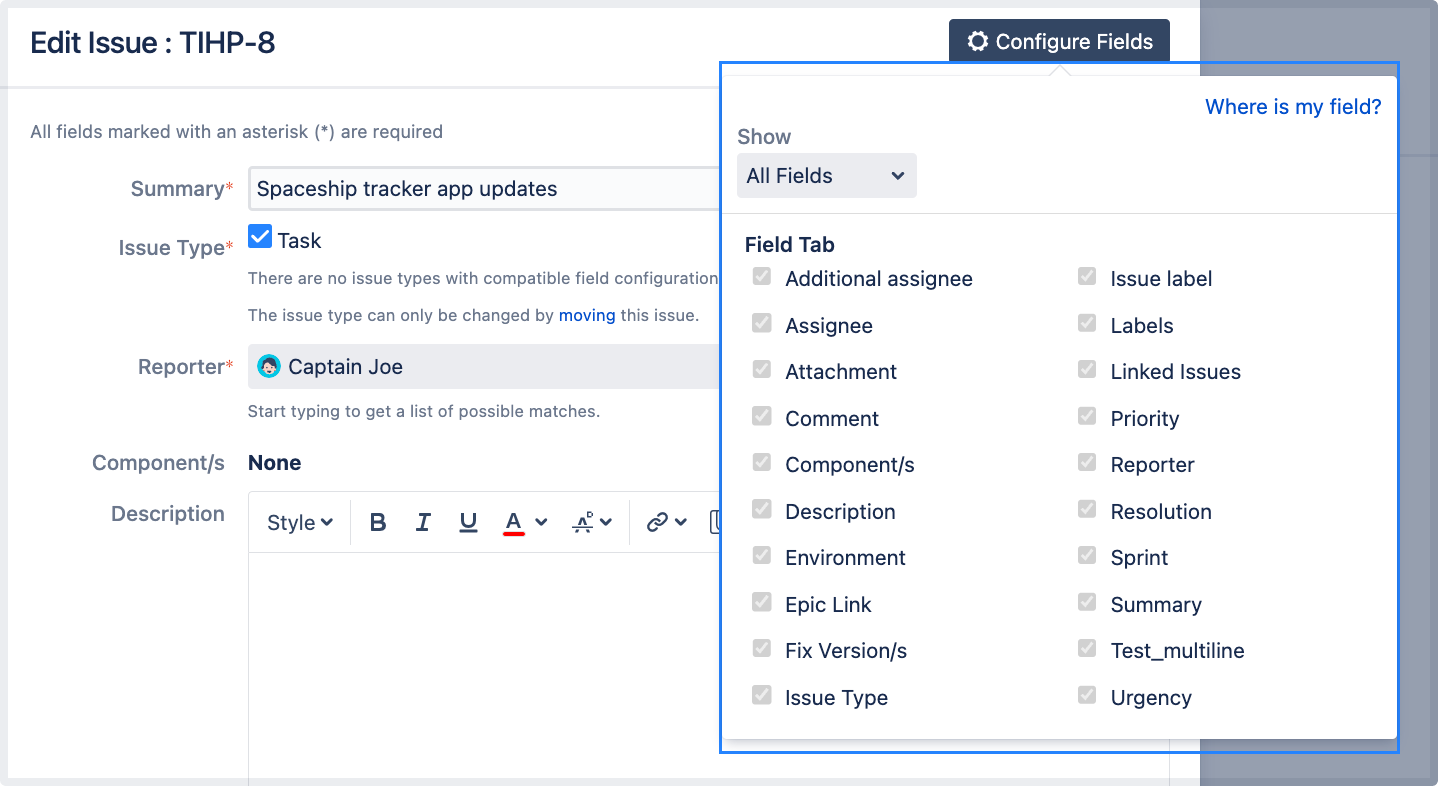
Enter the name of your custom field. In this case, “Issue label”.
You’ll see the field’s status and details on why your field isn’t displayed and how to update the field’s configuration.
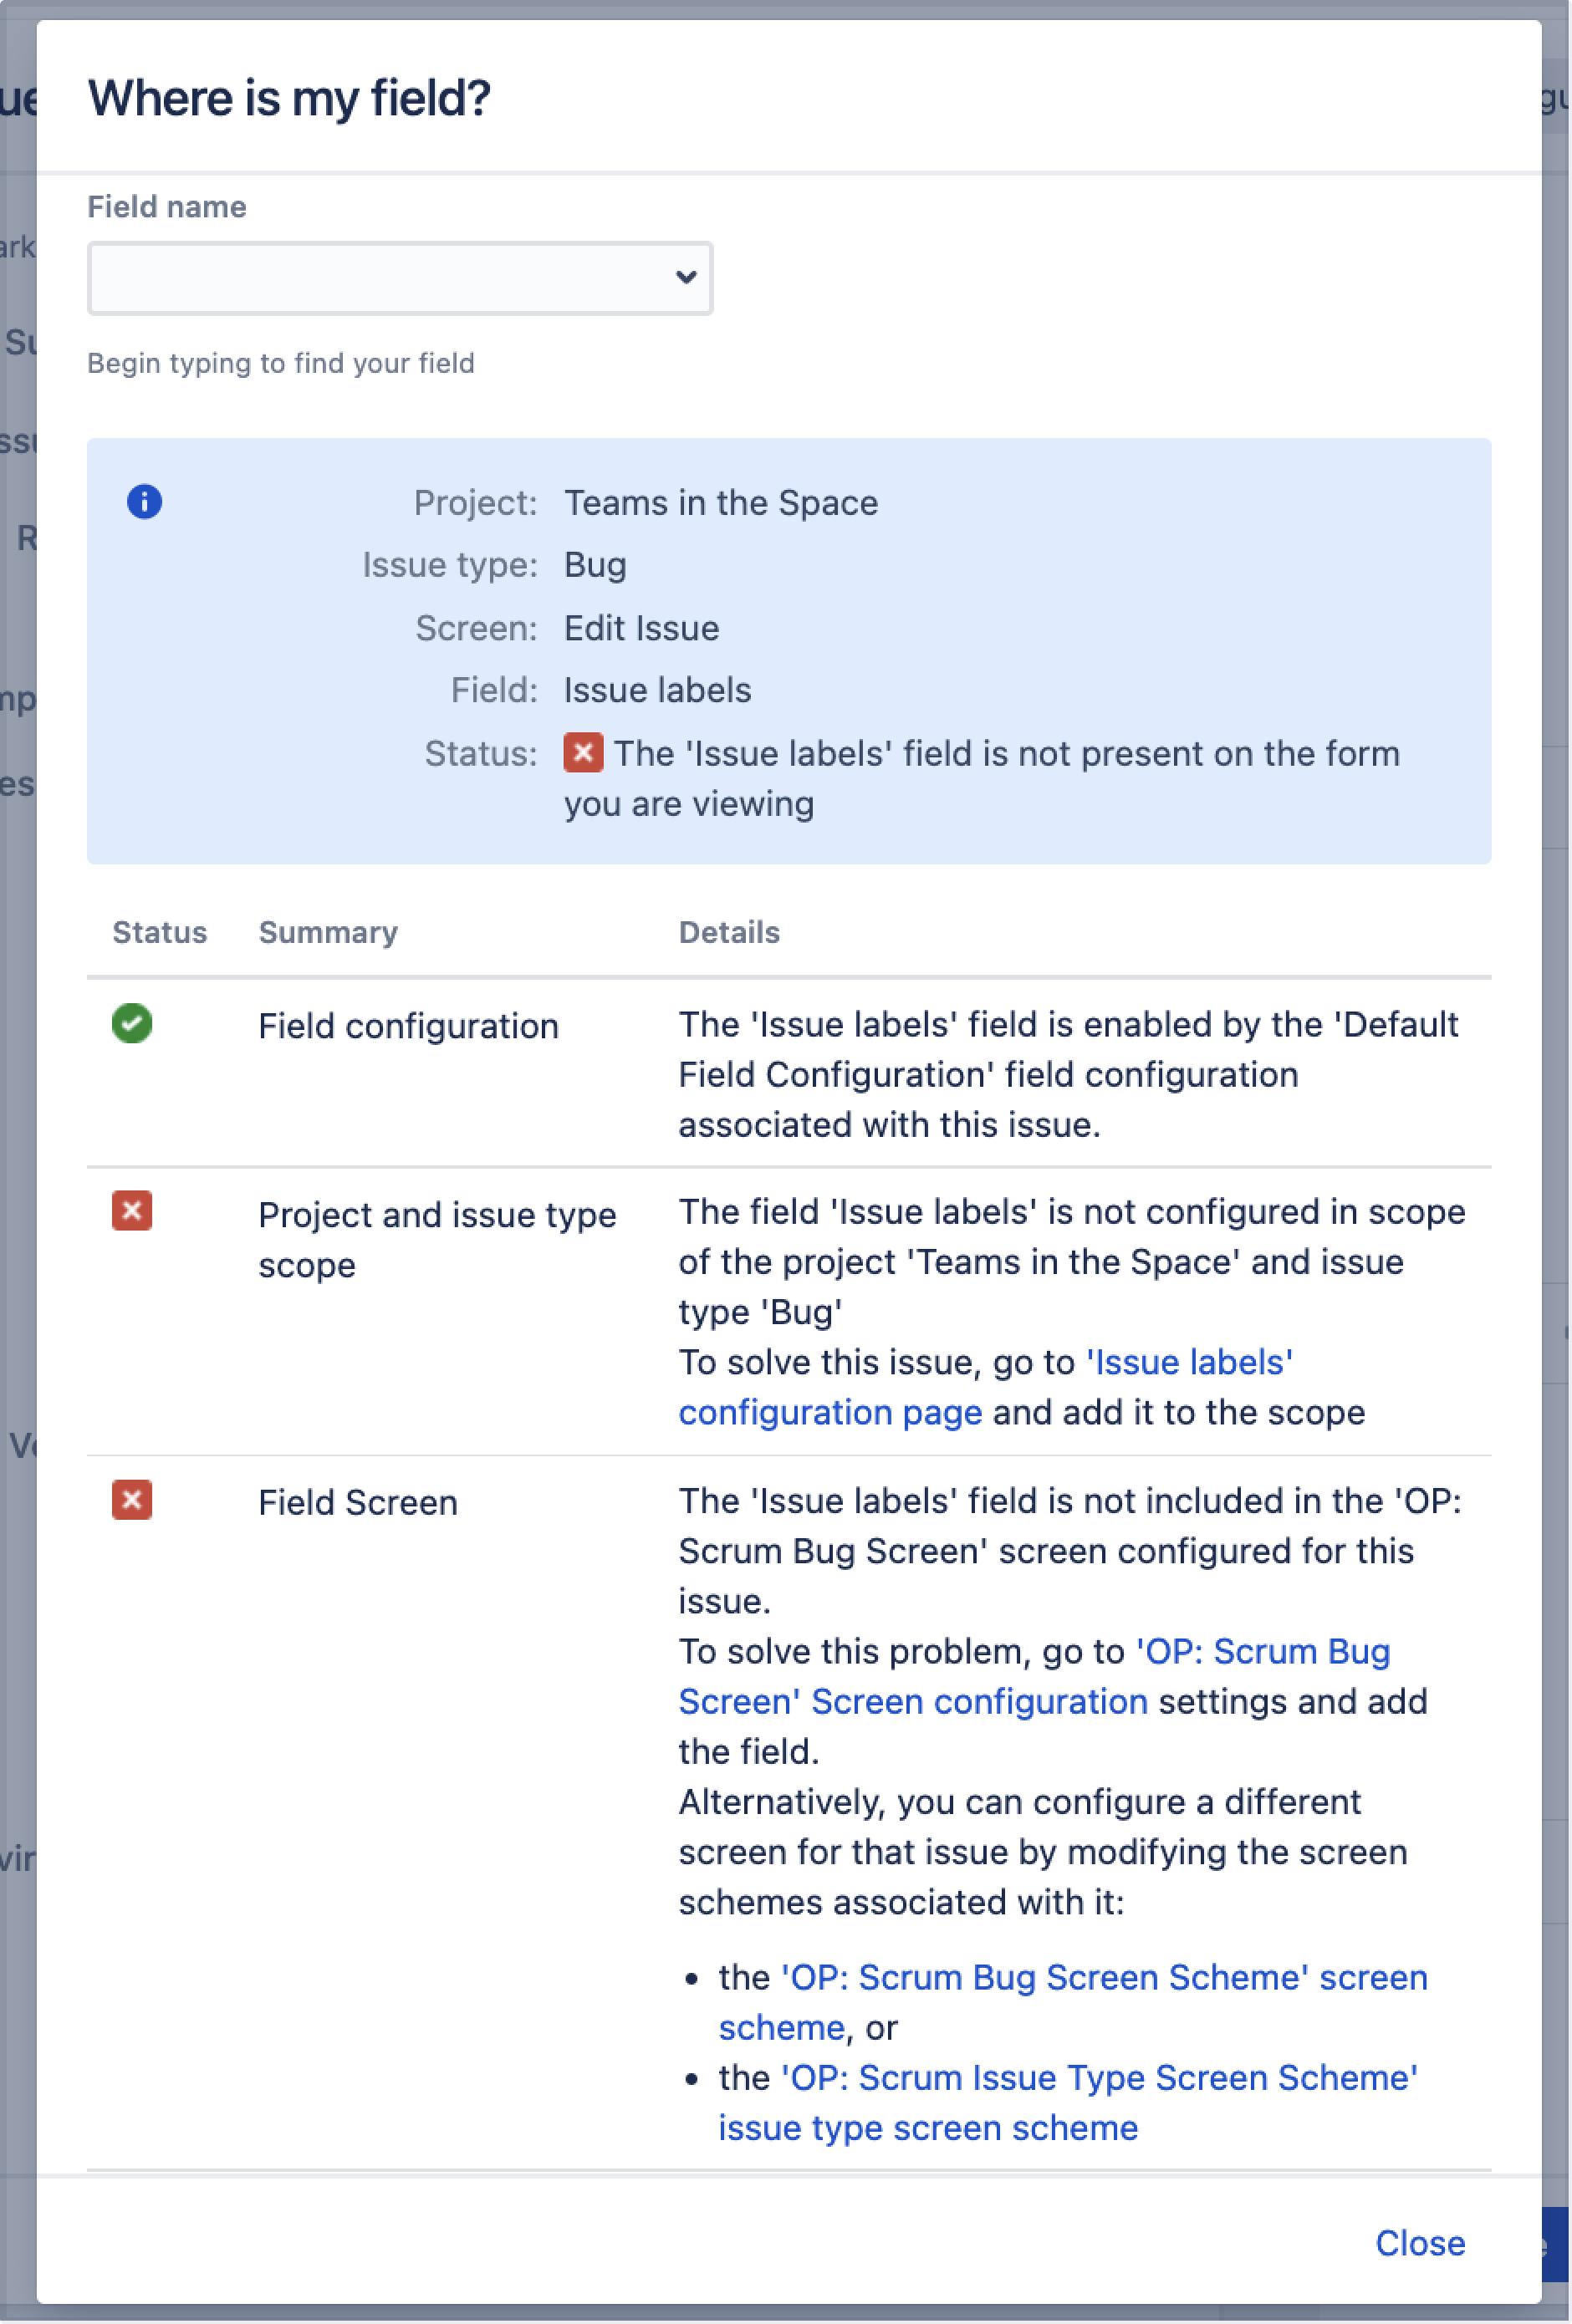
Update the field’s configuration for the Project and issue type scope from the Issue label configuration page. Check out Configuring custom field contexts for details.
- Update Field Screen configuration from the OP: Scrum Bug Screen Screen configuration page. See Making the added field editable in the issue view section from Configuring the issue view for details.
Changing issue types where custom fields are added
You can always change the issue types for which you’ve added custom fields. For example, the field can be added only to bugs, but you want to add it to issues of all types.
To change issue types:
- In the upper-right corner of the screen, select Administration > Issues.
Under Fields (the left-side panel), select Custom fields.
Find the field in the list, open the Actions menu, and select Configure contexts.
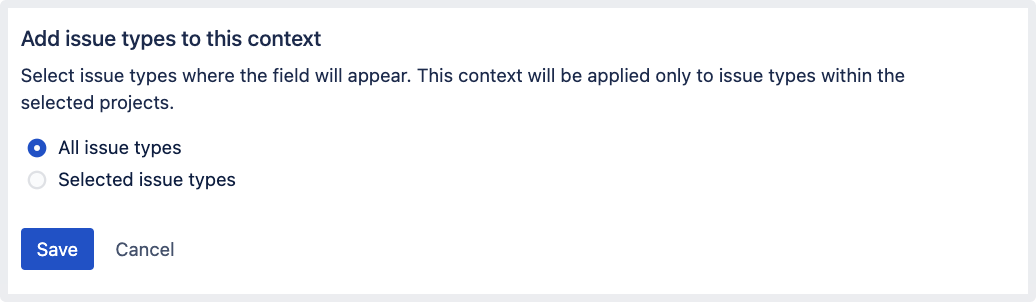
- Find the context that you want to modify, go to the Actions menu, and select Edit context.

- Go to Add issue types to this context, and select All issue types.
Learn more about how to edit custom fields
You can add the field to issues of all types. The association with the corresponding issue screens will be generated automatically.
Next steps
- Change the field’s context by following guidelines from Configuring custom field contexts.
- Find more custom fields from apps on the Atlassian Marketplace (for example, the Jira Toolkit).
- Build your own custom field types, see this tutorial from the Jira Developer Documentation.
To discover more opportunities of using custom fields in Jira, try one of the apps from the Atlassian Marketplace:
Projectrak – Project Tracking for Jira: add, manage, and customize Jira project fields according to each project's needs.
Power Custom Fields: use formulas, scripts, calculated fields, and custom messages inside a custom field.
Elements Connect – external data fields: create custom fields that can be populated with any data source.
Dynamic Forms for Jira: use dynamic forms to build clear, relevant, and easy-to-navigate issue screens.
Reindexing Jira
Changes to custom fields affect Jira search index. After you make changes to any settings, you'll get the following message in the Administration view:
We recommend that you perform a re-index, as configuration changes were made to 'SECTION' by USER at TIME. If you have other changes to make, complete them first so that you don't perform multiple re-indexes
The message means that configuration changes have been made to Jira but haven't yet been reflected in the search index. Until Jira search index has been rebuilt, some search queries from Jira might return incorrect results.
To avoid any discrepancies, you should rebuild Jira search index.
If you want to know after what actions with custom fields you need to re-index Jira, check Reindexing in Jira after configuring an instance for tips.
Learn more about other major configuration changes when Jira reindex is required