Storing avatars in Amazon S3
If you have a large number of users on your Jira instance and don't use Gravatar for serving avatars, we recommend storing your avatar files in Amazon S3.
Using Amazon S3 as a storage method simplifies your backup and data recovery procedures and ensures greater scalability.
We currently support Amazon S3 for storing user avatars, issue type icons, and project icons. In Jira Service Management, this also includes request type icons.
Before you begin
If you're considering using Amazon S3 for storing your avatar data, first read through the configuration requirements and current limitations to make sure this storage method is suitable for you. Learn more about Amazon S3 configuration
How S3 avatar storage is set up in Jira
Avatar storage in Amazon S3 is configured in the filestore-config.xml file that should be located in Jira <localhome>.
To use S3 as a target location for avatar data, the filestore attribute in the filestore-config.xml must match the s3-filestore id.
If you properly configured the file but the connection with Amazon S3 can’t be established, Jira will try to reconnect during startup, using S3 as target destination for storing avatar files.
In the case you want to use Jira <sharedhome> directory for storing avatars but don’t want to delete the configuration file, just remove all defined associations with S3. Jira will default to storing avatars locally if S3 isn't configured in filestore-config.xml or the file is missing from the <localhome> directory.
Connecting to Amazon S3 dual-stack endpoints
If your Jira installation is on an IPv6-only network, you need to connect to Amazon S3 dual-stack endpoints. Learn more about Amazon S3 dual-stack endpoints
To set up the connection, you need to override the default endpoint with the dual-stack endpoint like this:
<?xml version="1.1" ?>
<filestore-config>
  <filestores>
    <s3-filestore id="avatarBucket">
      <config>
        <bucket-name>dualstack-bucket</bucket-name>
        <region>us-east-1</region>
        <endpoint-override>https://s3.dualstack.us-east-1.amazonaws.com</endpoint-override>
      </config>
    </s3-filestore>
  </filestores>
  <associations>
    <association target="avatars" file-store="avatarBucket" />
  </associations>
</filestore-config>
You can also use this configuration option to store avatar files in a third-party object store that exposes an S3-compatible API. However, we’re not providing direct support for avatar files that are stored in an object store other than Amazon S3.
Migrate avatar data to Amazon S3
If you have existing avatar data in the file system and want to use Amazon S3, you need to migrate all avatar data to an S3 bucket for Jira to consume.
To migrate your avatar data:
- Check your Jira version and make sure that you’re on Jira 9.9 or later.
Create and set up a new Amazon S3 bucket for Jira. Learn how to configure Amazon S3 as your data storage method
Migrate your avatar data from its physical location in
<sharedhome>/data/avatarsto the root prefixavatars/in the S3 bucket.The physical location of avatar data depends on your environment. For example, clustered environments typically host this data in a network file system (NFS) as a shared mount.
You need to consider your setup and how much data you need to migrate. In general, we recommend using Amazon DataSync for migration.
Wait for the migration to complete.
Configure your Jira nodes one by one by creating a filestore-config.xml file with valid S3 bucket information in the
<localhome>of each node in your Jira cluster. After you provide the relevant configuration, each node will require a restart.During this process, if avatar files are created on nodes that have yet to be configured for S3, avatar data won't be available to already configured nodes. Likewise, those nodes will not have access to avatars created on nodes that are already configured to use S3.
Verify that Jira is using S3 object storage:
In the upper-right corner of the screen, select Administration
 > System.
Under Advanced (in the left-side panel), select Avatars. To access the page directly, use the
ggshortcut or press the full stop.and search for “Avatars”.Next to the Avatars location, you should see Amazon S3, as well as the region and bucket you specified in filestore-config.xml.

Make sure all the nodes have been configured and all avatars are migrated, and then re-run the original DataSync job to perform a final sync.
All avatars should now be read and written from Amazon S3.
DataSync doesn’t change or remove the source file system data. If you no longer need avatars located in the file system, you need to remove this data manually.
Switching back to local avatar storage
As the source file system data is not changed or removed by DataSync, Jira can be reverted back to reading and writing avatar data from the file system. To do this, remove the filestore-config.xml files from your <localhome> directories and restart Jira. You can also delete the <association> element targeting avatars.
If you are reverting back to the original file system, any data written to S3 must be synced back to the file system manually by the Jira administrator.
Configure Amazon S3 to store avatar data
If you’re ready to proceed with Amazon S3 configuration, follow instructions from the Configuring Amazon S3 as your data storage method.
Connect your S3 bucket with Jira
After you configure S3 object storage, you need to connect the created S3 bucket with your Jira instance:
In the Jira application home directory of one of your Jira installation nodes, create a
filestore-config.xmlfile. The Jira application home directory should be set to the value of theJIRA_HOMEenvironment variable. Learn about the contents of the Jira application home directory
In thefilestore-config.xmlfile, define which S3 bucket will be used by Jira to store avatars.Sample
filestore-config.xml file:<?xml version="1.1" ?> <filestore-config> <filestores> <s3-filestore id="avatarBucket"> <config> <bucket-name>example-co-jira-avatar-bucket</bucket-name> <region>ap-southeast-4</region> </config> </s3-filestore> </filestores> <associations> <association target="avatars" file-store="avatarBucket" /> </associations> </filestore-config>If you’re running a clustered installation, copy the
filestore-config.xmlfile to the Jira application home directory of the other nodes.Start or restart all Jira nodes.
When Jira starts up, it’ll check your bucket configurations, such as bucket connectivity, name and region validity, and bucket permissions. Learn about potential errors and how to fix them
To verify that Jira is using Amazon S3 object storage:
In the upper-right corner of the screen, select Administration
> System.Under Advanced settings (the left-side panel), select Avatars.
Next to the Avatars storage location, you'll see that avatars are stored in S3. Here you can also check the S3 bucket name and region.
Troubleshooting S3 avatar storage
When Jira starts up, it runs a series of checks to make sure there are no issues with the filestore-config.xml file. If there are any errors during the file parsing, Jira won't start and display an error message.
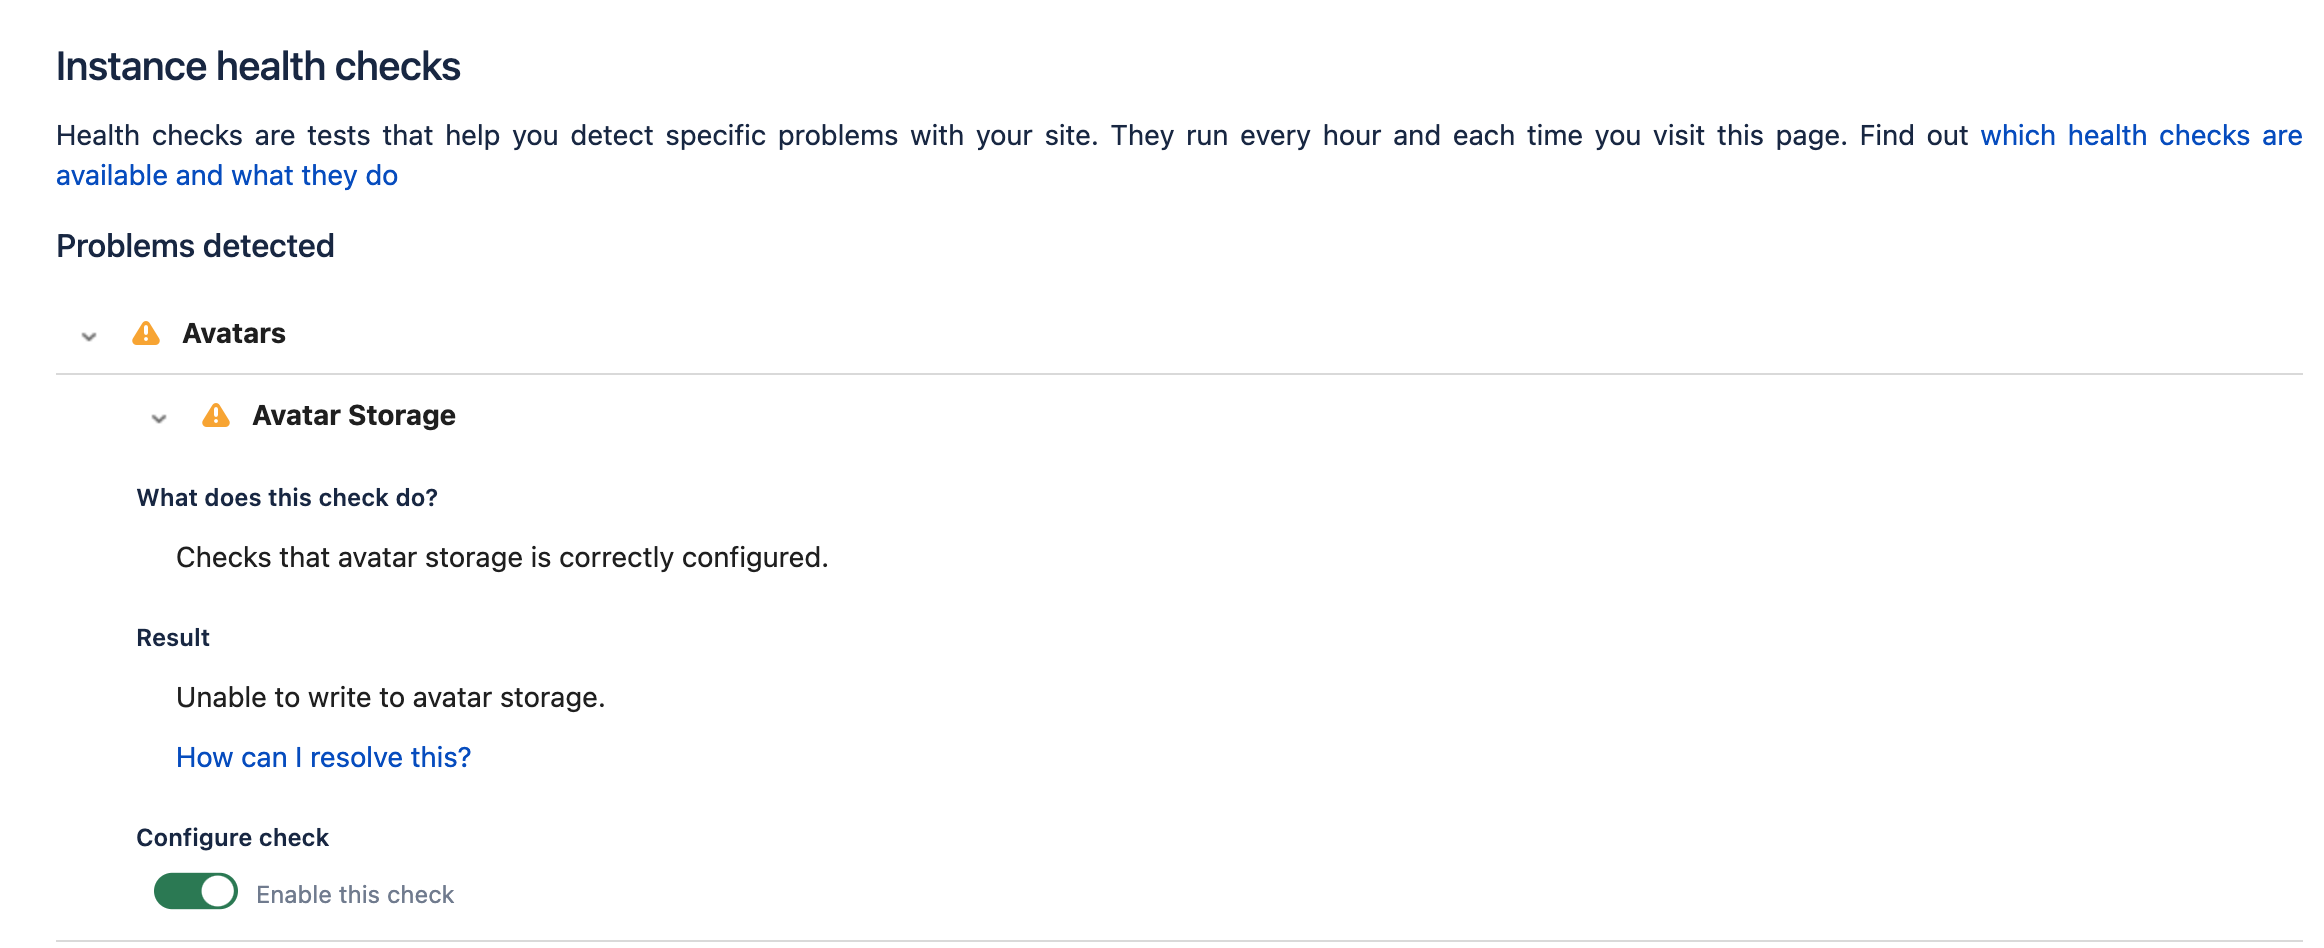
In the case there some problems with connecting to or performing operations on S3, Jira will also detect them and flag the Avatars instance health check as failing.
The following sections list the problems that can happen during S3 configuration along with the resolution steps. The issues are mainly related to improper S3 configuration, permissions, or authentication.
Jira startup failures
You can also find more details about the problems by checking Jira logs at <localhome>/log/atlassian-jira.log. Learn how to access Jira logs
Problem | Root cause & resolution |
|---|---|
Invalid
| The If you provide an |
Missing
| An |


Health check failures
Learn more about the instance health checks and how they are performed. Learn more about instance health checks
Problem | Root cause & resolution |
|---|---|
Unable to list the contents of avatar storage
| This health check can fail due to the following reasons:
If you need help with diagnosing the issue, check the logs in |
Unable to read data from avatar storage
| The
|
Unable to write to avatar storage
| The
|
Unable to delete files from avatar storage
| The
|