Set up an SSH key
When you set up SSH key, you create a key pair that contains a private key (saved to your local computer) and a public key (uploaded to Bitbucket). Bitbucket uses the key pair to authenticate anything the associated account can access. This two-way mechanism prevents man-in-the-middle attacks.
This first key pair is your default SSH identity. If you need more than a default identity, you can set up additional keys.
For security reasons, we recommend that you generate a new SSH key and replace the existing key on your account at least once a year.
You can't use the same key between accounts. You must create new keys for each individual Bitbucket account.
Here are your options when setting up SSH:
| Windows | macOS | Linux | |
|---|---|---|---|
| Git | Terminal | ||
| Mercurial | Sourcetree | Terminal |
Set up SSH for Git on Windows
Use this section to create a default identity and SSH key when you're using Git on Windows. By default, the system adds keys for all identities to the /Users/<username>/.ssh directory.
Step 1. Set up your default identity
From the command line, enter
ssh-keygen.For Windows 7 or earlier
You can only enter
ssh-keygeninto the Git Bash window. It won't work in the Command prompt.The command prompts you for a file to save the key in:
$ ssh-keygen

Generating public/private rsa key pair.
Enter file in which to save the key (/c/Users/emmap1/.ssh/id_rsa):
Press enter to accept the default key and path,
/c/Users/<username>/.ssh/id_rsa.We recommend you keep the default key name unless you have a reason to change it.
To create a key with a name or path other than the default, specify the full path to the key. For example, to create a key called
my-new-ssh-key, you would enter the Windows path, shown here:$ ssh-keygen
Generating public/private rsa key pair.
Enter file in which to save the key (/c/Users/emmap1/.ssh/id_rsa): c:\Users\emmap1\.ssh\my-new-ssh-keyEnter and re-enter a passphrase when prompted.
The command creates your default identity with its public and private keys. The whole interaction looks similar to this:
$ ssh-keygen

Generating public/private rsa key pair.
Enter file in which to save the key (/c/Users/emmap1/.ssh/id_rsa):
Created directory '/c/Users/emmap1/.ssh'.
Enter passphrase (empty for no passphrase):
Enter same passphrase again:
Your identification has been saved in /c/Users/emmap1/.ssh/id_rsa.
Your public key has been saved in /c/Users/emmap1/.ssh/id_rsa.pub.
The key fingerprint is: e7:94:d1:a3:02:ee:38:6e:a4:5e:26:a3:a9:f4:95:d4 emmap1@EMMA-PC
List the contents of
.sshto view the key files.You should see something like the following:
$ dir .ssh

id_rsa  id_rsa.pub
The command displays two files, one for the public key (for example
id_rsa.pub) and one for the private key (for example,id_rsa).
Step 2. Add the key to the ssh-agent
If you don't want to type your password each time you use the key, you'll need to add it to the ssh-agent.
To start the agent, run the following:
$ eval $(ssh-agent)

Agent pid 9700
Enter
ssh-addfollowed by the path to the private key file:$ ssh-add ~/.ssh/<private_key_file>
Step 3. Add the public key to your Account settings
- From Bitbucket, choose Personal settings from your avatar in the lower left.
The Account settings page opens. - Click SSH keys.
If you've already added keys, you'll see them on this page. Open your
.ssh/id_rsa.pubfile (or whatever you named the public key file) and copy its contents.
You may see an email address on the last line. It doesn't matter whether or not you include the email address.From Bitbucket, click Add key.
Enter a Label for your new key, for example,
Default public key.- Paste the copied public key into the SSH Key field.

Click Save.
Bitbucket sends you an email to confirm the addition of the key.Edit an SSH key
After you add a key, you can edit the key's Label but not the key itself. To change the key's contents, you need to delete and re-add the key.
Return to the command line and verify your configuration and username by entering the following command:
$ ssh -T git@bitbucket.orgThe command message tells you which of your Bitbucket accounts can log in with that key.
conq: logged in as emmap1.
You can use git or hg to connect to Bitbucket. Shell access is disabled.
If you get an error message with
Permission denied (publickey), check the Troubleshoot SSH issues page for help.
Now that you've got an SSH key set up, use the SSH URL the next time you clone a repository. If you already have a repository that you cloned over HTTPS, change the remote URL for your repository to its SSH URL.
Set up SSH on macOS/Linux
Whether you use Git or Mercurial, use this section to create a default identity and SSH key when on macOS or Linux. By default, the system adds keys to the /Users/<yourname>/.ssh directory on macOS and /home/<username>/.ssh on Linux.
Step 1. Set up your default identity
From the terminal, enter
ssh-keygenat the command line.
The command prompts you for a file to save the key in:$ ssh-keygen
Generating public/private rsa key pair.
Enter file in which to save the key (/Users/emmap1/.ssh/id_rsa):Press the Enter or Return key to accept the default location.
We recommend you keep the default key name unless you have a reason to change it.
To create a key with a name or path other than the default, specify the full path to the key. For example, to create a key called
my-new-ssh-key, enter a path like the one shown at the prompt:$ ssh-keygen
Generating public/private rsa key pair.
Enter file in which to save the key (/Users/emmap1/.ssh/id_rsa): /Users/emmap1/.ssh/my-new-ssh-keyEnter and re-enter a passphrase when prompted.
The command creates your default identity with its public and private keys. The whole interaction will look similar to the following:$ ssh-keygen
Generating public/private rsa key pair.
Enter file in which to save the key (/Users/emmap1/.ssh/id_rsa):
Created directory '/Users/emmap1/.ssh'.
Enter passphrase (empty for no passphrase):
Enter same passphrase again:
Your identification has been saved in /Users/emmap1/.ssh/id_rsa.
Your public key has been saved in /Users/emmap1/.ssh/id_rsa.pub.
The key fingerprint is:
4c:80:61:2c:00:3f:9d:dc:08:41:2e:c0:cf:b9:17:69 emmap1@myhost.local
The key's randomart image is:
+--[ RSA 2048]----+
|*o+ooo. |
|.+.=o+ . |
|. *.* o . |
| . = E o |
| o . S |
| . . |
| . |
| |
| |
+-----------------+List the contents of
~/.sshto view the key files.$ ls ~/.ssh
id_rsa id_rsa.pubThe command displays two files, one for the public key (for example
id_rsa.pub) and one for the private key (for example,id_rsa).
Step 2. Add the key to the ssh-agent
If you don't want to type your password each time you use the key, you'll need to add it to the ssh-agent.
To start the agent, run the following:
$ eval `ssh-agent`

Agent pid 9700
Enter
ssh-addfollowed by the path to the private key file:macOS
$ ssh-add -K ~/.ssh/<private_key_file>Linux
$ ssh-add ~/.ssh/<private_key_file>(macOS only) So that your computer remembers your password each time it restarts, open (or create) the
~/.ssh/configfile and add these lines to the file:Host * UseKeychain yes
Step 3. (Mercurial only) Enable SSH compression
Enabling SSH compression is recommended but not required.
By default, Git automatically performs compression when sending or retrieving data, but Mercurial doesn't. Enabling SSH compression can speed up sending and retrieving data, drastically in some cases.
To enable SSH compression:
- Open the Mercurial global configuration file (
~/.hgrc). Add this line to the UI section:
ssh = ssh -CWhen you are done the file should look similar to this:
[ui] # Name data to appear in commits username = Emma <emmap1@atlassian.com> ssh = ssh -C- Save and close the file.
Step 4. Add the public key to your Account settings
- From Bitbucket, choose Personal settings from your avatar in the lower left.
The Account settings page opens. - Click SSH keys.
If you've already added keys, you'll see them on this page. In your terminal window, copy the contents of your public key file. If you renamed the key, replace
id_rsa.pubwith the public key file name.On Linux, you can
catthe contents:$ cat ~/.ssh/id_rsa.pubOn macOS, the following command copies the output to the clipboard:
$ pbcopy < ~/.ssh/id_rsa.pubSelect and copy the key output in the clipboard.
If you have problems with copy and paste, you can open the file directly with Notepad. Select the contents of the file (just avoid selecting the end-of-file characters).From Bitbucket, click Add key.
Enter a Label for your new key, for example,
Default public key.- Paste the copied public key into the SSH Key field.
You may see an email address on the last line when you paste. It doesn't matter whether or not you include the email address in the Key. Click Save.
Bitbucket sends you an email to confirm the addition of the key.Edit an SSH key
After you add a key, you can edit the key's Label but not the key itself. To change the key's contents, you need to delete and re-add the key.
Return to the terminal window and verify your configuration and username by entering the following command:
$ ssh -T git@bitbucket.orgThe command message tells you which of your Bitbucket accounts can log in with that key.
conq: logged in as emmap1.
You can use git or hg to connect to Bitbucket. Shell access is disabled.
If you get an error message with
Permission denied (publickey), check the Troubleshoot SSH issues page for help.
Now that you've got an SSH key set up, use the SSH URL the next time you clone a repository. If you already have a repository that you cloned over HTTPS, change the remote URL for your repository to use its SSH URL.
Set up SSH with Sourcetree on Windows
Whether you use Git or Mercurial, use this section to generate an SSH key using Sourcetree. When you create an SSH key with Sourcetree, you can save the public and private key wherever you want locally. You may want to create an SSH directory when you do, so that you can refer to your SSH keys whenever you need them.
Step 1. Install Sourcetree and add your Bitbucket account
- If you don't yet have Sourcetree, go to https://www.sourcetreeapp.com/ and click the Download free button.
Click the
.exefile to install Sourcetree. Refer to the Install Sourcetree page for more details.You may see the Load SSH Key? dialog after installation. Click No if you don't have one and want to use Sourcetree to create one.
You may see the Sourcetree: Mercurial not found dialog after installation. Choose an appropriate option or select Download an embedded version of Mercurial for Sourcetree along to use.
- Add your account and select SSH as the Preferred Protocol. If you don't connect your account during set up, click Remote to open the Remote repositories page and click Add an account.
Step 2. Create an SSH key
- From Tools, select Create or Import SSH Keys.
- From the PuTTY Key Generator dialog, click the Generate button.
- As the SSH key generates, hover your mouse over the blank area in the dialog. It may take a minute or two.
When SSH key generation is complete, you see the public key and a few other fields. - Enter a passphrase for your SSH key in the Key passphrase and Confirm passphrase fields.

- Click Save public key. From the save dialog, choose where to save your public key, name the file with the
.pubfile extension, and click Save. - Click Save private key. From the save dialog, choose where to save your private key, name the file, and click Save.
- Close the PuTTY Key Generator dialog.
Step 3. (Mercurial only) Enable SSH compression
Enabling SSH compression is recommended but not required. You'll need to clone and open a Mercurial repository to complete these steps.
By default, Git automatically performs compression when sending or retrieving data, but Mercurial doesn't. Enabling SSH compression can speed up sending and retrieving data, drastically in some cases.
To enable SSH compression:
- Click Settings in the top right of the repository window.
The repository settings may open to the Remotes tab. If not, click the Remotes tab. - Click Edit Config File to open the Mercurial global configuration file (
~/.hgrc). Add this line to the UI section:
ssh = ssh -CWhen you're done the file should look similar to this:
[ui]
# name and email (local to this repository, optional), e.g.
username = Emma <emmap1@atlassian.com>
ssh = ssh -C
Save and close the file.
Step 4. Install your private key on Pageant
Sourcetree comes with an SSH authentication agent called Pageant. Load your private key into Pageant to automatically authenticate so that you don't need to enter your passphrase.
- Double-click the Pageant (PuTTY Authentication Agent) icon in your system tray to open the Pageant Key List dialog.

- Click the Add Key button to open the Select Private Key File dialog.
- Navigate to the private key file you saved in Step 1 and click Open.
- Enter the passphrase for your SSH key and click OK.
Pageant shows your key in the running list. - Click Close.
Step 5. Add the public key to your Account settings
- From Sourcetree, open the PuTTY Key Generator dialog by going to Tools > Create or Import SSH Keys.
- Click Load, navigate to your SSH folder, and click the private key. Make sure you're looking at All files if you don't see your private key.
- Enter your passphrase for the SSH key and click OK.
- Copy the public key in the first field.
- From Bitbucket, choose Personal settings from your avatar in the lower left.
The Account settings page opens. - Click SSH keys.
If you've already added keys, you'll see them on this page. - Click Add key.
Enter a Label for your new key, for example,
Default public key.- Paste the copied public key into the SSH Key field.
Click Save.
Bitbucket sends you an email to confirm the addition of the key.Edit an SSH key
After you add a key, you can edit the key's Label but not the key itself. To change the key's contents, you need to delete and re-add the key.
Now that you've got an SSH key set up, use the SSH URL the next time you clone a repository. If you already have a repository that you cloned over HTTPS, change the remote URL for your repository to its SSH URL.
Set up SSH with Sourcetree on macOS
Whether you use Git or Mercurial, use this section to generate an SSH key using Sourcetree. When you create an SSH key with Sourcetree on macOS, you can only create one key. You'll need to use the command line if you want additional keys.
Step 1. Install Sourcetree and add your Bitbucket account
- If you don't yet have Sourcetree, go to https://www.sourcetreeapp.com/ and click the Download free button.
- Open the ZIP file to install Sourcetree. Refer to the Install Sourcetree page for more details.
- If you don't connect your account during set up, you can add it from the Accounts tab by selecting Preferences from the Sourcetree menu.
Step 2. Create an SSH key
Follow these steps if you don't already have an SSH key for an account. If you do have an SSH key and you want to generate another key, you'll have to use the terminal because you can't use Sourcetree to create a second key.
Creating an SSH key looks something like this:
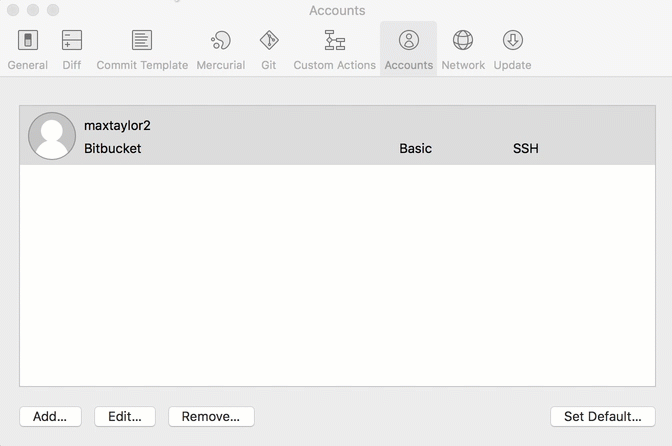
- From the Sourcetree menu, select Preferences.
- Click the Accounts tab, select the account where you want to add the SSH key and click Edit.
- Change the Protocol to SSH if it's not already selected.
Hold down the OPTION key on your keyboard to see the Generate Key button.
If you've already generated an SSH key for this account from Sourcetree, the OPTION key won't do anything. Use your existing key or generate another key from the terminal.
- Click Generate Key.
- Enter a passphrase for the SSH key in the Passphrase and Confirm Passphrase fields.
- Click Create.
Step 3. (Mercurial only) Enable SSH compression
Enabling SSH compression is recommended but not required. You'll need to clone and open a Mercurial repository to complete these steps.
By default, Git automatically performs compression when sending or retrieving data, but Mercurial doesn't. Enabling SSH compression can speed up sending and retrieving data, drastically in some cases.
To enable SSH compression:
- Click Settings in the top right of the repository window.
The repository settings may open to the Remotes tab. If not, click the Remotes tab. - Click Edit Config File to open the Mercurial global configuration file (
~/.hgrc). Add this line to the UI section:
ssh = ssh -CWhen you're done the file should look similar to this:
[ui]
# name and email (local to this repository, optional), e.g.
username = Emma <emmap1@atlassian.com>
ssh = ssh -C
Save and close the file.
Step 4. Add the public key to your Account settings
- From Bitbucket, choose Personal settings from your avatar in the lower left.
The Account settings page opens. - Click SSH keys.
If you've already added keys, you'll see them on this page. Select your account from your Accounts tab in Sourcetree.
- Click the Copy to Clipboard button to copy your public SSH key.
From Bitbucket, click Add key.
Enter a Label for your new key, for example,
Default public key.- Paste the copied public key into the SSH Key field.
Click Save.
Bitbucket sends you an email to confirm the addition of the key.Edit an SSH key
After you add a key, you can edit the key's Label but not the key itself. To change the key's contents, you need to delete and re-add the key.
Now that you've got an SSH key set up, use the SSH URL the next time you clone a repository. If you already have a repository that you cloned over HTTPS, change the remote URL for your repository to its SSH URL.