Creating issues
Before creating issues, make sure you've already done the following tasks:
- Created the initiative issue type in at least one of the projects that's being used in your plan
- Configured the hierarchy levels of your plan as needed
- Selected all available hierarchy levels for the hierarchy range in your plan
Otherwise, some of the issue types won't be available to use. See Configuring initiatives and other hierarchy levels for more details.
You can create issues directly in your plan without having to jump back to Jira Software, and there are several ways to do this in the improved interface:
- Create a child issue of an issue
- Create an issue of the same hierarchy level
- Create an issue at any hierarchy level
Also, note that the default duration for issues would depend on the timeframe in which you're viewing the plan. You can always edit the duration after the issue is created.
- 3M: 1 week
- 1Y: 1 month
- Fit: The default duration depends on the date range of the issues in the timeline, which affects the width of the issues in the timeline. If the width fit is small, then the default duration could perhaps be a week or a month.
- Custom: The default duration depends on the duration that you set between the start and end dates. If you set a short period of time, then the default duration would be shorter as well.
If you've also customized and grouped the issues in your plan, you can also create issues in the specific groupings. See Grouping issues for more details.
Creating a child issue of an issue
A plan typically contains issues coming from multiple issue sources, such as boards, projects, or filters. As a best practice, it would help you plan work and create issues more efficiently if you keep in mind the issue source, and the parent issue of the issue you're creating. This helps you create child issues of issues across multiple issue sources, where it makes most sense.
Creating a child issue of an issue
To create a child issue of an issue:
- In the scope section of your plan, go to the parent issue for the issue you want to create.
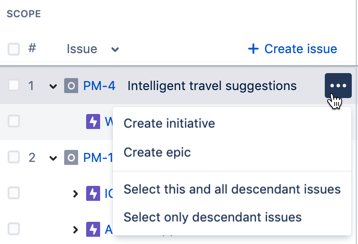
- Hover on the parent issue > click more () > select the hierarchy level for the issue you're creating. This will add a row for the new issue right below the parent issue.
- In the new row, select the issue type for the new issue > select the corresponding project.
Note that the chosen project will be selected by default the next time you create an issue. You can update the project as needed. - Give the new issue a name, then click Enter.If you're using any issue filters in the plan, the newly created issue may not be visible. Make sure to clear all filters to see the new issue in the plan.
- If already known, specify other issue details, like assignee, team, estimate, sprint, release, and dates.
The details that you can specify for an issue will depend on the corresponding issue source. For example, if you're selecting a release for TIS-123, only the relevant releases for the TIS project will be available.
- You can set the estimate value of issues to 0. This is different from keeping the estimate value blank. Any issues that have blank estimates are treated as unestimated issues in a plan.
If you're creating a sub-task, the issue will inherit certain values of its parent story, including sprints, releases, and teams.
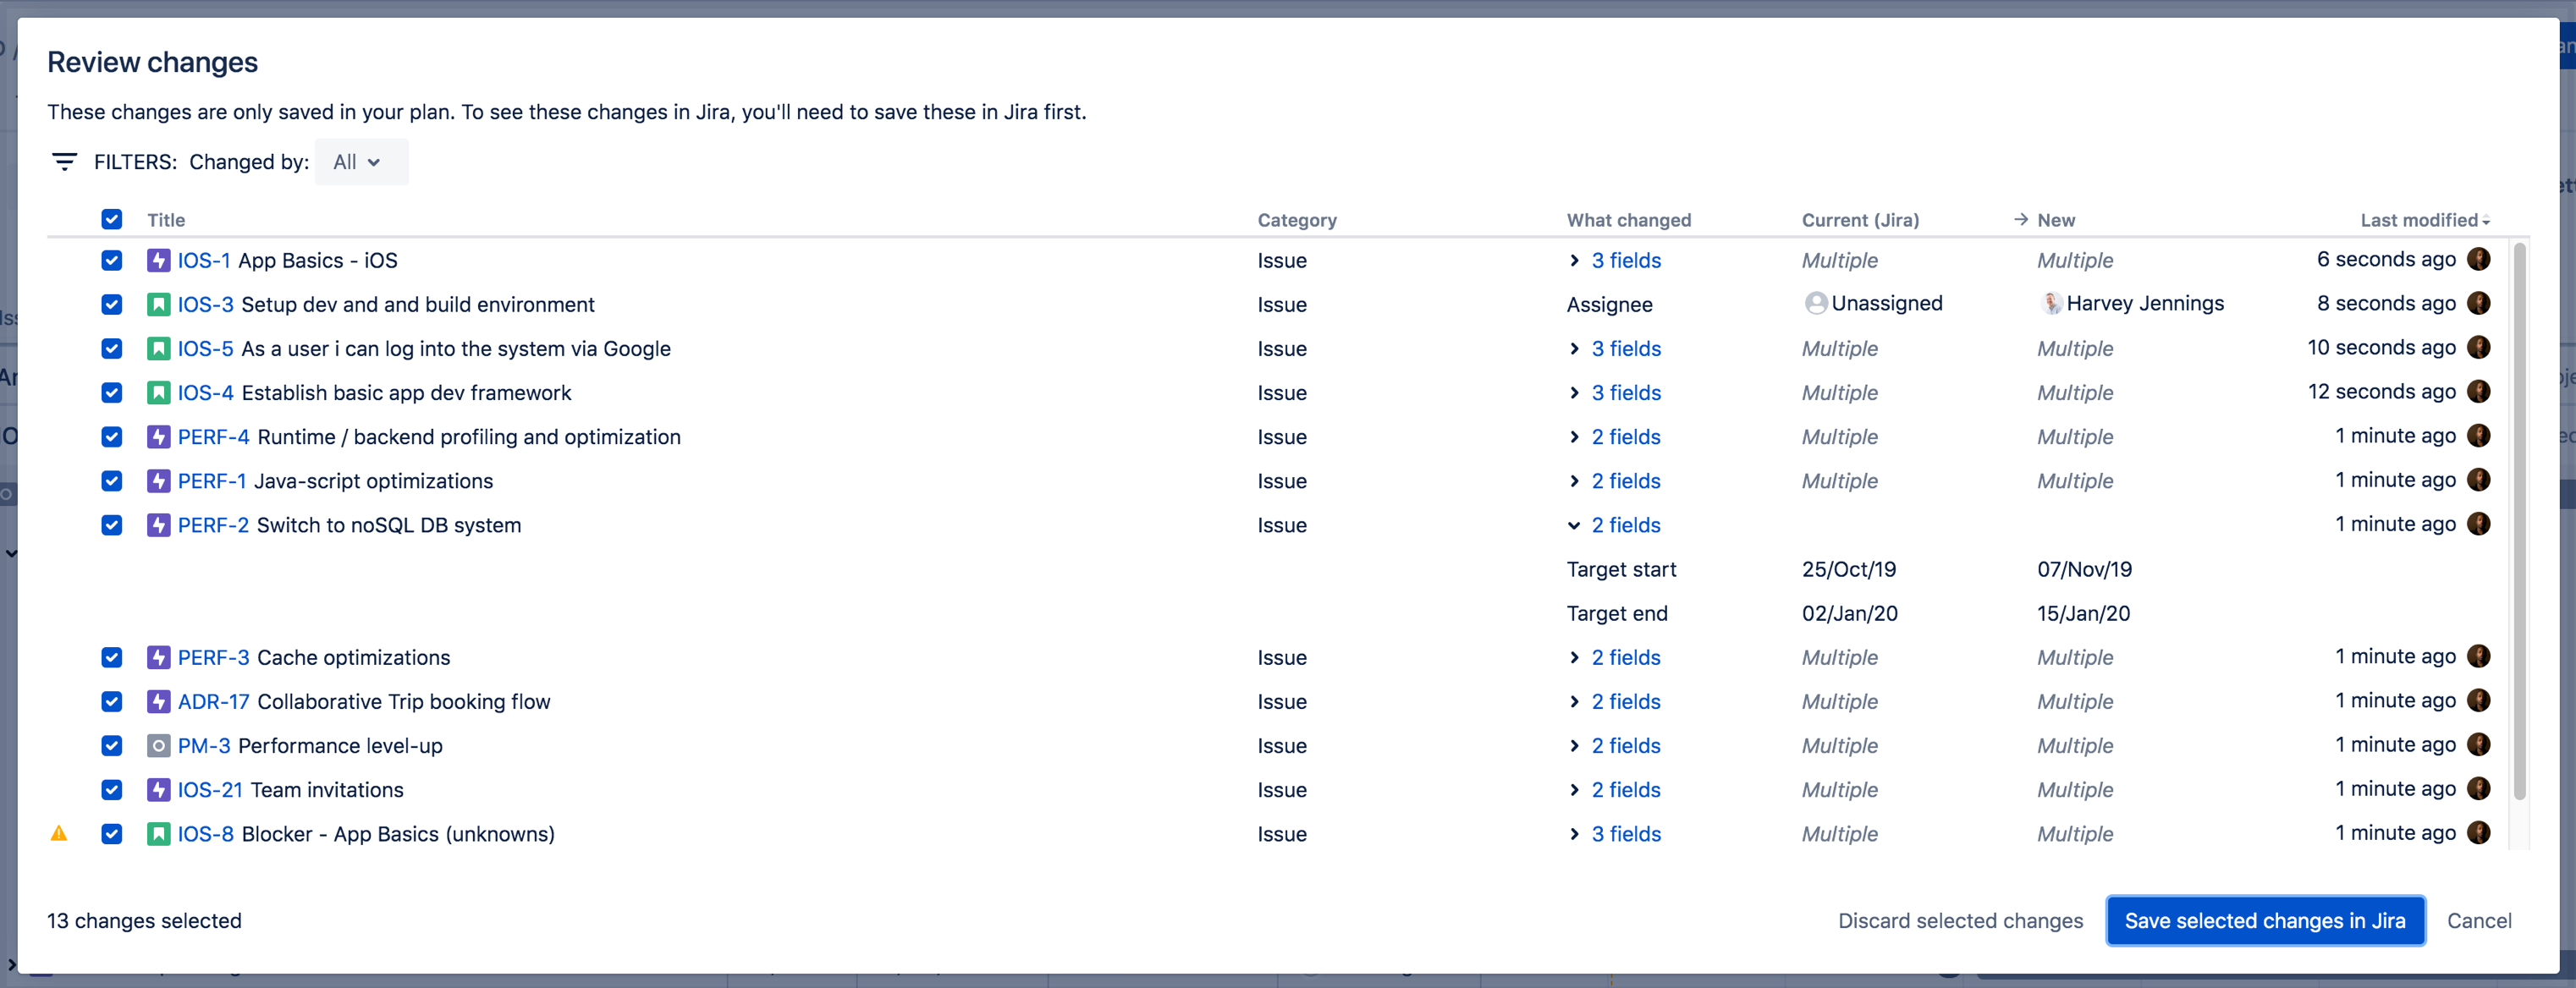
In the roadmap view of your plan, above the timeline section, click Review changes. The 'Review changes' dialog will display, with all changes selected by default.
While reviewing your changes, do the following as needed:
- Filter changes made by yourself and others in the plan, by using the Change by menu in the top left side of the dialog.
- View multiple changes by expanding the item in the What changed column.
- Select the checkboxes of the changes you want to save in Jira Software, then click Save selected changes in Jira. All checkboxes are selected by default. Those that you deselect won't be saved in Jira Software, but will remain in your plan.
- Select the checkboxes of the changes you want to remove from your plan, then click Discard selected changes. These changes will be discarded from your plan and the values will revert to those currently saved in Jira Software.
- If you encounter any warnings when saving changes to Jira Software, we recommend fixing these first, then try saving the corresponding changes again. See Troubleshooting for commonly encountered issues.
Creating an issue of the same hierarchy level
You can also create a sibling issue — sibling issues are issues of the same hierarchy level.
Creating an issue of the same hierarchy level
To create an issue of the same hierarchy level:
- In the scope section of your plan, find an issue of the same hierarchy level of the sibling issue you want to create.
- Hover on the issue > click more () > select the same hierarchy level. This will add a row for the new issue, right below the issue you'd referenced.
- In the new row, select the corresponding project.
Note that the chosen project will be selected by default the next time you create an issue. You can update the project as needed. - Give the new issue a name, then click Enter.If you're using any issue filters in the plan, the newly created issue may not be visible. Make sure to clear all filters to see the new issue in the plan.
- If already known, specify other issue details, like assignee, team, estimate, sprint, release, and dates.
The details that you can specify for an issue will depend on the corresponding issue source. For example, if you're selecting a release for TIS-123, only the relevant releases for the TIS project will be available.
- You can set the estimate value of issues to 0. This is different from keeping the estimate value blank. Any issues that have blank estimates are treated as unestimated issues in a plan.
If you're creating a sub-task, the issue will inherit certain values of its parent story, including sprints, releases, and teams.
In the roadmap view of your plan, above the timeline section, click Review changes. The 'Review changes' dialog will display, with all changes selected by default.
While reviewing your changes, do the following as needed:
- Filter changes made by yourself and others in the plan, by using the Change by menu in the top left side of the dialog.
- View multiple changes by expanding the item in the What changed column.
- Select the checkboxes of the changes you want to save in Jira Software, then click Save selected changes in Jira. All checkboxes are selected by default. Those that you deselect won't be saved in Jira Software, but will remain in your plan.
- Select the checkboxes of the changes you want to remove from your plan, then click Discard selected changes. These changes will be discarded from your plan and the values will revert to those currently saved in Jira Software.
- If you encounter any warnings when saving changes to Jira Software, we recommend fixing these first, then try saving the corresponding changes again. See Troubleshooting for commonly encountered issues.
Creating an issue at any hierarchy level
If you're planning high-level work and just want to create issues fast, you can choose to create issues at any hierarchy level. This is helpful for when you have some issues to create, but you can't connect these to parent issues just yet.
Creating an issue at any hierarchy level
To create an issue at any hierarchy level:
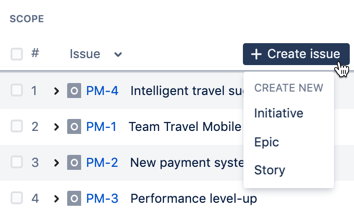
- In the scope section of your plan, click + Create issue.
- Select the hierarchy level for the issue. This will create a new issue at the bottom of the scope section, along with other issues that don't have parent issues.
- Give the new issue a name, and click Enter.If you're using any issue filters in the plan, the newly created issue may not be visible. Make sure to clear all filters to see the new issue in the plan.
- Specify the corresponding issue details as needed:
- Issue type, which is necessary when you have multiple issue types mapped to the story level
- Issue source, for when your plan has multiple issue sources
- If already known, specify other issue details, like assignee, team, estimate, sprint, release, and dates.
The details that you can specify for an issue will depend on the corresponding issue source. For example, if you're selecting a release for TIS-123, only the relevant releases for the TIS project will be available.
- You can set the estimate value of issues to 0. This is different from keeping the estimate value blank. Any issues that have blank estimates are treated as unestimated issues in a plan.
If you're creating a sub-task, the issue will inherit certain values of its parent story, including sprints, releases, and teams.
In the roadmap view of your plan, above the timeline section, click Review changes. The 'Review changes' dialog will display, with all changes selected by default.
While reviewing your changes, do the following as needed:
- Filter changes made by yourself and others in the plan, by using the Change by menu in the top left side of the dialog.
- View multiple changes by expanding the item in the What changed column.
- Select the checkboxes of the changes you want to save in Jira Software, then click Save selected changes in Jira. All checkboxes are selected by default. Those that you deselect won't be saved in Jira Software, but will remain in your plan.
- Select the checkboxes of the changes you want to remove from your plan, then click Discard selected changes. These changes will be discarded from your plan and the values will revert to those currently saved in Jira Software.
- If you encounter any warnings when saving changes to Jira Software, we recommend fixing these first, then try saving the corresponding changes again. See Troubleshooting for commonly encountered issues.
- You need the Advanced Roadmaps user permission to save changes in Jira Software.
- When creating an issue at any hierarchy level, both the project and issue type of the previously created issue will be used by default. You can update these details as needed.


