Upgrade a Confluence cluster manually without downtime
This document provides step-by-step instructions on how to perform a rolling upgrade on deployments with little or no automation. These instructions are also suitable for deployments based on our Azure templates.
For an overview of rolling upgrades (including planning and preparation information), see Upgrade Confluence without downtime.
Step 1: Download upgrade files
Alternatively, go to > General Configuration > Plan your upgrade to run the pre-upgrade checks and download a compatible bug fix version.
Step 2: Enable upgrade mode
To enable upgrade mode:
- Go to > General Configuration > Rolling upgrades.
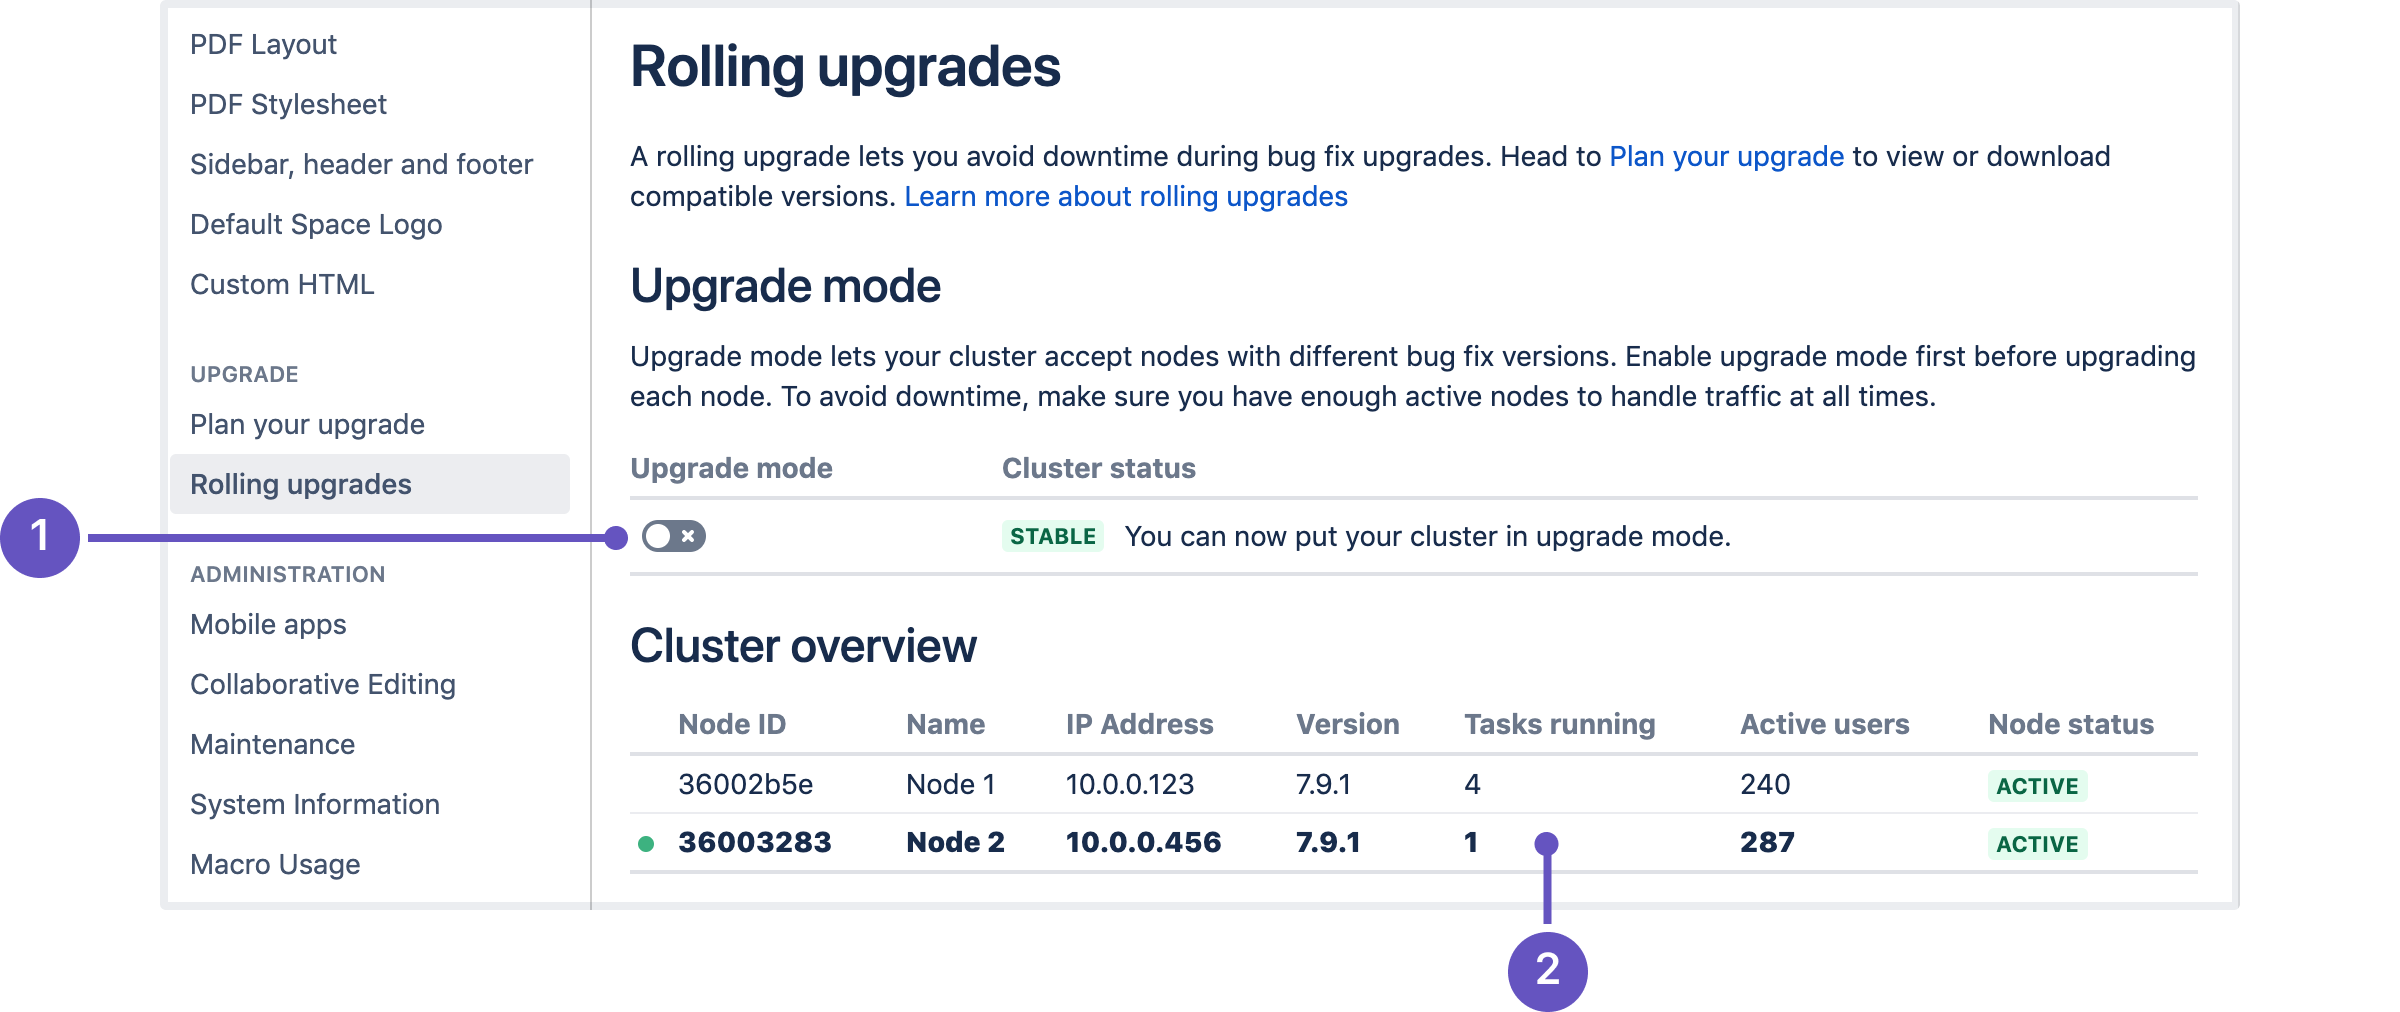
- Select the Upgrade mode toggle (1).
Screenshot: The Rolling upgrades screen.
The cluster overview can help you choose which node to upgrade first. The Tasks running (2) column shows how many long-running tasks are running on that node, and the Active users shows how many users are logged in. When choosing which node to upgrade first, start with the ones with the least number of tasks running and active users.
Upgrade mode allows your cluster to temporarily accept nodes running different Confluence versions. This lets you upgrade a node and let it rejoin the cluster (along with the other non-upgraded nodes). Both upgraded and non-upgraded active nodes work together to keep Confluence available to all users. You can disable upgrade mode as long as you haven’t upgraded any nodes yet.
Step 3: Upgrade the first node
Start with the least busy node
We recommend that you start upgrading the node with the least number of running tasks and active users. You can check this on the Rolling upgrades page.
Start by shutting down Confluence gracefully on the node:
Access the node through a command line or SSH.
Shut down Confluence gracefully on the node. To do this, run the stop script corresponding to your operating system and configuration. For example, if you installed Confluence as a service on Linux, run the following command:
$ sudo /etc/init.d/confluence stop
Learn more about graceful Confluence shutdowns
A graceful shutdown allows the Confluence node to finish all of its tasks first before going offline. During shutdown, the node's status will be Terminating, and user requests sent to the node will be redirected by the load balancer to other Active nodes.For nodes running on Linux or Docker, you can also trigger a graceful shutdown through the
killcommand (this will send aSIGTERMsignal directly to the Confluence process).Wait for the node to go offline. You can monitor its status on the Node status column of the Rolling upgrade page’s Cluster overview section.
Once the status of the node is offline, you can start upgrading the node. Copy the Confluence installation file you downloaded to the local file system for that node.
To upgrade the first node:
- Extract (unzip) the files to a directory (this will be your new installation directory, and must be different to your existing installation directory)
- Update the following line in the
<Installation-Directory>\confluence\WEB-INF\classes\confluence-init.propertiesfile to point to the existing local home directory on that node. - If your deployment uses a MySQL database, copy the jdbc driver jar file from your existing Confluence installation directory to
confluence/WEB-INF/libin your new installation directory.
The jdbc driver will be located in either the<Install-Directory>/common/libor<Installation-Directory>/confluence/WEB-INF/libdirectories. See Database Setup For MySQL for more details. - If you run Confluence as a service:
- On Windows, delete the existing service then re-install the service by running
<install-directory>/bin/service.bat. - On Linux, update the service to point to the new installation directory (or use symbolic links to do this).
- On Windows, delete the existing service then re-install the service by running
Copy any other immediately required customizations from the old version to the new one (for example if you are not running Confluence on the default ports or if you manage users externally, you'll need to update / copy the relevant files - find out more in Upgrading Confluence Manually).
If you configured Confluence to run as a Windows or Linux service, don't forget to update its service configuration as well. For related information, see Start Confluence Automatically on Windows as a Service or Run Confluence as a systemd service on linux.
- Start Confluence, and confirm that you can log in and view pages before continuing to the next
step.
As soon as the first upgraded node joins the cluster, your cluster status will transition to Mixed. This means that you won’t be able to disable Upgrade mode until all nodes are running the same version.
Upgrade Synchrony (optional)
If you've chosen to let Confluence manage Synchrony for you (recommended), you don't need to do anything. Synchrony was automatically upgraded with Confluence.
If you're running your own Synchrony cluster, grab the new synchrony-standalone.jar from the <local-home> directory on your upgraded Confluence node. Then, perform the following steps on each Synchrony node:
- Stop Synchrony on the node using either the
start-synchrony.sh(for Linux) orstart-synchrony.bat(for Windows) file from the Synchrony home directory. - Copy the new
synchrony-standalone.jarto your Synchrony home directory. - Start Synchrony as normal.
See Set up a Synchrony cluster for Confluence Data Center for related information.
Step 4: Upgrade all other nodes individually
After starting the upgraded node, wait for its status to change to Active in the Cluster overview. At this point you should check the application logs for that node, and log in to Confluence on that node to make sure everything is working. It's still possible to roll back the upgrade at this point, so taking some time to test is recommended.
Once you've tested the first node, you can start upgrading another node, following the same steps. Do this for each remaining node – as always, we recommend that you upgrade the node with the least number of running tasks each time.
Step 5: Finalize the upgrade
Finalize upgrade to a bugfix version
To finalize the upgrade:
- Wait for the cluster status to change to Ready to finalize. This won't happen until all nodes are active, and running the same upgraded version.
- Select the Finalize upgrade button.
- Wait for confirmation that the upgrade is complete. The cluster status will change to Stable.
Your upgrade is now complete.
Finalize upgrade to a feature version
To finalize the upgrade:
- Wait for the cluster status to change to Ready to run upgrade tasks. This won't happen until all nodes are active, and running the same upgraded version.
- Select the Run upgrade tasks and finalize upgrade button.
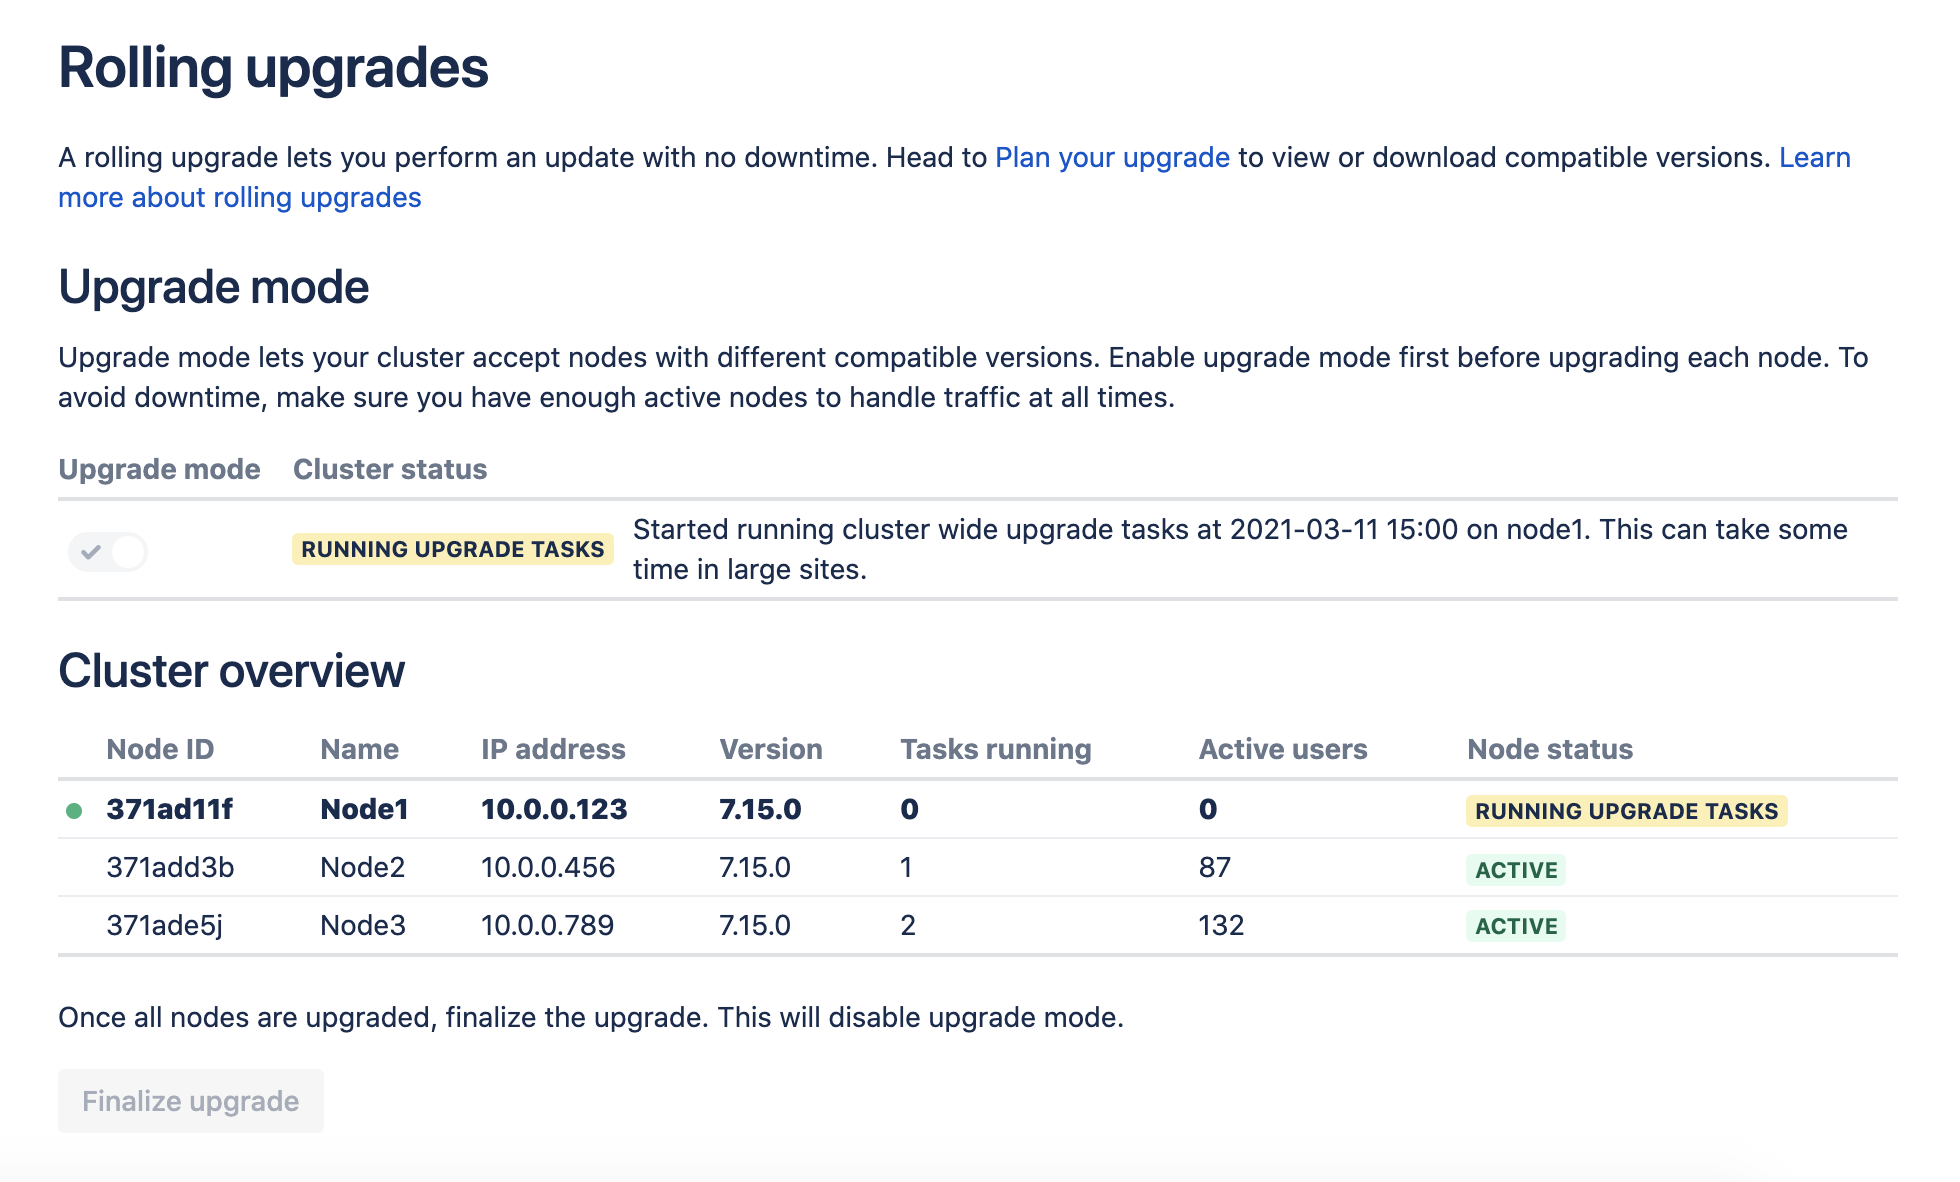
- One node will start running upgrade tasks. Tail the logs on this node if you want to monitor the process.
- Wait for confirmation that the upgrade is complete. The cluster status will change to Stable.
Your upgrade is now complete.
Screenshot: One cluster node running upgrade tasks for the whole cluster.
Troubleshooting
Node errors during rolling upgrade
There are several ways to address this:
Shut down Confluence gracefully on the node. This should disconnect the node from the cluster, allowing the node to transition to an Offline status.
If you can’t shut down Confluence gracefully, shut down the node altogether.
Once all active nodes are upgraded with no nodes in Error, you can finalize the rolling upgrade. You can investigate any problems with the problematic node afterwards and re-connect it to the cluster once you address the error.
Upgrade tasks failed error
- Check the application log on the node running the upgrade task for errors. The node identifier is included in the cluster status message.
- Resolve any obvious issues (such as file system permissions, or network connectivity problems)
- Select Re-run upgrade tasks and finalize upgrade to try again.
If upgrade tasks are still failing, and you can't identify a cause, you should contact our Support team for assistance. You may also want to roll back the upgrade at this point. We don't recommend leaving Confluence in upgrade mode for a prolonged period of time.
Roll back a node to its original version
Mixed status with Upgrade mode disabled
If a node is in an Error state with Upgrade mode disabled, you can't enable Upgrade mode. Fix the problem or remove the node from the cluster to enable Upgrade mode.
Disconnect a node from the cluster through the load balancer
| NGINX | NGINX defines groups of cluster nodes through the upstream directive . To prevent the load balancer from connecting to a node, delete the node's entry from its corresponding upstream group. Learn more about the upstream directive in the ngx_http_upstream_module module. |
|---|---|
| HAProxy | With HAProxy, you can disable all traffic to the node by putting it in a Learn more about forcing a server's administrative state. |
| Apache | You can disable a node (or "worker") by setting its activation member attribute to disabled. Learn more about advanced load balancer worker properties in Apache. |
| Azure Application Gateway | We provide a deployment template for Confluence Data Center on Azure; this template uses the Azure Application Gateway as its load balancer. The Azure Application Gateway defines each node as a target within a backend pool. Use the Edit backend pool interface to remove your node's corresponding entry. Learn more about adding (and removing) targets from a backend pool. |
Traffic is disproportionately distributed during or after upgrade
To address this, you can also temporarily disconnect the node from the cluster. This will force the load balancer to re-distribute active users between all other available nodes. Afterwards, you can add the node again to the cluster.


