Cloud Migration Assistant for Confluence
Before you migrate, check your cloud organization
We’re currently rolling out changes that may affect your migration experience. From your organization at admin.atlassian.com, if the Users list and Groups list are under the Directory tab, you have the improved user management experience. This means that the users and groups across sites will be merged under the organization. Read more about how groups and permissions are migrated. If you have any concerns, contact support.
For a test migration or UAT, we recommend that your test cloud site is not part of the organization that also hosts your prod site. The prod site should be hosted in a different organization. This is to ensure smooth migration of the relevant users and groups.
The Confluence Cloud Migration Assistant is an app that helps you easily move content, users, and groups from Confluence Server or Data Center to Confluence Cloud. Built and maintained by Atlassian, the app is free to install and use.
With the app, you can choose what you want to move to the cloud, start migrating at your convenience, and monitor the progress of everything throughout the migration process.
When to use the Confluence Cloud Migration Assistant
When you want to move users or data from Confluence Server or Data Center to Confluence Cloud.
- When you want to assess your apps before moving from Confluence Server or Data Center to Confluence Cloud.
When you want to run a test or trial migration from Confluence Server or Data Center to Confluence Cloud.
When the Atlassian Support team has recommended using the app.
The Confluence Cloud Migration Assistant will not work for Jira products. You can download the Jira Cloud Migration Assistant for Jira migrations to cloud.
Before you begin
Make sure you have reviewed the server to cloud migration guide. This guide will walk you through the migration process step-by-step and help you identify what to look out for.
Before attempting a test or production migration, ensure you've completed all of the steps for the Confluence Cloud Migration Assistant in the pre-migration checklist. The checklist will help you prepare yourself and your data for migration, and ensure you avoid common sources of migration failure.
Install the Confluence Cloud Migration Assistant app
If your Confluence Server site is version 6.13 or above you won't need to install anything because it comes pre-installed, although you may be asked to update the app.
To install the app on versions 5.10 to 6.12:
- In Confluence Server go to Administration menu
 then Manage apps.
 - Choose Find new add-ons.
- Search for the Confluence Cloud Migration Assistant app.
- Choose Install and you're all set.
Alternatively, you can install it from the Atlassian Marketplace.
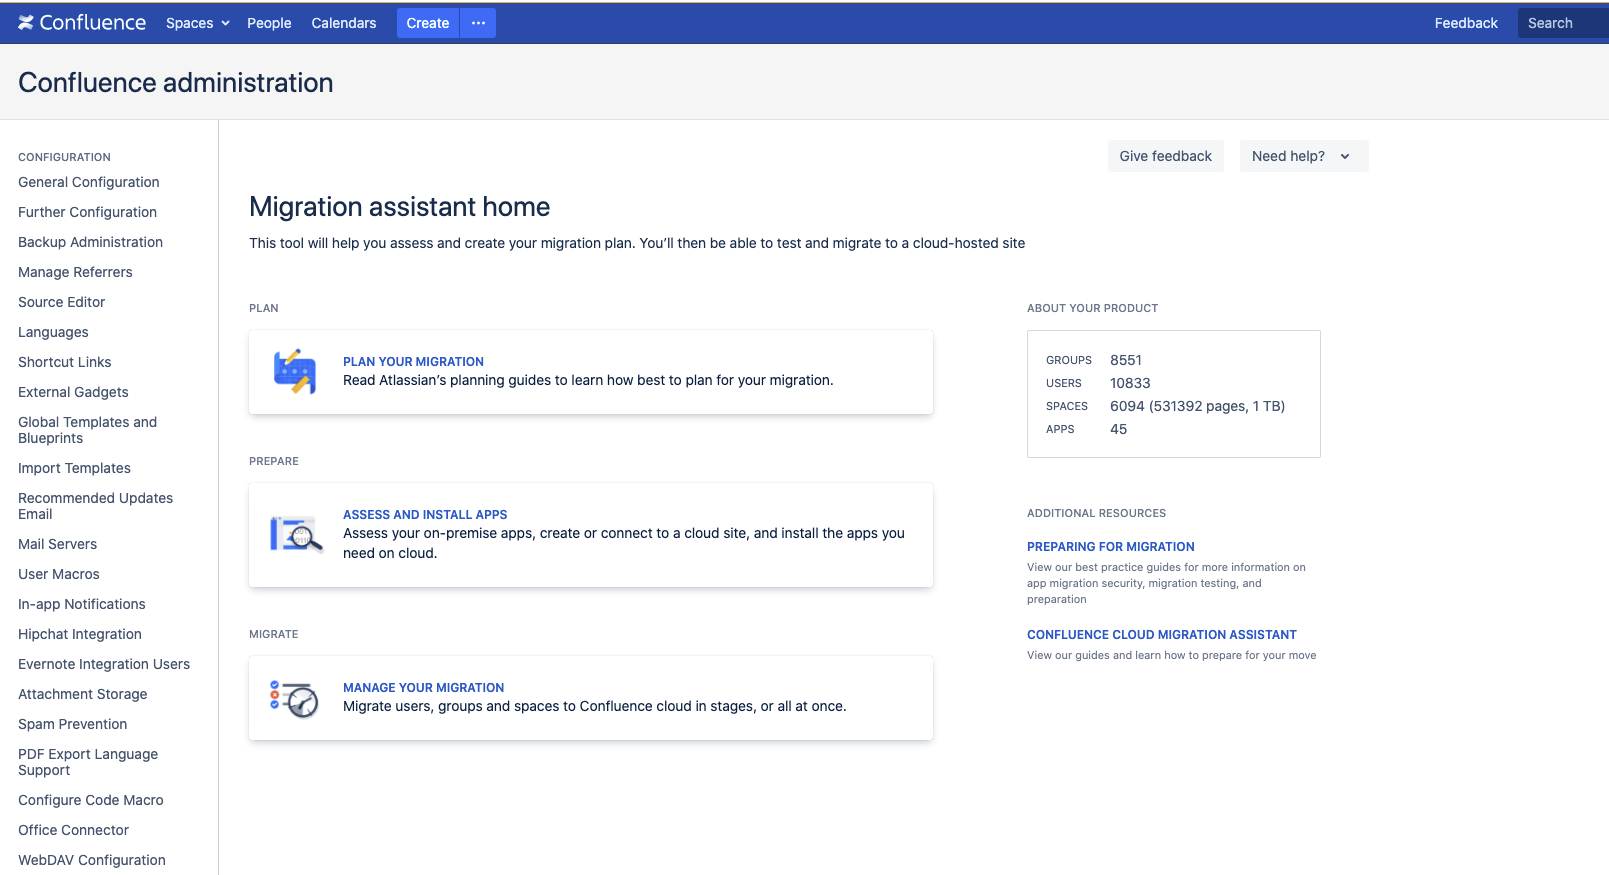
Once installed, you can access the migration assistant by going to Confluence Administration > look for the Atlassian Cloud category > select Migration Assistant.
If your Confluence Server site is behind a firewall, you'll need to allow access to the domain: atlassian.com
Use the migration assistant to assess your apps
Carrying out an assessment of your apps helps you to establish which apps are needed for a migration.
You can find step-by-step instructions for this process in Assessing and migrating apps with the Confluence Cloud Migration Assistant.
Check for possible data conflicts in your cloud site
You can reduce the risk of running into issues, or the migration failing, if you conduct some manual checks in your server and cloud sites.
1. Check for group conflicts
Make sure that there are no groups already in your cloud site with the same name as groups from your server site, unless you are intentionally trying to merge them.
If we find a group in your server site that has the same name as a group in your cloud site (either Jira or Confluence), we will merge the users from the server group into the cloud group. The server group users will inherit the permissions of the cloud group. This also applies to groups with Jira product access that have the same name as a Confluence group you are migrating. This is because all users and groups are managed in a central location in your cloud site.
If you don’t want this to happen, you’ll need to make sure all groups across server and cloud have unique names before running your migration.
The following groups manage admin access and are blacklisted. They will not be migrated at all: "site-admins", "system-administrators", "atlassian-addons", "atlassian-addons-admin". Users in these groups will still be migrated; if you want them to be in one of the blacklisted groups you’ll need to manually add them after migration.
2. Check for space key conflicts
Before migrating, check that there are no spaces with the same space key between your server and cloud sites.
If a space from your server site has the same space key as a space in your cloud site your migration will fail. This is because every space in Confluence Cloud must have a unique space key. If you find a conflict you can:
choose not to migrate these spaces
If the migration assistant finds a conflict, the space will not migrate.
If a space key conflict is caused by a previous test migration you can reset your cloud site before migrating.
Use the app to set up and run your migration
Once you have the app installed, there are five key steps to set up and run your migration from server or Data Center to cloud:
Connect to cloud
Choose what to migrate
Check for errors
Review your migration
Migrate

The sections below describe each step in detail and explain some common errors that you may come across. If you have technical questions or issues while using the migration assistant, get in touch with our support team.
Running a test migration
We strongly recommend doing a trial run of your migration to a test or staging site before running your final migration. Check out our guidance on testing your migration.
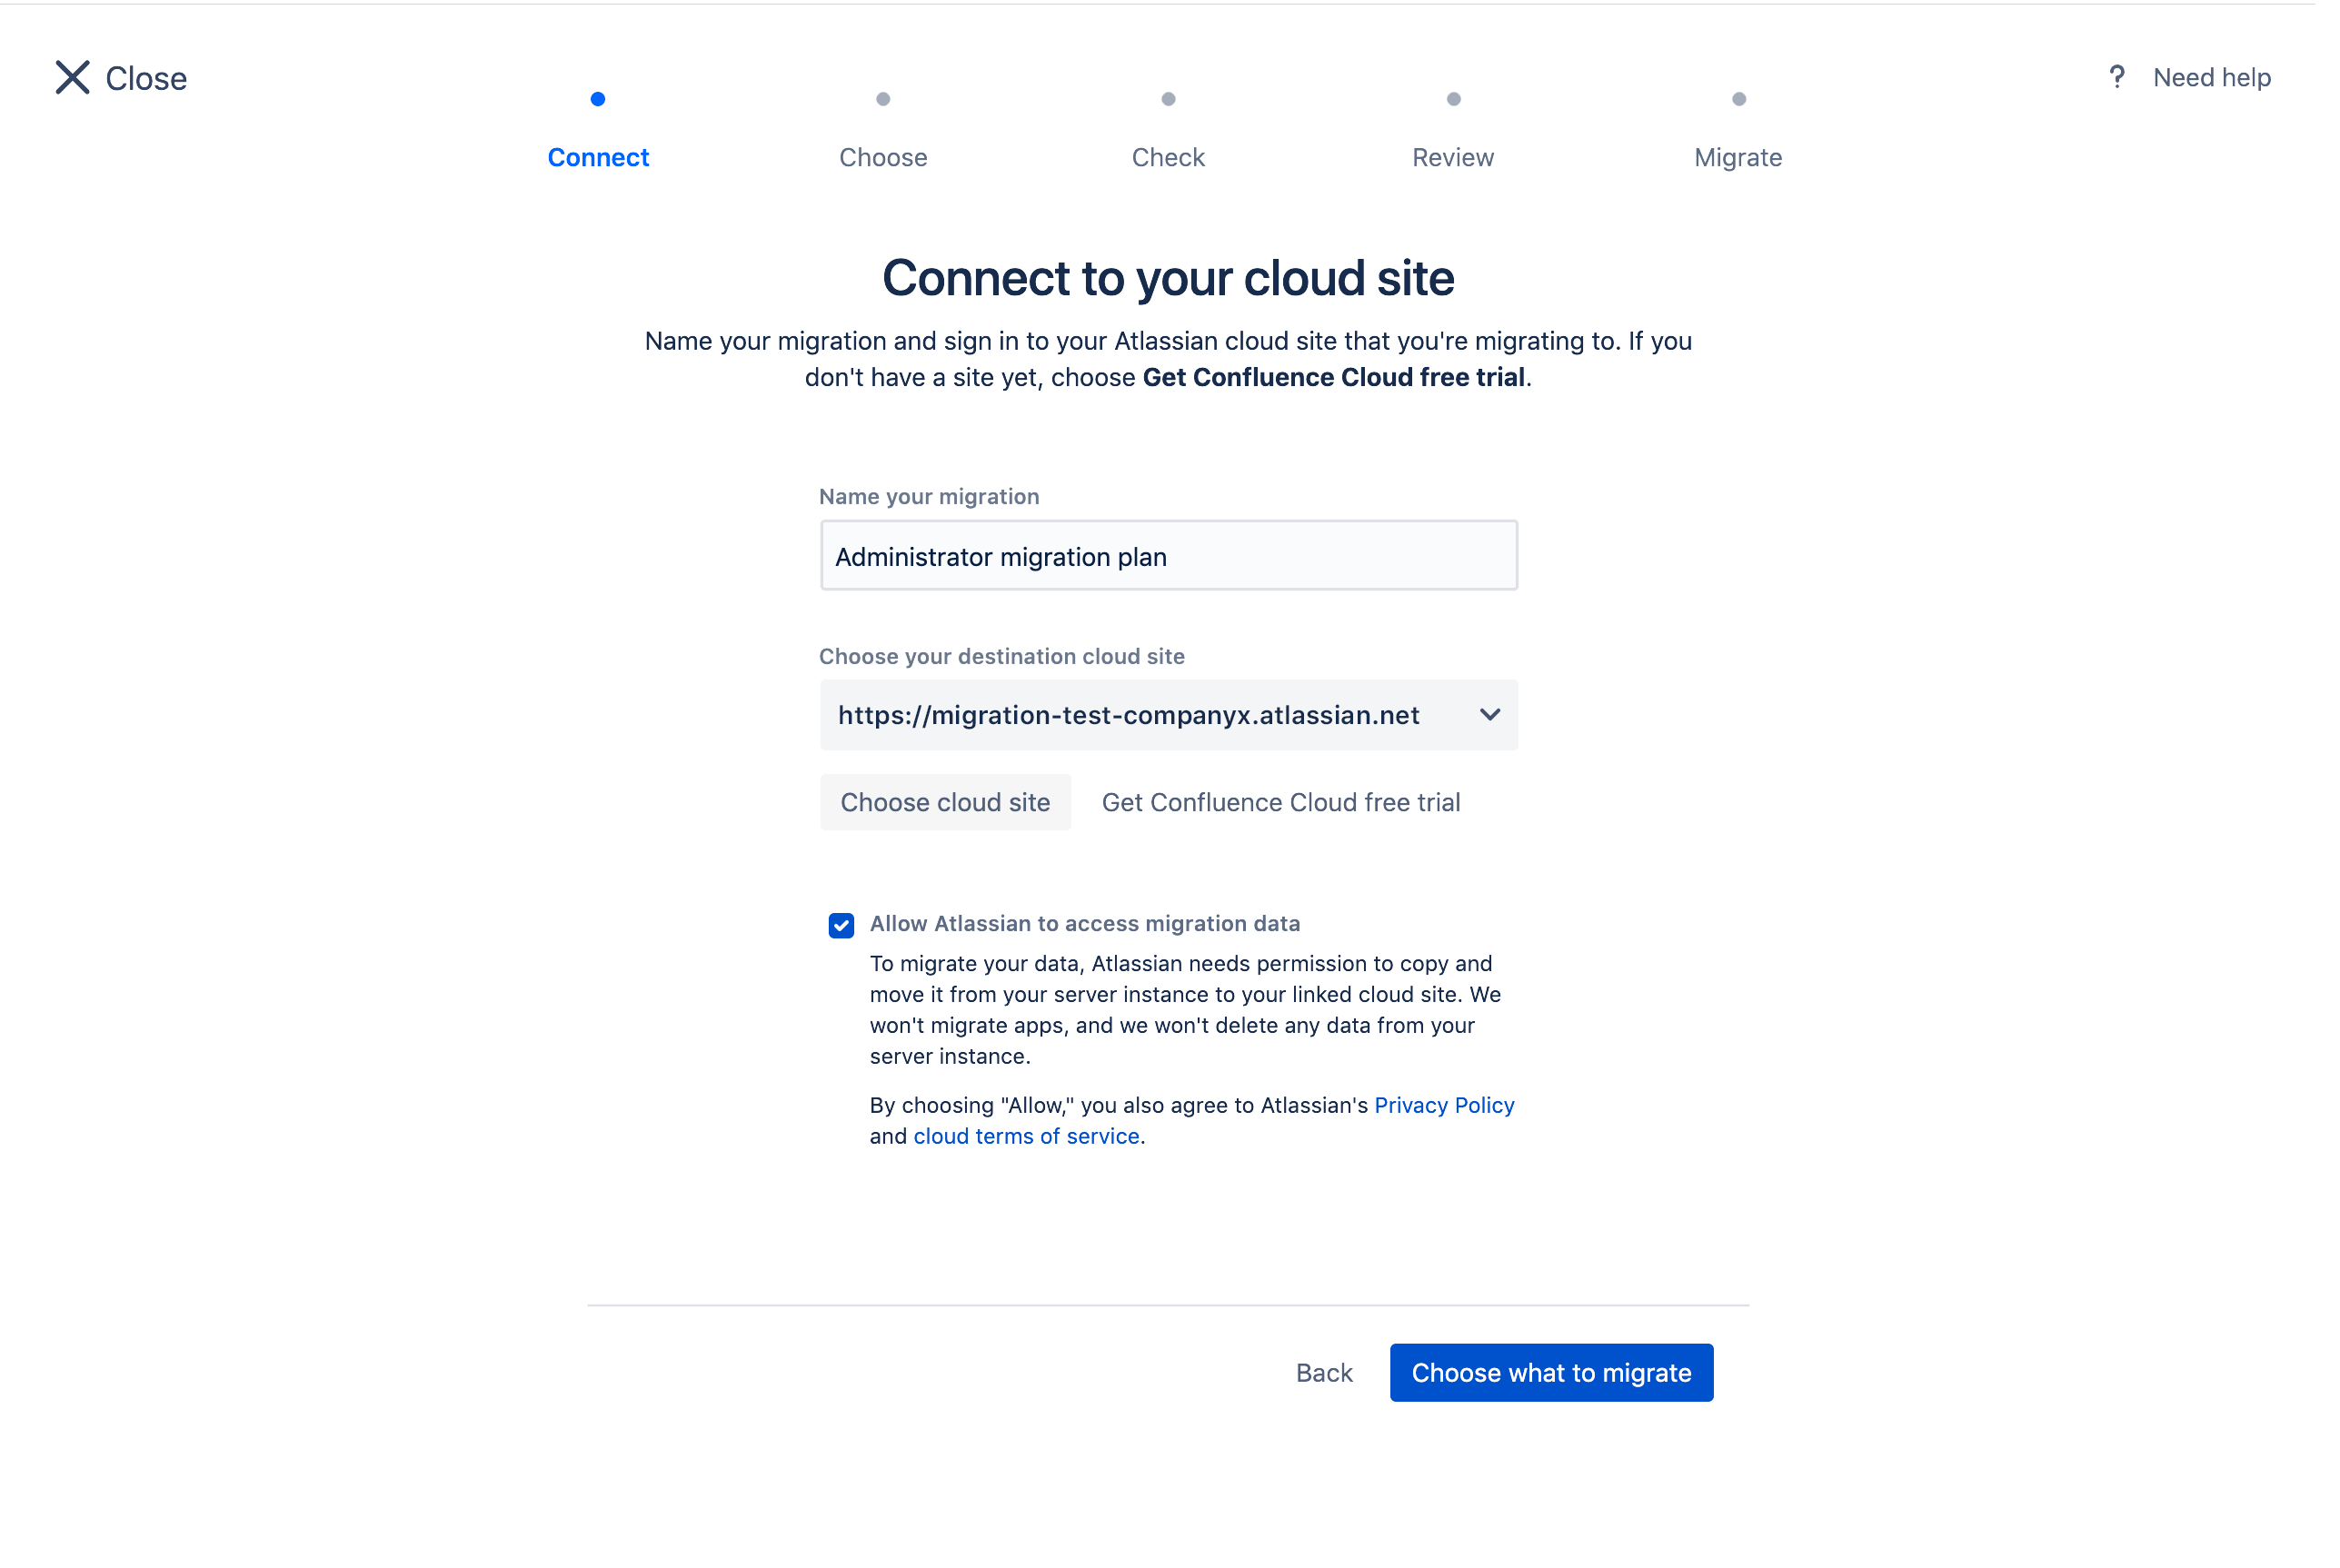
1. Connect to your destination Confluence Cloud site
You’ll be asked to add a name for your migration and choose which cloud site you would like to migrate to. You need to be an admin in both your server and the destination cloud sites.
If you have already connected a cloud site, you should see it in the dropdown. If there is nothing there, you will need to either connect a new cloud site or sign up for a new cloud license.
When you’re ready to go, check the box to allow Atlassian to move your data from your server site to your cloud site. If you’re unable to grant Atlassian this access, you won’t be able to migrate with the migration assistant and will need to do a space import instead.
If your Confluence Server site is behind a firewall, you'll need to allow access to the domain: atlassian.com. You also might need to allow access to other Atlassian domains.
2. Choose what to migrate
You can migrate everything together or break it up into different stages.
You can choose:
all or some of your users and groups
which individual spaces (and their attachments) you'd like to migrate
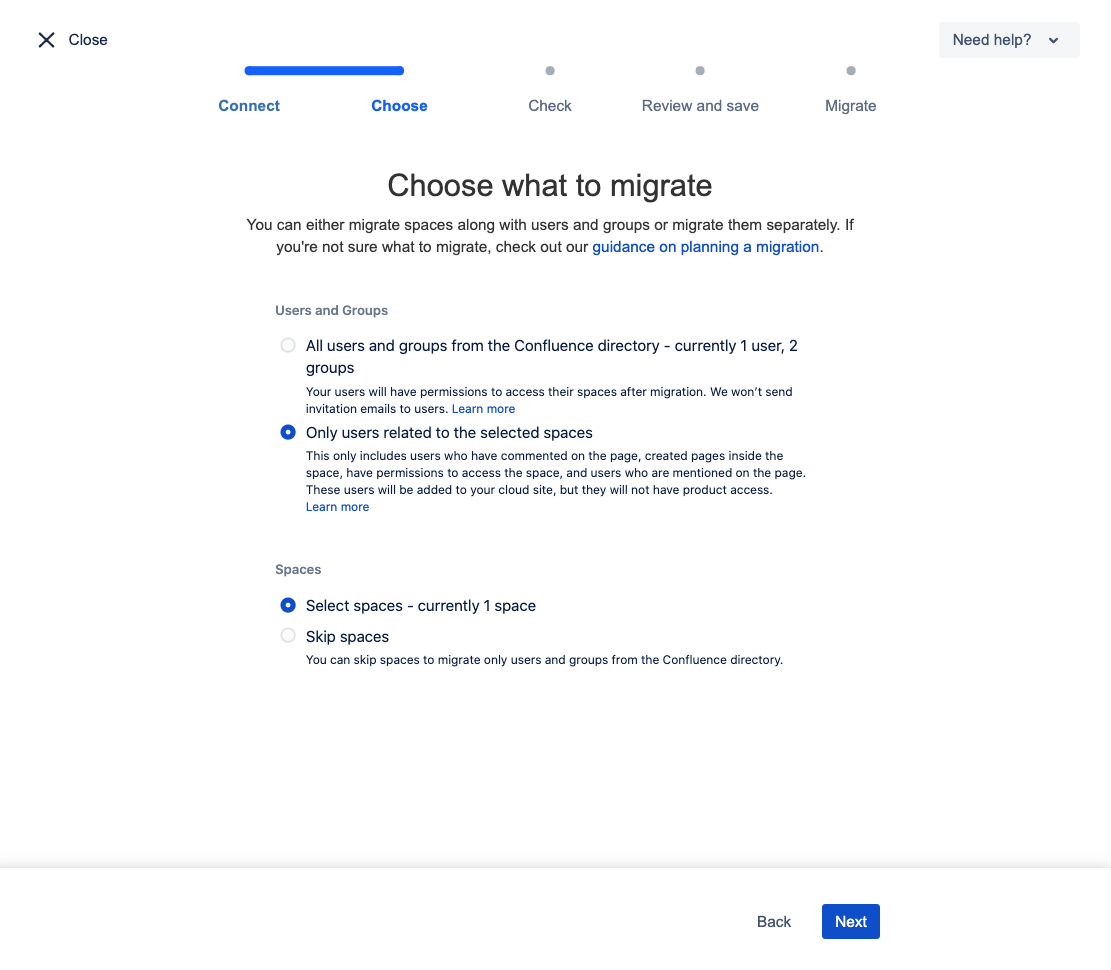
Users and groups
You can choose to either migrate all or some of your users.
If you choose the migrate your users, the first time you do so all your users will be added to your cloud site. Every migration, after the first, we will just link your data to the users that already exist in cloud. If you have a large userbase we suggest following our recommendations.
When you migrate your users, they will be added to their groups when they get to cloud. You will need to review and approve group permissions after you migrate. When you approve group permissions, your users will be given Confluence access and will be added to your bill.
We won’t send an invitation to your users. To invite your users you can choose to send an invitation from the Administration space after you have migrated, or send a link for them to log in themselves.
When you select Only users related to the selected spaces under users and groups, we will still migrate some user data connected to the spaces you are migrating. This is to make sure that mentions, comments, and page history stay active.
User data that will be migrated every time includes:
full name
username (discarded after migration)
email address
We will only migrate this information for users directly connected to the spaces you are migrating. We will not give these users product access or add them to any groups. They will appear in your cloud site user list.
If you choose to migrate users later, their product and group access will be updated.
Also, if you choose not to migrate users and groups and you have a space permission granted by a group that don't exist in cloud, the Confluence Cloud Migration Assistant will not migrate the respective space permission. To avoid this scenario, we recommend you to create the specific group in the cloud site before migration.
Other things to be aware of when migrating users and groups:
Users are migrated using email address as the source of truth. On subsequent migrations, the migration assistant will link users by email address rather than re-migrating them. Check out our tips for migrating a large number of users.
You must validate all your user accounts (email addresses) before migrating to cloud. Migrating unknown user accounts can potentially allow unauthorized access to your cloud sites. For example, if you had users in your server instance with emails that you don’t own, say “email@example.com”, you might be inviting someone who owns “@example.com” to your site in cloud.
Confluence Cloud is subscription-based and billed on a per-user basis. If you plan to migrate your users, make sure you check the licensing options available.
If you use an external user management system, we recommend synchronizing it with your local directory before migrating. This is to make sure that your users and groups are up to date before you transfer any data.
Users with disabled status in your server site will be migrated as active but without any product access. This means they will not be counted as active Confluence users for billing purposes.
If we find a group in your server site that has the same name as a group in your cloud site, we will merge the users from the server group into the cloud group.
Global settings and global site permissions are not migrated with this tool. You’ll need to set these manually after migration.
If you have users that already exist in your destination cloud site and you choose to migrate users with this app, the following will occur:
If a user has product access in cloud, but has disabled status in your server site, they will continue to have product access in cloud after migration.
If a user does not have product access in cloud, but is enabled in your server site, they will be granted product access through the migration process.
If you use Confluence as a knowledge base for Jira Service Management (formerly Jira Service Desk), your Jira Service Management users may also be migrated along with your Confluence users. This will happen if you can see your Jira Service Management users in the cwd_user table in Confluence.
Spaces
If you want to migrate all or some of your spaces choose Select spaces from the options. You will then be able to select what spaces you want to migrate. If you aren’t migrating any spaces you will be taken straight to check for errors.

Select the spaces you want to add to your migration. You can filter the list or search for particular spaces, or click Select all if you want to migrate everything at once. You won’t be able to migrate spaces with space keys that already exist in your Confluence Cloud destination site.
If a space has a MIGRATED status, we have detected that you have already migrated this space to the same cloud site.
If a space has a QUEUED status, it has already been added to a migration that is waiting to be run.
If you have lots of spaces and attachments or you are on Data Center, you might want to break the migration up into a few smaller migrations. The migration assistant can be slow to load and process tasks when there is a lot to manage.
When you've chosen all your spaces, select Add to migration.
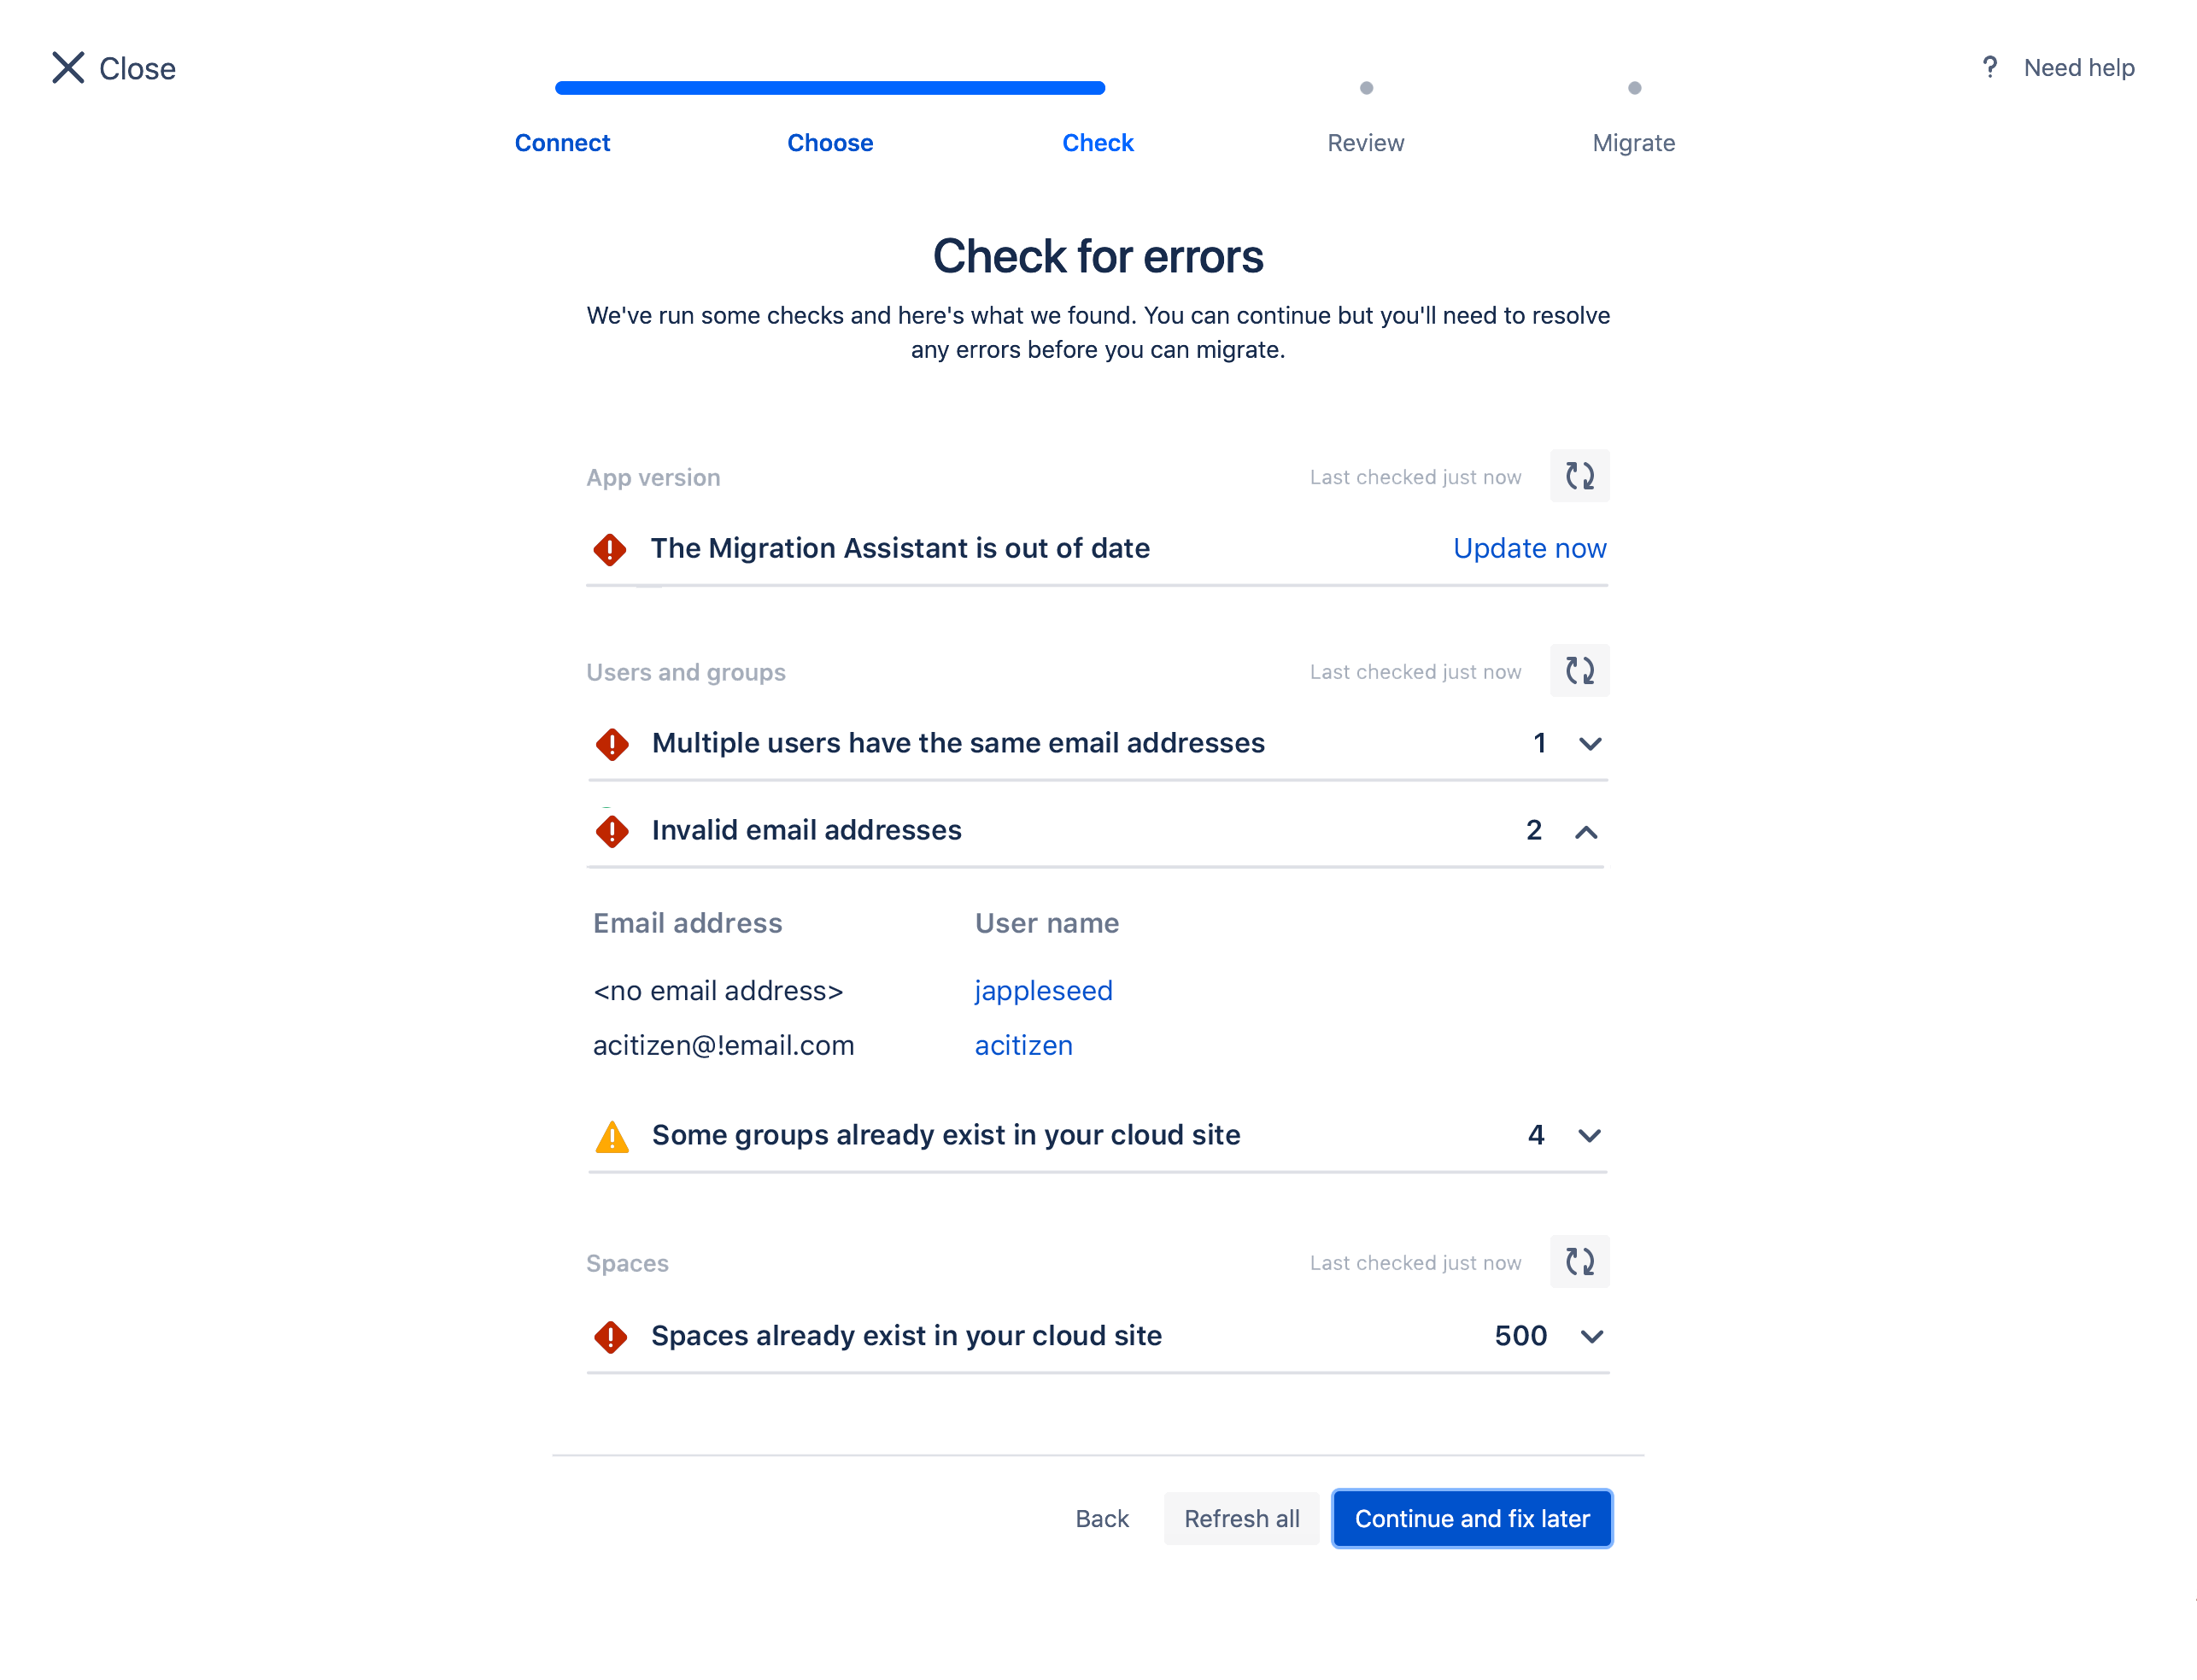
3. Check for errors
In this step, the Confluence Cloud Migration Assistant will review your migration and check for common errors. It will check if your:
migration assistant app is up to date
users have valid and unique email addresses
groups will merge through the migration process
spaces already exist in your cloud site
- spaces are publicly available and searchable online
You may also encounter other issues during the migration process; this step only checks for the issues mentioned here.
If there is a green tick ![]() then the check has passed. If you get a warning sign
then the check has passed. If you get a warning sign ![]() then you can continue, but you need to be aware of a potential issue.
then you can continue, but you need to be aware of a potential issue.
If a check comes back with a red error ![]() then you will need to resolve the error before you can run your migration.
then you will need to resolve the error before you can run your migration.
If you decide to Continue and fix later, you can come back to view the errors once you have saved your migration.
Updating the app
The migration assistant may be out of date. If you get this error, you’ll need to update it before running any migrations.
Users and groups errors
All users will need to have a valid and unique email address. If we detect invalid emails or multiple users with the same email, you will get an error. You will need to fix these email addresses before you can run your migration.
If you have chosen to migrate all users, we will check to see if you have any groups with the same name already in your cloud site. If we find groups with the same name, we will merge the users from the server group into the cloud group with the same name. You can continue with your migration without fixing this issue, but it’s important to check that this won’t cause permission escalation.
The following groups manage admin access and are blacklisted. They will not be migrated at all: "site-admins", "system-administrators", "atlassian-addons", "atlassian-addons-admin". Users in these groups will still be migrated; if you want them to be in one of the blacklisted groups you’ll need to manually add them after migration.
Space errors
If you’re migrating spaces we will check to see if there will be any space key conflicts. If you get an error you can:
choose not to migrate these spaces by removing them from your migration
You will need to resolve any space key conflicts before you can run your migration.
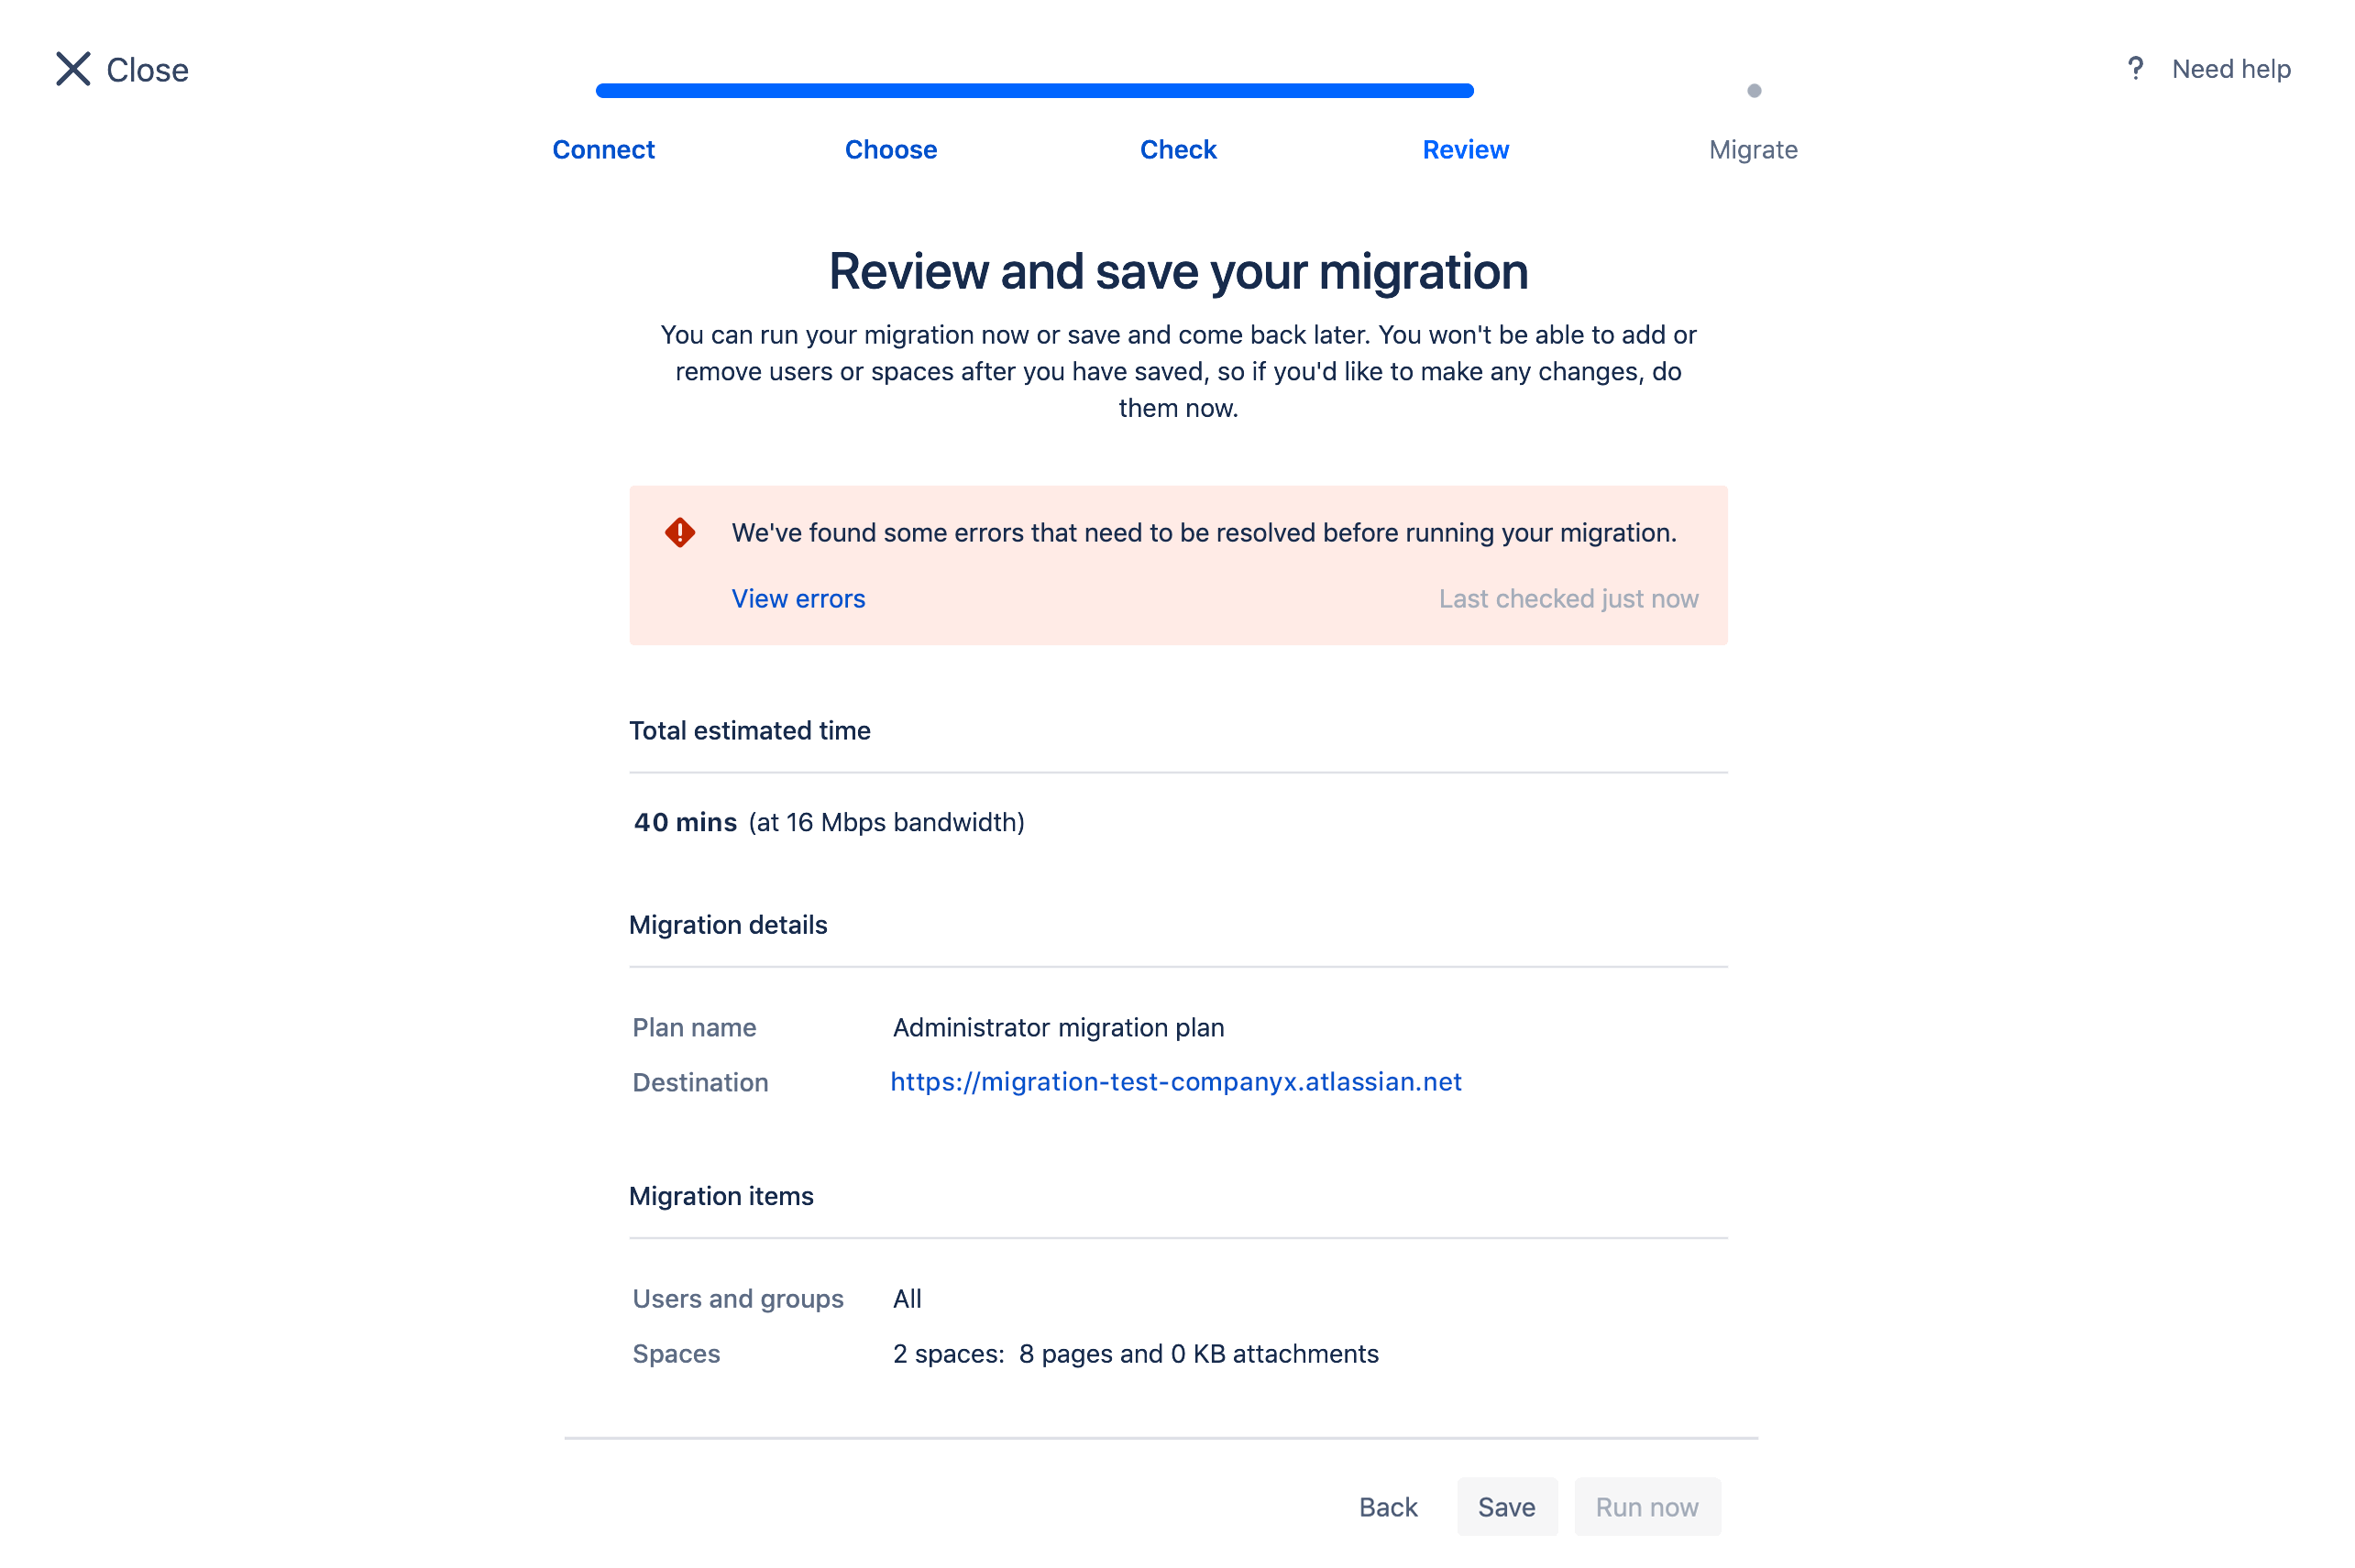
4. Review your migration
This is the final step in setting up your migration.
If everything looks correct and you want to start your migration, click Run. If you would like to start your migration later or you still have errors to fix, click Save. If you choose to run your migration, it will still be saved to your dashboard. There, you can view the progress and details of all your migrations.
5. Manage your migrations
Your saved migration will be listed on the migration dashboard, where you can view details or run it. You can also check the status of a migration, monitor the progress, stop a migration that's currently running, or create a new one.
You can create as many migrations as you need. At this time, migrations can't be edited or deleted, so if you create a migration that can't be used, just create a new one.

Status definitions
SAVED Your migration is saved and ready to run.
RUNNING Your migration is currently in progress.
FINISHED All tasks in your migration have been completed.
STOPPED Your migration has been manually stopped. Once stopped, it can't be resumed. Any step already in progress will first need to finish before the migration is shown as fully stopped. Some users, groups, and spaces may already have been migrated to your Confluence Cloud site.
FAILED We were unable to complete the migration. This might be because a space key already exists in the destination site, or the migration hit an unexpected error. Some users, groups, and spaces may already have been migrated to your Confluence Cloud site.
After migrating
After migrating spaces, it may take a while for them to appear in the space directory. However, you can still access them via a direct link.
Depending on the type of migration, there may be some things you need to do once your migration is finished.
Users and groups
To make sure your users and groups are set up correctly:
Review members of groups and approve their permissions by going to Review imported groups. (If you have the Free plan, permissions can’t be modified; users and groups retain the same permissions that they had on your original site.)
Add users to the generic groups if necessary. The generic groups are: "site-admins", "system-administrators", "atlassian-addons", "atlassian-addons-admin".
If you use an external user management system, check that your users have synced correctly.
When you are ready, invite your users. Go to Administration > Users > Show details and then Resend invite. When they first log in they may be prompted to set a new password and add personal details.
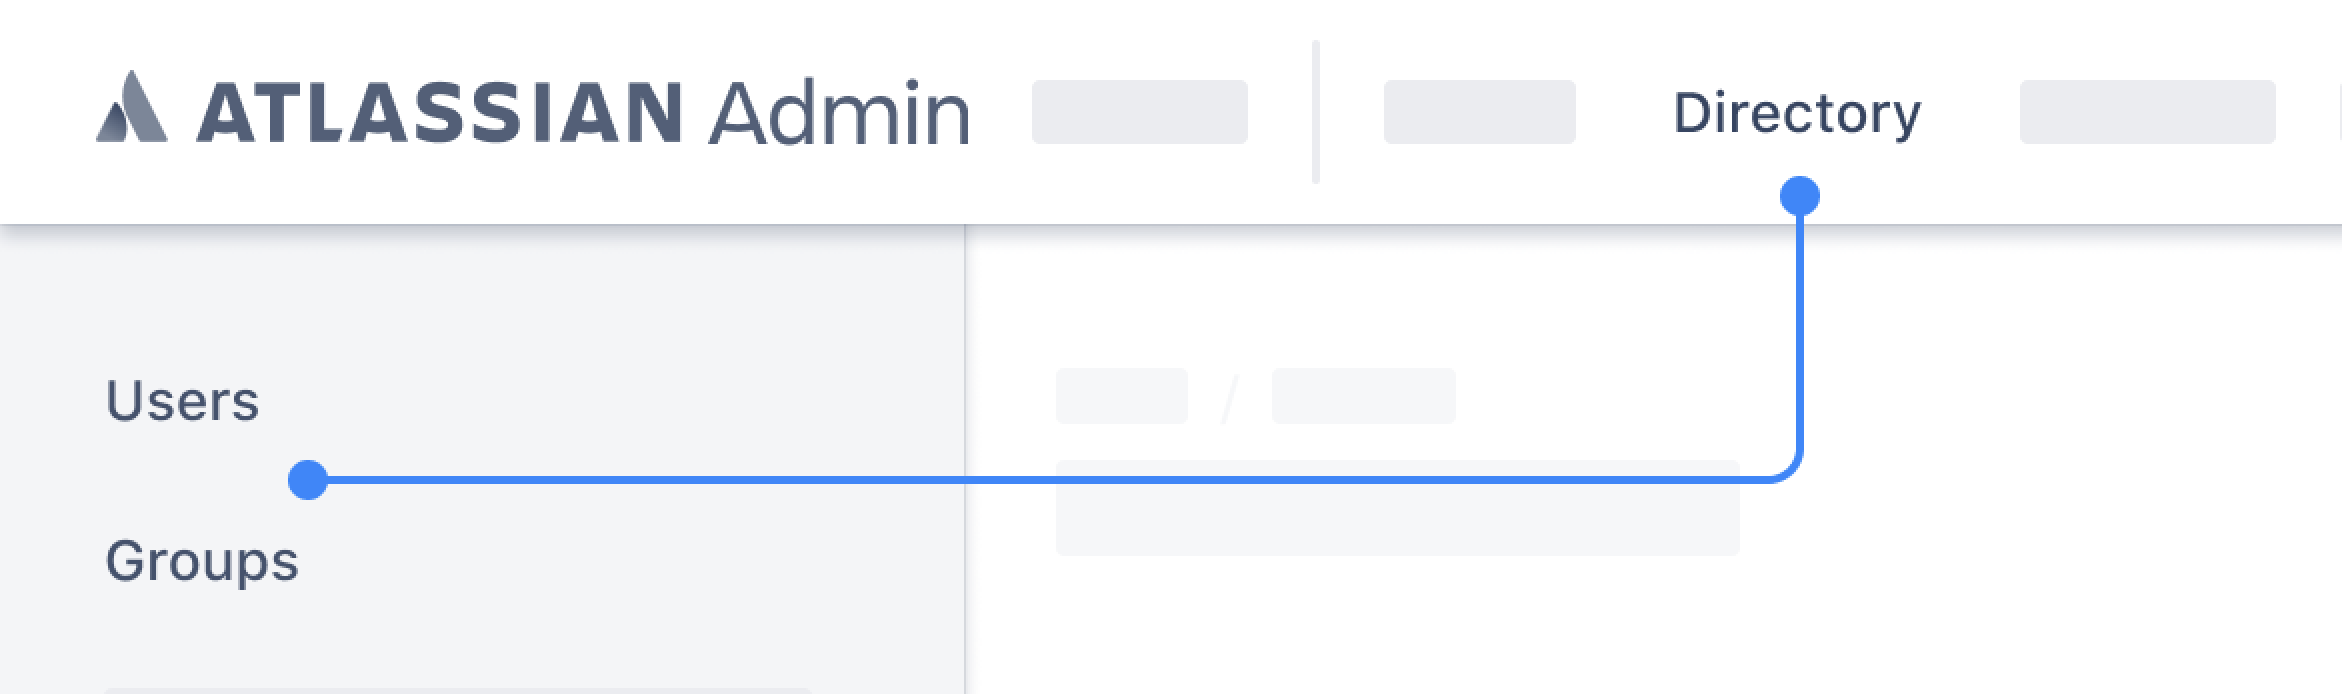
If you have the improved user management experience, go to Administration > Directory > Users > Show details and then Resend invite.- We recommend providing some training or sending an onboarding email to your users to help them get familiar with their new cloud workspace.
Spaces
To check that your spaces have migrated successfully:
Review content and spaces, or ask your users to review their own content.
Check for any instances of Former User. This means that we were unable to match content to a user.
Link your other Atlassian products by going to Settings > Application links.
Use the Jira macro repair to update any links to Jira. On your cloud site go to Settings > Jira macro repair and follow the steps.
Confluence short links like https://confluence.example.com/x/PywS may not work after migrating. Replacing them with internal links (or full URLs if they’re not in your Confluence site)\before migrating should solve this issue.
You can then install any apps you wish to use and onboard your users.
For the full overview of post-migration actions check out the server to cloud migration guide.
More information and support
We have a number of channels available to help you with your migration.
- For more migration planning information and FAQs, visit the Atlassian Cloud Migration Center.
- Have a technical issue or need more support with strategy and best practices? Get in touch.
- Looking for peer advice? Ask the Atlassian Community.
- Want expert guidance? Work with an Atlassian Partner.