Deploying enterprise-scale Confluence on AWS: a step-by-step guide
The AWS Quick Start template as a method of deployment is no longer supported by Atlassian. You can still use the template, but we won't maintain or update it.
We recommend deploying your Data Center products on a Kubernetes cluster using our Helm charts for a more efficient and robust infrastructure and operational setup. Learn more about deploying on Kubernetes.
AWS now recommends switching launch configurations, which our AWS Quick Start template uses, to launch templates. We won’t do this switch, however, as we’ve ended our support for the AWS Quick Start template. This means you're no longer able to create launch configurations using this template.
Confluence Data Center supports multi-node clustering, giving you high availability and flexible scalability. You can leverage these features by deploying Confluence Data Center on appropriate infrastructure.
Confluence Data Center comes equipped with AWS Quick Start, but this deployment method is no longer supported or maintained by Atlassian, though it is still usable. Instead, we strongly recommend deploying your Data Center products on a Kubernetes cluster using our Helm charts for a more efficient and robust setup.
AWS Quick Start provided a framework for deploying your infrastructure with recommended pre-set defaults. This framework originally sped up your deployment, as you didn't have to build every piece of your infrastructure from scratch. Rather, you could design your infrastructure around our Quick Start and deploy it quickly on AWS.
This legacy document will serve as a single place to access most of the knowledge resources needed to streamline deployment. Here, we guide you through an end-to-end deployment of Confluence Data Center.
Non-clustered VS clustered infrastructure
1. What you need to know
The AWS Quick Start for Confluence Data Center takes the guesswork out of designing your required infrastructure, preparing all the components that need to be configured. It provides templates that you can use in this document to deploy your Confluence Data Center instance.
1.1 Is this document different from the Quick Start deployment guide?
Yes. In this document, we show you a reference deployment suitable for enterprise-scale organizations. Then, we walk you through the entire deployment process (which includes using the AWS Quick Start for Confluence Data Center). In doing so, we also provide recommendations based on our knowledge and experience in managing Confluence Data Center at scale.
The AWS Quick Start for Confluence Data Center comes with its own deployment guide. That guide shows you how to use the Quick Start to deploy Confluence Data Center on AWS. However, it's designed to be useful for organizations of all sizes, and doesn't provide recommendations for a specific reference deployment.
1.2 Why use a third-party cloud platform?
When it comes to hosting Confluence Data Center, using a third-party cloud platform like AWS offers many benefits compared to using physical servers. For one, it frees your organization from much of the burden of deploying, maintaining, and scaling physical hardware.
We collaborated with AWS to develop the Quick Start, focusing on making it highly configurable for most types of organizations. We formerly used this Quick Start to deploy and maintain Confluence Data Center for different teams inside Atlassian before switching to Kubernetes. In fact, many of the design principles used for shaping this Quick Start came from lessons we learned from our own AWS deployments.
1.3 What does enterprise-scale mean?
This document is focused on how enterprise-scale organizations can deploy Confluence Data Center and tweak it to suit their needs. We define enterprise-scale organizations as those with Large or XLarge instances (based on our Confluence Data Center load profiles).
1.4 How do I know these recommendations are right for me?
Most of the recommendations in this document are based on the following:
- Benchmarks: Infrastructure recommendations for enterprise Confluence instances on AWS provides guidance on how to design architecture for the enterprise scale. This guidance is based on extensive testing, whose methodology we also explain in that same article. We use many of the same recommendations in this document.
- Experience: Within Atlassian, we run some of the biggest Confluence Data Center deployments in production. We do this because Confluence is vital to the work of thousands of Atlassians. In turn, we also get to experience firsthand how to run Confluence Data Center at the enterprise scale. We learn a lot in the process, and many of our recommendations are based on those learnings.
- Customer research: We assist many customers and partners, and in the process we learn a lot about how our products are used. This exposes us to the challenges customers face in deploying and maintaining infrastructure; our recommendations are designed to help you address those challenges.
Keep in mind, however, that these recommendations are based on what we believe are appropriate for most enterprise-scale organizations. Your own organization will likely have unique needs and quirks that call for different strategies. Use these recommendations as a baseline which you can tailor to better address your needs.
1.5 Prerequisite skills
This document will guide you on deploying Confluence Data Center on AWS. It assumes you're already familiar with Confluence.
- how to manage Linux servers, and
- how to navigate through AWS resources through their UI.
1.6 What this deployment will entail
Then, we'll explain how to assess your own organization's size (or load profile), and choose the right settings to tweak it to your preferences. From there, we'll show you how to apply those settings on an AWS deployment using our fully supported AWS Quick Start. The Quick Start has access to more parameters you can customize, but we don't cover them in detail here.
2. Reference architecture
The following diagram illustrates the basic architecture of what you can deploy through the Quick Start:
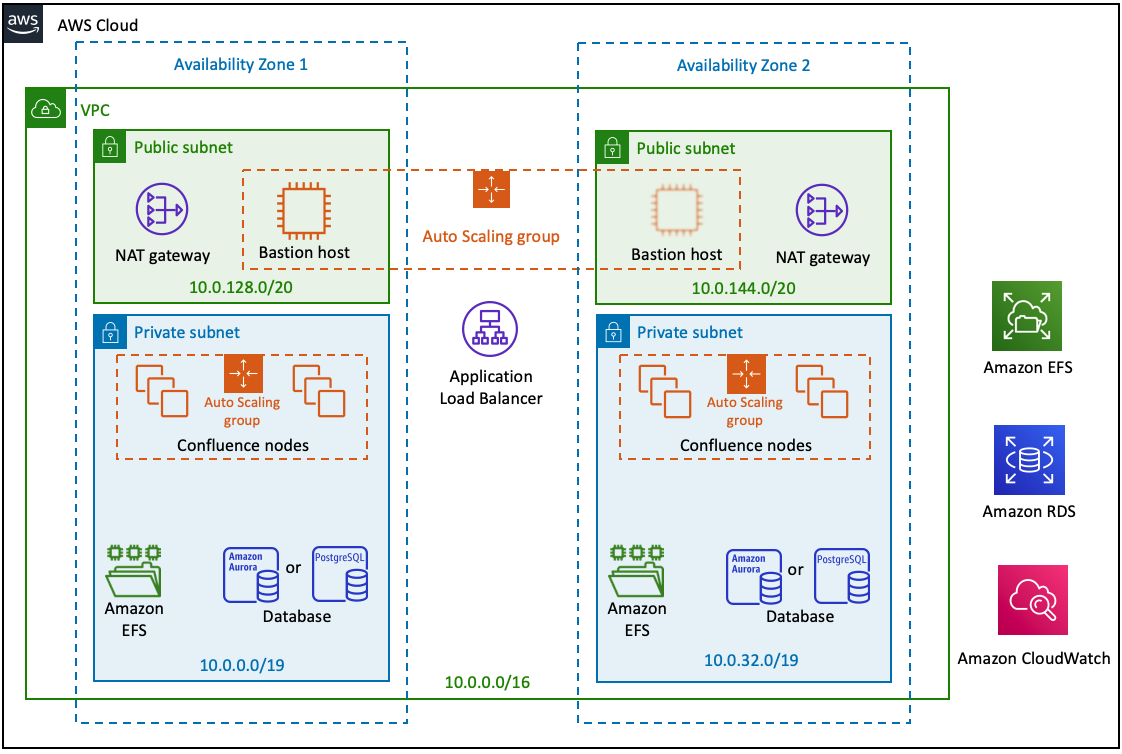
2.1 Bastion host
This host enables secure access to Confluence Data Center without exposing it to the internet. For more information, see Bastion Hosts.
2.2 Amazon Application Load Balancer
When deploying Confluence on AWS, you need to use an Application Load Balancer (ALB). The Quick Start configures the ALB as a load balancer and SSL-terminating reverse proxy.
2.3 Atlassian Standard Infrastructure
The AWS Quick Starts for Jira, Confluence, and Bitbucket all use the Atlassian Standard Infrastructure (ASI). The ASI is a highly available, secure virtual private cloud (VPC) specifically customized to host Atlassian Data Center products on AWS. The ASI contains basic networking components required by Confluence Data Center, and makes it easier to integrate multiple Atlassian Data Center products under a shared infrastructure. The following diagram shows the different components set up by the ASI:

2.4 Clustered application deployment
One of the key components of a Confluence Data Center infrastructure is a clustered application deployment. Clustering provides your Confluence application with better performance and high availability.
Confluence Data Center Technical Overview lays out all the benefits and requirements of clustering for Confluence. The AWS Quick Start for Confluence Data Center simplifies the configuration of your cluster, allowing you to simply choose what nodes to use and setting up the rest as needed.
2.5 Highly available database
The Quick Start allows you to deploy Confluence Data Center with either of two supported databases: Amazon RDS for PostgreSQL (default) or Amazon Aurora Features: PostgreSQL-Compatible Edition. You can configure either one with high availability using its own built-in failover features.
2.6 Amazon Elastic File System (EFS)
Confluence Data Center uses a shared file system to store artifacts like attachments, avatars, icons, import/export files, and plugins in a common location accessible to all Confluence nodes. The Quick Start architecture implements the shared file system by using the highly available Amazon Elastic File System (Amazon EFS) service.
2.7 Amazon CloudWatch
By default, Amazon CloudWatch will also collect and store logs from each node into a single, central source. This centralized logging allows you to search and analyze your deployment's log data more easily and effectively. See Analyzing Log Data with CloudWatch Logs Insights and Search Log Data Using Filter Patterns for more information.
Amazon CloudWatch provides basic logging and monitoring, but also costs extra. To help reduce the cost of your deployment, you can disable logging or turn off Amazon CloudWatch integration during deployment.
To download your log data (for example, to archive it or analyze it outside of AWS), you’ll have to export it first to S3. From there, you can download it. See Exporting Log Data to Amazon S3 for details.
2.8 Synchrony
By default, the Quick Start will deploy Synchrony as managed by Confluence. This allows you to install Synchrony on your application nodes, and Confluence will manage it for you. See Possible Confluence and Synchrony Configurations for more details.
back to Reference architecture
3. Choosing the right settings for your deployment
The Quick Start simplifies the deployment process by choosing the right settings for most infrastructure components. The following sub-sections guide you through configuring the settings that help tweak it to fit your organization's size. It's best to decide now what settings to use, as this will help streamline the deployment process.
3.1 Database engine
The Quick Start allows you to choose between the following two supported databases, both of which also feature high availability:
- Amazon RDS for PostgreSQL (default): you can deploy this as a primary database instance replicating to a standby instance hosted in a different AZ. Should the primary database instance fail, Amazon RDS will perform an automatic failover to the replica. For related information about high availability with Amazon RDS, see Multi-AZ Deployments.
- Amazon Aurora Features: PostgreSQL-Compatible Edition: like Amazon RDS, you can have a primary database instance (a "writer" node) replicating to a standby (a "reader" node) in a different AZ. However, you can improve your database's reliability by increasing the number of reader nodes.
Either database will be deployed with a configuration fully supported by Atlassian. You'll need to enable Multi-AZ deployment to enable high availability.
3.2 Application and database nodes
Infrastructure recommendations for enterprise Confluence instances on AWS lays out the recommended node configurations (instance type and number) to use for the application and database. These recommendations are based on robust performance tests we ran for different Confluence Data Center load profiles.
Enterprise-scale organizations are typically Large or XLarge; use the table below to see where your existing instance's size fits based on your metrics:
Metric | Large | XLarge |
|---|---|---|
| Content (all versions) | 2.5 million to 10 million | 10 million to 25 million |
| Total Spaces | 2,500 to 5,000 | 5,000 to 50,000 |
| Local users | 10,000 to 100,000 | 100,000 to 250,000 |
| HTTP calls per hour | 350,000 to 700,000 | 700,000 to 1,000,000 |
For extra help on retrieving your existing deployment's metrics and figuring out your overall size, see Confluence Data Center load profiles.
After finding out whether you're Large or XLarge, note the type of node configuration you'll need for your infrastructure. Each node configuration offers different benefits, and in our own internal tests they all performed with an Apdex of 0.8 or above. This is the same target Apdex we use when assessing and managing the performance of our own Confluence deployments within Atlassian.
Test-based recommendations
Some of the recommendations we provide here are based on test results, and are useful as a baseline for the node configuration you'll need. Your own performance results depend on many factors such as 3rd-party apps, data, traffic, or instance type. Hence, the target Apdex we use might not be replicable for your environment. Read through our test methodology if you want to understand the basis for these recommended configurations.
3.2.1 Large
| Node configuration | Application nodes | Database node | |
|---|---|---|---|
| RDS | Aurora | ||
| Performance | c5.4xlarge x 2 | db.m5.2xlarge | db.r5.2xlarge |
| Stability | c5.2xlarge x 4 | db.m5.xlarge | db.r5.xlarge |
| Low cost | c5.2xlarge x 3 | db.m5.xlarge | db.r5.xlarge |
The Performance option offered the best Apdex among all the configurations we tested. Our benchmarks show that it maintained an Apdex above 0.8 even when it lost one node.
The Stability and Low cost options offer a good balance between price, fault tolerance, and performance. You'll notice that they both use the same virtual machine types – the Stability option just has an additional application node. The Stability option can afford to lose more nodes before going completely offline, but the Low cost option costs less. Any performance difference between the two is negligible.
3.2.2 XLarge
| Node configuration | Application nodes | Database node | |
|---|---|---|---|
| RDS | Aurora | ||
| Stability | c5.4xlarge x 4 | db.m5.2xlarge | db.r5.2xlarge |
| Low cost | c5.4xlarge x 3 | db.m5.2xlarge | db.r5.2xlarge |
In our benchmarks, the Stability configuration maintained acceptable performance (that is, Apdex above 0.8) even after losing one application node. At four application nodes, it is more fault tolerant overall than the Low cost configuration.
Both Stability and Low cost configurations are identical except for the number of nodes. Their Apdex scores don't differ much either. The Low cost configuration is fairly fault-tolerant, in that it can afford to lose 3 nodes before the service goes offline. However, our tests show that if the Low cost configuration loses one node, the Apdex dipped below 0.8.
3.3 HTTPS setup
For added security, we strongly recommend that you enable HTTPS. Proxy and HTTPS setup for Confluence outlines the requirements for doing so, but the Quick Start simplifies this process by just asking you for a valid certificate. You have two options for getting a certificate:
Option 2: Alternatively, you can obtain a valid certificate issued by a trusted Certificate Authority. Once you have a certificate, you'll need to import it into AWS Certificate Manager.
3.4 Check app compatibility
By default, the Quick Start deploys Confluence Data Center 6.13 (the latest Long Term Support release). You need to check if apps you want to install are compatible with your chosen Confluence version.
back to Choosing the right settings for your deployment
4. Using the AWS Quick Start for Confluence Data Center
This section will guide you through an end-to-end deployment. This involves deploying a new ASI, and then deploying Confluence Data Center into it. This ASI can serve as the foundational network stack for all other Atlassian Data Center products, should you also choose to deploy them (and integrate with Confluence).
Quick Start Guide
The following steps are taken from Confluence Data Center on the AWS Cloud Quick Start Reference Deployment. We streamlined the steps to help make it easier for you.
Step 1: Choose an AWS Region
You'll need to choose a region that supports Amazon Elastic File System (EFS). These regions are:
- Americas
- Northern Virginia
- Ohio
- Oregon
- Northern California
- Montreal
- Europe/Middle East/Africa
- Ireland
- Frankfurt
- London
- Paris
- Asia Pacific
- Singapore
- Tokyo
- Sydney
- Seoul
- Mumbai
This list was last updated on .
The services offered in each region change from time to time. If your preferred region isn't on this list, check the Regional Product Services table in the AWS documentation to see if it already supports EFS.
Even though you can deploy our Data Center products on AWS GovCloud, we don’t test or verify our AWS Quick Starts on the AWS GovCloud environment and can’t provide any support.
Step 2: Prepare your AWS account
Once you've chosen an AWS Region for your deployment, you'll need to prepare your AWS accordingly:
- If you don’t already have an AWS account, create one at https://aws.amazon.com by following the on-screen instructions.
- Use the region selector in the navigation bar to choose the AWS Region where you want to deploy.
- (Optional) If you plan to provision a Bastion host, create a key pair in your preferred region.
If necessary, request a service limit increase for the EC2 t3.medium instance type. You might need to do this if you already have an existing deployment that uses this instance type, and you think you might exceed the default limit with this reference deployment.
Step 3: Import an SSL certificate
If you obtained a valid certificate issued by a trusted Certificate Authority, you'll need to import it using the AWS Management Console:
Open the AWS Certificate Manager (ACM).
Choose Import a certificate.
Do the following:
For Certificate body, paste the PEM-encoded certificate to import.
For Certificate private key, paste the PEM-encoded, unencrypted private key that matches the certificate's public key.
Important
Currently, Services Integrated with AWS Certificate Manager support only the
RSA_1024andRSA_2048algorithms.(Optional) For Certificate chain, paste the PEM-encoded certificate chain.
Choose Review and import.
Review the information about your certificate, then choose Import.
From the AWS Certificate Manager, you can get the Amazon Resource Name (ARN) of your certificate. You'll use this later on in Step 5: Customize your deployment.
Step 4: Launch the Quick Start
You are responsible for the cost of the AWS services used while running this Quick Start reference deployment. For full details, see the pricing pages for each AWS service you will be using in this Quick Start. Prices are subject to change.
Log in to your AWS account and click here to launch the Quick Start. An end-to-end deployment (that is, deploying with a new ASI) should take around 40 minutes.
The fastest way to launch the Quick Start is directly from its AWS S3 bucket. However, when you do, any updates we make to the Quick Start templates will propagate directly to your deployment. These updates sometimes involve adding or removing parameters from the templates. This could introduce unexpected (and possibly breaking) changes to your deployment.
For production environments, we recommend that you copy the Quick Start templates into your own S3 bucket. Then, launch them directly from there. Doing this gives you control over when to propagate Quick Start updates to your deployment.
- Clone the Quick Start templates (including all of its submodules) to your local machine. From the command line, run:
git clone --recurse-submodules https://github.com/aws-quickstart/quickstart-atlassian-confluence.git - (Optional) The Quick Start templates repository uses the directory structure required by the Quick Start interface. If needed (for example, to minimize storage costs), you can remove all other files except the following:
quickstart-atlassian-confluence├─ submodules│ └─ quickstart-atlassian-services│ └─ templates│ └── quickstart-vpc-for-atlassian-services.yaml└─ templates├── quickstart-confluence-master-with-vpc.template.yaml└── quickstart-confluence-master.template.yaml Install and set up the AWS Command Line Interface. This tool will allow you to create an S3 bucket and upload content to it.
Create an S3 bucket in your region:
aws s3 mb s3://<bucket-name> --region <AWS_REGION>
At this point, you can now upload the Quick Start templates to your own S3 bucket. Before you do, you'll have to choose which Quick Start template you’ll be using:
quickstart-confluence-master-with-vpc.template.yaml: use this for deploying into a new ASI (end-to-end deployment).quickstart-confluence-master.template.yaml: use this for deploying into an existing ASI.
- In the template you’ve chosen, the
QSS3BucketNamedefault value is set toaws-quickstart. Replace this default with the name of your S3 bucket. - Go into the parent directory of your local clone of the Quick Start templates. From there, upload all the files in local clone to your S3 bucket:
aws s3 cp quickstart-atlassian-confluence s3://<bucket-name> --recursive --acl public-read - Once you’ve uploaded everything, you’re ready to deploy your production stack from your S3 bucket. Go to Cloudformation → Create Stack. When specifying a template, paste in the Object URL of the Quick Start template you’ll be using.
Step 5: Customize your deployment
On the Specify Details page, change the stack name if needed. Review the parameters for the template and customize the deployment.
The first parameter to set is which product version to use (ConfluenceVersion).
However, if you are planning to migrate data from an existing deployment, use its version instead. This helps avoid any risks that could result in inconsistencies or data loss. You can always upgrade later on after you've completed the migration process.
The following table describes the other options that will allow you to implement the choices you made earlier in Choosing the right settings for your deployment:
| Cluster Nodes | ||
|---|---|---|
| Parameter label (name) | Default | Description |
| Cluster node instance type ( ClusterNodeInstanceType) | c5.2xlarge | Choose the application node type that matches your size and preferred node configuration in Application and database nodes. For example, if you prefer Performance for Large, choose c5.4xlarge. |
| Maximum number of cluster nodes ( ClusterNodeMax) | 1 | Both of these parameters default to 1. Do not change this default, even if the Application and database nodes recommends a specific number of nodes. You'll need to deploy Confluence Data Center with one one application node, and then scale it up later after configuring Confluence. |
| Minimum number of cluster nodes ( ClusterNodeMin) | ||
| Database | ||
| Parameter label (name) | Default | Description |
Database engine (DBEngine) | PostgreSQL | You can choose between the default Amazon RDS database or Amazon Aurora. |
Database instance class (DBInstanceClass) | db.m4.large | Choose the database node type that matches your size and preferred node configuration in Application and database nodes. For example, if you prefer Performance for Large, choose m4.2xlarge (for Amazon RDS) or db.r4.xlarge (for Amazon Aurora). |
| Master (admin) password ( DBMasterUserPassword) | N/A | The password for the master (postgres) account. This password should be 8-128 alphanumeric characters and include uppercase letters, lowercase letters, numbers, and at least 1 symbol (excluding /, @, &, ",'). |
| Enable RDS Multi-AZ deployment ( DBMultiAZ) | True | By default, high availability features for your chosen database will be enabled. Do not change this setting. |
| Application user database password ( DBPassword) | N/A | The password for the database user account. This password should be 8-128 alphanumeric characters and include uppercase letters, lowercase letters, numbers, and at least 1 symbol (excluding /, @, &, ",'). |
| Bastion host provisioning | ||
| Parameter label (name) | Default | Description |
Use/Deploy Bastion host (BastionHostRequired) | true | Depending on which template you choose, this controls whether to provision a Bastion host or use an existing one. Set this to |
| Networking | ||
| Parameter label (name) | Default | Description |
SSL certificate ARN (SSLCertificateARN) | N/A | Enter the Amazon Resource Name (ARN) of the certificate from Step 2: Import an SSL certificate. This will enable SSL on Confluence Data Center deployment, using your certificate to secure connections. |
Availability Zones (AvailabilityZones) | N/A | The list of Availability Zones to use for the subnets in the ASI. The Quick Start uses two Availability Zones from your list and preserves the logical order you specify. |
Permitted IP range (CidrBlock) | N/A | Enter the CIDR IP range that should be permitted access Atlassian services. We recommend that you set this value to a trusted IP range. For example, you might want to grant only your corporate network access to the software. |
SSH Key Pair Name (KeyPairName) | N/A | Choose the key pair you created in Step 2: Prepare your AWS account. This public/private key pair will allow you to connect to your nodes via the Bastion host. |
| Application tuning | ||
| Parameter label (name) | Default | Description |
| Confluence Heap Size Override ( JvmHeapOverride) | N/A | Set this to 8g. This is the same heap size used in the tests that form the basis for our recommendations. |
- On the Review page, review and confirm the template settings. Under Capabilities, check the following options:
- I acknowledge that AWS CloudFormation might create IAM resources with custom names.
- I acknowledge that AWS CloudFormation might require the following capability: CAPABILITY_AUTO_EXPAND
- Choose Create to deploy the stack.
- Monitor the status of the stack. When the status is
CREATE_COMPLETE, your deployment is ready for configuration. - Use the URLs displayed in the Outputs tab for the stack to view the resources that were created.
Step 5: Configure Confluence Data Center
The Quick Start deploys Confluence Data Center with a single application node (Auto Scaling group of min=1 and max=1).
- Choose the URL displayed in the Outputs tab of the AWS CloudFormation stack to go to the Confluence setup screen. If you get an HTTP Error 503 response when you access the URL, it means that Confluence Data Center is still loading. This is normal, and you should wait 2-3 minutes before trying again.
- In the Get add-ons page of Confluence setup, choose Next. You can enable add-ons after setup if you wish.

- On the License key page, enter a valid Confluence Data Center license, and then choose Next. If you don’t have a valid license for Confluence Data Center, choose Get an evaluation license. You’ll be taken to my.atlassian.com where you can generate an evaluation license. You can’t use a Confluence Server license with this Quick Start.

- On the Load Content page, choose Example Site.

- On the Configure User Management page, choose Manage Users and Groups within Confluence.

- To set up Confluence Data Center, you need to create an administrator account and password. The administrator account has full access to all data in Confluence, so we highly recommend that you choose a strong password for this account. Enter the administrator’s user details, and then choose Next.

You should now see the Setup Successful page. Choose Further configuration to go directly to the Confluence administration console, and log in with the administrator user account you created in the previous step.
back to Using the AWS Quick Start for Confluence Data Center
5. Scaling up your deployment
After fully deploying your Confluence Data Center and installing the apps you need, you can now scale it up. This involves increasing the number of nodes used by the application cluster (at present, it only has one node).
Open the Confluence administration page of your new deployment. You can access this page using the URL displayed in the Outputs tab of the AWS CloudFormation stack. From there, go to Clustering in the administration console sidebar. You should see a page similar to the following screen, which shows that the node is ready for clustering.

Step 1: Scale the number of application nodes
Start with increasing the number of application nodes (as recommended for your choice in Application database nodes).
- Sign in to the AWS Management Console, use the region selector in the navigation bar to choose the AWS Region for your deployment, and open the AWS CloudFormation console at https://console.aws.amazon.com/cloudformation/.
- Click the Stack name of your deployment. This will display your deployment's Stack info. From there, click Update.
- On the Select Template page, leave Use current template selected, and then choose Next.
- On the Specify Details page, go to the Cluster nodes section of Parameters. From there, set your desired number of application nodes in the following parameters:
- Minimum number of cluster nodes
- Maximum number of cluster nodes
- Click through to update the stack.
After the stack update finishes, you should now have a static number of cluster nodes.
Disabled Auto Scaling
Since your cluster has the same minimum and maximum number of nodes, Auto Scaling is effectively disabled.
Setting different values for the minimum and maximum number of cluster nodes enables Auto Scaling. This dynamically scale the size of your cluster based on system load.
However, we recommend that you keep Auto Scaling disabled. At present, Auto Scaling can't effectively address sudden spikes in your deployment's system load. This means that you'll have to manually re-scale your cluster depending on the load.
In Confluence Data Center, go to Administration menu ![]() , then General Configuration > General Configuration > Clustering to confirm that the additional nodes have formed a cluster.
, then General Configuration > General Configuration > Clustering to confirm that the additional nodes have formed a cluster.
Step 2: Enable collaborative editing (if needed)
Confluence Data Center 6.13 enables Collaborative editing by default. However, it's disabled on older versions of Confluence Data Center. If it is, you’ll need to manually enable it.
- In Confluence Data Center, go to Administration menu
 , then General Configuration> General Configuration > Collaborative editing, and verify that it is off.
- On the Collaborative editing page, choose the Change Mode button, choose On, and then choose Change.

- Verify that collaborative editing is on and that the status of Synchrony is Running.

back to Scaling up your deployment
6. Enhancing and securing your deployment
After scaling your deployment to the right size, you can now install any apps you need to enhance Confluence's functionality. This is also a good time to further secure your deployment – right before you let users start accessing it.
6.1 Installing apps
For alternative methods of installing apps, see Installing Marketplace apps. Refer to Using the Universal Plugin Manager for more related information.
6.2 Improving security
By importing an SSL certificate and enabling SSL, you've taken the first step in securing connections to your Confluence Data Center deployment. You can further enhance your deployment's security by following our Best Practices for Configuring Confluence Security.
For a more detailed list of security resources, see Configuring Confluence Security. In particular, we recommend that you read and understand the following:
- Connecting to LDAP or Jira applications or Other Services via SSL
- Configuring Secure Administrator Sessions
We also recommend that you enable Single Sign-On (SSO) via Crowd. SSO offers a great balance between security, manageability, and convenience.
6.3 Migrating from an existing Confluence deployment
If you have an existing Confluence deployment, you can now migrate your users and data across. For more information about the migration process, see Migrating your existing Confluence site to AWS.
back to Enhancing and securing your deployment
7. Maintaining your infrastructure
- AWS Management Console: allows you to interface with a broad collection of other service consoles.
- AWS Systems Manager: lets you view and control your infrastucture on AWS.
Refer to the AWS documentation on both services for more details.
7.1 Connecting to your nodes via SSH
You can perform node-level configuration or maintenance tasks on your deployment through the AWS Systems Manager Sessions Manager. This browser-based terminal lets you access your nodes without any SSH Keys or a Bastion host. For more information, see Getting started with Session Manager.
Access via Bastion host
You can also access your nodes via a Bastion host (if you deployed one). To do this, you'll need your SSH private key file (the PEM file you specified for the Key Name parameter). Remember, this key can access all nodes in your deployment, so keep this key in a safe place.
The Bastion host acts as your "jump box" to any instance in your deployment's internal subnets. That is, access the Bastion host first, and from there access any instance in your deployment.
The Bastion host's public IP is the BastionPubIp output of your deployment's ATL-BastionStack stack. This stack is nested in your deployment's Atlassian Standard Infrastructure (ASI). To access the Bastion host, use ec2-user as the user name, for example:
ssh -i keyfile.pem ec2-user@<BastionPubIp>
The ec2-user has sudo access. SSH access is by root is not allowed.
The keyfile.pem private key should be the same one you created earlier in Step 2: Prepare your AWS account of Using the AWS Quick Start for Confluence Data Center.
7.2 Backing up and restoring
Refer to the following resources for information on backing up and restoring Confluence Data Center:
If your organization has other backup tools at your disposal, test them first on your new Confluence Data Center. Some tools may not work well with large data sets.
7.3 Upgrading
Here's some useful advice for upgrading your deployment:
- Before upgrading to a later version of Confluence Data Center, check if your apps are compatible with that version. Update your apps if needed. For more information about managing apps, see Using the Universal Plugin Manager.
- If you need to keep Confluence Data Center running during your upgrade, we recommend using read-only mode for site maintenance. Your users will be able to view pages, but not create or change them.
- We strongly recommend that you perform the upgrade first in a staging environment before upgrading your production instance. Create a staging environment for upgrading Confluence provides helpful tips on doing so.
When the time comes to upgrade your deployment to a later Long Term Support release, perform the following steps:
Step 1: Terminate all running Confluence Data Center application nodes
Set the number of application nodes used by the Confluence Data Center stack to 0. Then, update the stack.
If your deployment uses standalone Synchrony, scale the number of Synchrony nodes to 0 at the same time.
Step 2: Update the version used by your Confluence Data Center stack
Set the number of application nodes used by Confluence Data Center to 1. Configure it to use the version you want. Then, update the stack again.
If your deployment uses standalone Synchrony, scale the number of Synchrony nodes to 1 at the same time.
Step 3: Scale up the number of application nodes
You can now scale up your deployment to your original number of application nodes. You can do so for your Synchrony nodes as well, if you have standalone Synchrony. Refer back to Step 1 for instructions on how to re-configure the number of nodes used by your cluster.
Confluence Data Center in AWS currently doesn't allow upgrading an instance without some downtime in between the last cluster node of the old version shutting down and the first cluster node on the new version starting up. Make sure all existing nodes are terminated before launching new nodes on the new version.
7.4 Monitoring
Monitoring is crucial in maintaining the integrity and continued optimal operation of Confluence Data Center. Tracking the health of Confluence helps you prepare for usage growth or re-configuration. Confluence Data Center sample deployment and monitoring strategy explains how we monitor one of our own production deployments.
It's also important to choose tools that can monitor all the parameters you need to track. Focus on building enough data to identify trends: this will be more informative than studying performance snapshots when deciding how to best optimize your application over time. We compiled a list of tools for monitoring your Data Center application.
7.5 Re-scaling your infrastructure
If you can identify any periods of high and low load, you can schedule the application node cluster to scale accordingly. See Scheduled Scaling for Amazon EC2 Auto Scaling for more information.
back to Maintaining your infrastructure
8. Atlassian Enterprise Support
Over time, we may change our recommendations depending on new tests, insights, or improvements in Confluence Data Center. Contact an Atlassian Technical Account Manager for more guidance on choosing the right configuration for your Data Center deployment.
Our Premier Support team performs health checks by meticulously analyzing your deployment and logs to ensure that your infrastructure configuration is suitable for your Data Center application. If the health check process reveals any gaps or areas of improvement, Premier Support will recommend possible changes.
Remember, the AWS Quick Start template used in the preceding deployment steps is no longer supported or maintained by Atlassian. We strongly recommend deploying your Data Center products on a Kubernetes cluster using our Helm charts for a more efficient and robust infrastructure and operational setup.