Deploy Data Center products with the AWS Quick Start template

The AWS Quick Start template as a method of deployment is no longer supported by Atlassian. You can still use the template, but we won't maintain or update it.

We recommend deploying your Data Center products on a Kubernetes cluster using our Helm charts for a more efficient and robust infrastructure and operational setup. Learn more about deploying on Kubernetes.

AWS now recommends switching launch configurations, which our AWS Quick Start template uses, to launch templates. We won’t do this switch, however, as we’ve ended our support for the AWS Quick Start template. This means you're no longer able to create launch configurations using this template.

If you decide to deploy your Data Center instance in a clustered environment, consider using Amazon Web Services (AWS). AWS allows you to scale your deployment elastically by resizing and quickly launching additional nodes, and provides a number of managed services that work out of the box with Data Center products. These services make it easier to configure, manage, and maintain your deployment's clustered infrastructure. Learn more about Data Center

Non-clustered VS clustered environment

A single node is adequate for most small or medium size deployments, unless you need specific features that require clustering (for example high availability or zero-downtime upgrades).

If you have an existing Server installation, you can still use its infrastructure when you upgrade to Data Center. Many features exclusive to Data Center (like SAML single sign-onself-protection via rate limiting, and CDN support) don't require clustered infrastructure. You can start using these Data Center features by simply upgrading your Server installation’s license.

For more information on whether clustering is right for you, check out Data Center architecture and infrastructure options.

Deploying your Data Center instance in a cluster using the AWS Quick Start

The simplest way to deploy your entire Data Center cluster in AWS is by using the Quick Start. The Quick Start launches, configures, and runs the AWS compute, network, storage, and other services required to deploy a specific workload on AWS, using AWS best practices for security and availability.

The Quick Start provides two deployment options, each with its own template. The first option deploys the Atlassian Standard Infrastructure (ASI) and then provisions either your Data Center product into this ASI. The second option only provisions your Data Center product on an existing ASI.

The ASI is a virtual private cloud (VPC) that contains the components required by all Atlassian Data Center applications. For more information, see Atlassian Standard Infrastructure (ASI) on AWS.

The deployment consists of the following components:

Note that the deployment infrastructure is different for Bitbucket. Check out the details below:

Bitbucket-specific deployment infrastructure
  • Instances/nodes: One or more Amazon Elastic Cloud (EC2) instances as cluster nodes, running Bitbucket.

  • Load balancer: An Amazon Elastic Load Balancer (ELB), which works both as load balancer and SSL-terminating reverse proxy.

  • Database: Your choice of shared database instance – Amazon RDS or Amazon Aurora.

  • Storage: A shared NFS server to store repositories in a common location accessible to all Bitbucket nodes.

  • Amazon CloudWatch: Basic monitoring and centralized logging through Amazon's native CloudWatch service.

  • An Amazon OpenSearch Service domain: For code and repository search.

  • Instances/nodes: One or more Amazon Elastic Cloud (EC2) instances as cluster nodes, running your Data Center instance.

  • Load balancer: An Application Load Balancer (ALB), which works both as a load balancer and SSL-terminating reverse proxy.

  • Amazon EFS: A shared file system for storing artifacts in a common location, accessible to multiple nodes. The Quick Start architecture implements the shared file system using the highly available Amazon Elastic File System (Amazon EFS) service.

  • Database: Your choice of shared database instance—Amazon RDS or Amazon Aurora.

  • Amazon CloudWatch: Basic monitoring and centralized logging through Amazon's native CloudWatch service.

Confluence will use the Java Runtime Engine (JRE) that is bundled with Confluence (/opt/atlassian/confluence/jre/), and not the JRE that is installed on the EC2 instances (/usr/lib/jvm/jre/). 

Learn more about Jira products on AWS, Confluence on AWS, Bitbucket on AWS, and Crowd on AWS.

Advanced customizations

To get you up and running as quickly as possible, the Quick Start doesn't allow the same level of customization as a manual installation. You can, however, further customize your deployment through the variables in the Ansible playbooks we use.

All of our AWS Quick Starts use Ansible playbooks to configure specific components of your deployment. These playbooks are available publicly on this repository: https://bitbucket.org/atlassian/dc-deployments-automation.

You can override these configurations by using Ansible variables. Refer to the repository’s README file for more information.

Note about customization in Jira

Jira allows you to apply advanced settings through the jira-config.properties file. You can also use the same file to apply the same settings to an existing Quick Start deployment. Learn how to customize the jira-config.properties file

Launching the Quick Start from your own S3 bucket (recommended)

The fastest way to launch the Quick Start is directly from its AWS S3 bucket. However, when you do, any updates we make to the Quick Start templates will propagate directly to your deployment. These updates sometimes involve adding or removing parameters from the templates. This could introduce unexpected (and possibly breaking) changes to your deployment.

For production environments, we recommend that you copy the Quick Start templates into your own S3 bucket. Then, launch them directly from there. Doing this gives you control over when to propagate Quick Start updates to your deployment.

To launch the Quick Start:

Jira-specific instructions
  1. Clone the Quick Start templates (including all of its submodules) to your local machine. From the command line, run:

    git clone --recurse-submodules https://github.com/aws-quickstart/quickstart-atlassian-jira.git

  2. (Optional) The Quick Start templates repository uses the directory structure required by the Quick Start interface. If needed (for example, to minimize storage costs), you can remove all other files except the following:

    quickstart-atlassian-jira 
    ├─ submodules 
    │ └─ quickstart-atlassian-services 
    │ └─ templates 
    │ └── quickstart-vpc-for-atlassian-services.yaml 
    └─ templates 
    ├── quickstart-jira-dc-with-vpc.template.yaml 
    └── quickstart-jira-dc.template.yaml

  3. Install and set up the AWS Command Line Interface. This tool will allow you to create an S3 bucket and upload content to it.

  4. Create an S3 bucket in your region:

    aws s3 mb s3://<bucket-name> --region <AWS_REGION>

At this point, you can now upload the Quick Start templates to your own S3 bucket. Before you do, you'll have to choose which Quick Start template you’ll be using:

  • quickstart-jira-dc-with-vpc.template.yaml: use this for deploying into a new ASI (end-to-end deployment).

  • quickstart-jira-dc.template.yaml: use this for deploying into an existing ASI.

  1. In the template you’ve chosen, the QSS3BucketName default value is set to aws-quickstart. Replace this default with the name of your S3 bucket.

  2. Go into the parent directory of your local clone of the Quick Start templates. From there, upload all the files in local clone to your S3 bucket:

    aws s3 cp quickstart-atlassian-jira s3://<bucket-name> --recursive --acl public-read
  3. Once you’ve uploaded everything, you’re ready to deploy your production stack from your S3 bucket. Go to Cloudformation > Create Stack. When specifying a template, paste in the Object URL of the Quick Start template you’ll be using.

Confluence-specific instructions
  1. Clone the Quick Start templates (including all of its submodules) to your local machine. From the command line, run:

    git clone --recurse-submodules https://github.com/aws-quickstart/quickstart-atlassian-confluence.git

  2. (Optional) The Quick Start templates repository uses the directory structure required by the Quick Start interface. If needed (for example, to minimize storage costs), you can remove all other files except the following:

    quickstart-atlassian-confluence 
    ├─ submodules 
    │ └─ quickstart-atlassian-services 
    │ └─ templates 
    │ └── quickstart-vpc-for-atlassian-services.yaml 
    └─ templates 
    ├── quickstart-confluence-master-with-vpc.template.yaml 
    └── quickstart-confluence-master.template.yaml

  3. Install and set up the AWS Command Line Interface. This tool will allow you to create an S3 bucket and upload content to it.

  4. Create an S3 bucket in your region:

    aws s3 mb s3://<bucket-name> --region <AWS_REGION>

At this point, you can now upload the Quick Start templates to your own S3 bucket. Before you do, you'll have to choose which Quick Start template you’ll be using:

  • quickstart-confluence-master-with-vpc.template.yaml: use this for deploying into a new ASI (end-to-end deployment).

  • quickstart-confluence-master.template.yaml: use this for deploying into an existing ASI.

  1. In the template you’ve chosen, the QSS3BucketName default value is set to aws-quickstart. Replace this default with the name of your S3 bucket.

  2. Go into the parent directory of your local clone of the Quick Start templates. From there, upload all the files in local clone to your S3 bucket:

    aws s3 cp quickstart-atlassian-confluence s3://<bucket-name> --recursive --acl public-read

  3. Once you’ve uploaded everything, you’re ready to deploy your production stack from your S3 bucket. Go to Cloudformation > Create Stack. When specifying a template, paste in the Object URL of the Quick Start template you’ll be using.

Bitbucket-specific instructions
  1. Clone the Quick Start templates (including all of its submodules) to your local machine. From the command line, run:

    git clone --recurse-submodules https://github.com/aws-quickstart/quickstart-atlassian-bitbucket

  2. (Optional) The Quick Start templates repository uses the directory structure required by the Quick Start interface. If needed (for example, to minimize storage costs), you can remove all other files except the following:

    quickstart-atlassian-bitbucket 
    ├─ submodules 
    │ └─ quickstart-atlassian-services 
    │ └─ templates 
    │ └── quickstart-vpc-for-atlassian-services.yaml 
    └─ templates 
    ├── quickstart-bitbucket-dc-with-vpc.template.yaml 
    └── quickstart-bitbucket-dc.template.yaml

  3. Install and set up the AWS Command Line Interface. This tool will allow you to create an S3 bucket and upload content to it.

  4. Create an S3 bucket in your region:

    aws s3 mb s3://<bucket-name> --region <AWS_REGION>

At this point, you can now upload the Quick Start templates to your own S3 bucket. Before you do, you'll have to choose which Quick Start template you’ll be using:

  • quickstart-bitbucket-dc-with-vpc.template.yaml: use this for deploying into a new ASI (end-to-end deployment).

  • quickstart-bitbucket-dc.template.yaml: use this for deploying into an existing ASI.

  1. In the template you’ve chosen, the QSS3BucketName default value is set to aws-quickstart. Replace this default with the name of your S3 bucket.

  2. Go into the parent directory of your local clone of the Quick Start templates. From there, upload all the files in local clone to your S3 bucket:

    aws s3 cp quickstart-atlassian-bitbucket s3://<bucket-name> --recursive --acl public-read

  3. Once you’ve uploaded everything, you’re ready to deploy your production stack from your S3 bucket. Go to Cloudformation > Create Stack. When specifying a template, paste in the Object URL of the Quick Start template you’ll be using.

Crowd-specific instructions
  1. Clone the Quick Start templates (including all of its submodules) to your local machine. From the command line, run:

    git clone --recurse-submodules https://github.com/aws-quickstart/quickstart-atlassian-crowd.git

  2. (Optional)The Quick Start templates repository uses the directory structure required by the Quick Start interface. If needed (for example, to minimize storage costs), you can remove all other files except the following:

    quickstart-atlassian-crowd 
    ├─ submodules 
    │  └─ quickstart-atlassian-services 
    │    └─ templates 
    │     └── quickstart-vpc-for-atlassian-services.yaml 
    └─ templates 
       ├── quickstart-crowd-dc-with-vpc.template.yaml 
       └── quickstart-crowd-dc.template.yaml

  3. Install and set up the AWS Command Line Interface. This tool will allow you to create an S3 bucket and upload content to it.

  4. Create an S3 bucket in your region:

    aws s3 mb s3://<bucket-name> --region <AWS_REGION>

At this point, you can now upload the Quick Start templates to your own S3 bucket. Before you do, you'll have to choose which Quick Start template you’ll be using:

  • quickstart-crowd-dc-with-vpc.template.yaml: use this for deploying into a new ASI (end-to-end deployment).

  • quickstart-crowd-dc.template.yaml: use this for deploying into an existing ASI.

  1. In the template you’ve chosen, the QSS3BucketName default value is set to aws-quickstart. Replace this default with the name of your S3 bucket.

  2. Go into the parent directory of your local clone of the Quick Start templates. From there, upload all the files in local clone to your S3 bucket:

    aws s3 cp quickstart-atlassian-crowd s3://<bucket-name> --recursive --acl public-read

  3. Once you’ve uploaded everything, you’re ready to deploy your production stack from your S3 bucket. Go to Cloudformation > Create Stack. When specifying a template, paste in the Object URL of the Quick Start template you’ll be using.

Amazon Aurora database for high availability

The Quick Start also allows you to deploy your Data Center instance with an Amazon Aurora clustered database (instead of RDS). 

This cluster will be PostgreSQL-compatible, featuring a primary database writer that replicates to two database readers. You can also set up the writers and readers in separate availability zones for better resiliency.

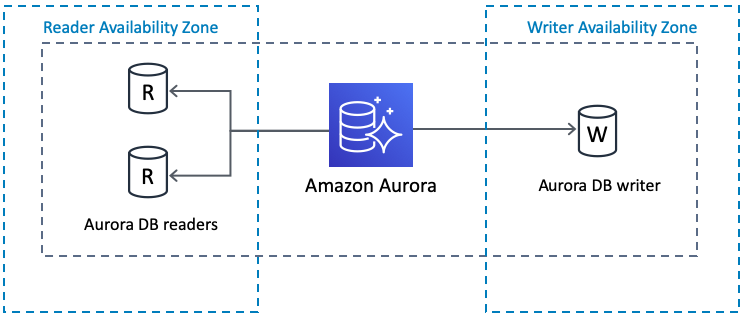
If the writer fails, Aurora automatically promotes one of the readers to take its place. For more information, see Amazon Aurora Features: PostgreSQL-Compatible Edition.

Amazon CloudWatch for basic monitoring and centralized logging

The Quick Start can also provide you with node monitoring through Amazon CloudWatch. This will allow you to track each node's CPU, disk, and network activity, all from a pre-configured CloudWatch dashboard. The dashboard will be configured to display the latest log output, and you can customize the dashboard later on with additional monitoring and metrics.

By default, Amazon CloudWatch will also collect and store logs from each node into a single, central source. This centralized logging allows you to search and analyze your deployment's log data more easily and effectively. See Analyzing Log Data with CloudWatch Logs Insights and Search Log Data Using Filter Patterns for more information.

Amazon CloudWatch provides basic logging and monitoring but also costs extra. To help reduce the cost of your deployment, you can disable logging or turn off Amazon CloudWatch integration during deployment.
tip/resting Created with Sketch. To download your log data (for example, to archive it or analyze it outside of AWS), you’ll have to export it first to S3. From there, you can download it. See Exporting Log Data to Amazon S3 for details.

Auto Scaling groups

This Quick Start uses Auto Scaling groups, but only to statically control the number of its cluster nodes. We don't recommend that you use Auto Scaling to dynamically scale the size of your cluster. Adding an application node to the cluster usually takes more than 20 minutes, which isn't fast enough to address sudden load spikes.

If you can identify any periods of high and low load, you can schedule the application node cluster to scale accordingly. See Scheduled Scaling for Amazon EC2 Auto Scaling for more information. To study trends in your organization's load, you'll need to monitor the performance of your deployment.

Customizing the AWS Quick Start's CloudFormation templates

To get you up and running as quickly as possible, the Quick Start doesn't allow the same level of customization as a manual installation. Alternatively, you can customize the CloudFormation templates used by the Quick Start to fit your needs. These templates are available from the following repository:

Supported AWS regions

Not all regions offer the services required to run Data Center products. You'll need to choose a region that supports Amazon Elastic File System (EFS). These regions are:

  • Americas

    • Northern Virginia

    • Ohio

    • Oregon

    • Northern California

    • Montreal

  • Europe/Middle East/Africa

    • Ireland

    • Frankfurt

    • London

    • Paris

  • Asia Pacific

    • Singapore

    • Tokyo

    • Sydney

    • Seoul

    • Mumbai

This list was last updated on June 20, 2019.

The services offered in each region change from time to time. If your preferred region isn't on this list, check the Regional Product Services table in the AWS documentation to see if it already supports EFS. 

Even though you can deploy our Data Center products on AWS GovCloud, we don’t test or verify our AWS Quick Starts on the AWS GovCloud environment and can’t provide any support.

Other product-specific instructions

Scaling, migrating, and upgrading Confluence Data Center on AWS

Synchrony setup in Confluence

If you have a Confluence Data Center license, two methods are available for running Synchrony:

  • Managed by Confluence (recommended)
    Confluence will automatically launch a Synchrony process on the same node, and manage it for you. No manual setup is required. 

  • Standalone Synchrony cluster (managed by you)
    You deploy and manage Synchrony standalone in its own cluster with as many nodes as you need. Significant setup is required. During a rolling upgrade, you'll need to upgrade the Synchrony separately from the Confluence cluster.

If you want simple setup and maintenance, we recommend allowing Confluence to manage Synchrony for you.  If you want full control, or if making sure the editor is highly available is essential, then managing Synchrony in its own cluster may be the right solution for your organisation. 

By default, the Quick Start will configure Synchrony to be managed by Confluence. However, you can use the Quick Start to configure standalone Synchrony. When you do, the Quick Start creates an Auto Scaling group containing one or more Amazon EC2 instances as cluster nodes, running Synchrony. Learn more about the possible Confluence and Synchrony configurations

Managed mode is only available in 6.12 and later. If you plan to deploy a Confluence Data Center version earlier than 6.12, you can only use Standalone mode. In the Quick Start, this means you should set your Collaborative editing mode to synchrony-separate-nodes.

For Large or XLarge deployments, check out our AWS infrastructure recommendations for application, Synchrony, and database sizing advice. For smaller deployments, you can use instances that meet Confluence's system requirements.  Smaller instance types (micro, small, medium) are generally not adequate for running Confluence.

Internal domain name routing with Route53 Private Hosted Zones

Even if your Confluence site is hosted on AWS, you can still link its DNS with an internal, on-premise DNS server (if you have one). You can do this through Amazon Route 53, creating a link between the public DNS and internal DNS. This will make it easier to access your infrastructure resources (database, shared home, and the like) through friendly domain names. You can make those domain names accessible externally or internally, depending on your DNS preferences.

Step 1: Create a new hosted zone

Create a Private hosted zone in Services > Route 53. The Domain Name is your preferred domain. For the VPC, use the existing Atlassian Standard Infrastructure.

Step 2: Configure your stack to use the hosted zone

Use your deployment’s Quick Start template to point your stack to the hosted zone from step 1. If you’re setting up Confluence for the first time, follow the Quick Start template as below:

  1. Under DNS (Optional), enter the name of your hosted zone in the Route 53 Hosted Zone field.

  2. Enter your preferred domain sub-domain in the Sub-domain for Hosted Zone field. If you leave it blank, we'll use your stack name as the sub-domain.

  3. Follow the prompts to deploy the stack.

If you already have an existing Confluence site, you can also configure your stack through the Quick Start template. To access this template:

  1. Go to to Services > CloudFormation in the AWS console

  2. Select the stack, and select Update Stack.

  3. Under DNS (Optional), enter the name of your hosted zone in the Route 53 Hosted Zone field.

  4. Enter your preferred domain sub-domain in the Sub-domain for Hosted Zone field. If you leave it blank, we'll use your stack name as the sub-domain.

  5. Follow the prompts to update the stack.

In either case, AWS will generate URLs and Route 53 records for the load balancer, EFS, and database. For example, if your hosted zone is my.hostedzone.com and your stack is named mystack, you can access the database through the URL mystack.db.my.hostedzone.com.

Step 3: Link your DNS server to the Confluence site’s VPC

If you use a DNS server outside of AWS, then you need to link it to your deployment’s VPC (in this case, the Atlassian Standard Infrastructure). This means your DNS server should use Route 53 to resolve all queries to the hosted zone’s preferred domain (in Step 1).

For instructions on how to set this up, see Resolving DNS Queries Between VPCs and Your Network.

If you want to deploy an internal facing Confluence site, using your own DNS server, you can use Amazon Route 53 to create a link between the public DNS and internal DNS. 

  1. In Route 53, create a Private hosted zone. For the VPC, you can use the existing Atlassian Services VPC. The domain name is your preferred domain.

  2. If you've already set up Confluence, go to Services > CloudFormation in the AWS console, select the stack, and select Update stack. (If you're setting up Confluence for the first time, follow the Quick Start template as below). 

  3. Under Other parameters, enter the name of your hosted zone in the Route 53 Hosted Zone field. 

  4. Enter your preferred sub-domain or leave the Sub-domain for Hosted Zone field blank and we'll use your stack name as the sub-domain.

  5. Follow the prompts to update the stack. We'll then generate the load balancer and EFS url, and create a record in Route 53 for each. 

  6. In Confluence, go to Administration > General configuration and update the Confluence base URL to your Route 53 domain. 

  7. Set up DNS resolution between your on-premises network and the VPC with the private hosted zone. You can do this with:

    1. an Active Directory (either Amazon Directory Service or Microsoft Active Directory)

    2. a DNS forwarder on EC2 using bind9 or Unbound.

  8. Finally, terminate and re-provision each Confluence and Synchrony node to pick up the changes.

For related information on configuring Confluence's base URL, see Configuring the Server Base URL.

Scaling up and down

To increase or decrease the number of Confluence or Synchrony cluster nodes:

  1. Sign in to the AWS Management Console, use the region selector in the navigation bar to choose the AWS Region for your deployment, and open the AWS CloudFormation console at https://console.aws.amazon.com/cloudformation/.

  2. Select the Stack name of your deployment. This will display your deployment's Stack info. From there, select Update.

  3. On the Select template page, leave Use current template selected, and then select Next.

  4. On the Specify details page, go to the Cluster nodes section of Parameters. From there, set your desired number of application nodes in the following parameters:

    1. Minimum number of cluster nodes

    2. Maximum number of cluster nodes

  5.  Continue to update the stack.

Since your cluster has the same minimum and maximum number of nodes, Auto Scaling is effectively disabled. Setting different values for the minimum and maximum number of cluster nodes enables Auto Scaling. This dynamically scale the size of your cluster based on system load.

However, we recommend that you keep Auto Scaling disabled. At present, Auto Scaling can't effectively address sudden spikes in your deployment's system load. This means that you'll have to manually re-scale your cluster depending on the load.

Vertical vs. horizontal scaling

Adding new cluster nodes, especially automatically in response to load spikes, is a great way to increase capacity of a cluster temporarily. Beyond a certain point,  adding very large numbers of cluster nodes will bring diminishing returns. In general, increasing the size of each node (i.e., "vertical" scaling) will be able to handle a greater sustained capacity than increasing the number of nodes (i.e., "horizontal" scaling), especially if the nodes themselves are small. See Infrastructure recommendations for enterprise Confluence instances on AWS for more details. See the AWS documentation for more information on auto scaling groups. 

Connecting to your nodes over SSH

You can perform node-level configuration or maintenance tasks on your deployment through the AWS Systems Manager Sessions Manager. This browser-based terminal lets you access your nodes without any SSH Keys or a Bastion host. For more information, see Getting started with Session Manager.

You can also access your nodes via a Bastion host (if you deployed one). To do this, you'll need your SSH private key file (the PEM file you specified for the Key Name parameter). Remember, this key can access all nodes in your deployment, so keep this key in a safe place.

The Bastion host acts as your "jump box" to any instance in your deployment's internal subnets. That is, access the Bastion host first, and from there access any instance in your deployment. 

The Bastion host's public IP is the BastionPubIp output of your deployment's ATL-BastionStack stack. This stack is nested in your deployment's Atlassian Standard Infrastructure (ASI). To access the Bastion host, use ec2-user as the user name, for example:

  • ssh -i keyfile.pem ec2-user@<BastionPubIp>

The ec2-user has sudo access. SSH access is by root isn't allowed.

Upgrading

Consider upgrading to a Long Term Support release (if you're not on one already). Enterprise releases get fixes for critical bugs and security issues throughout its two-year support window. This gives you the option to keep a slower upgrade cadence without sacrificing security or stability. Long Term Support releases are suitable for companies who can't keep up with the frequency at which we ship feature releases.

Here's some useful advice for upgrading your deployment:

  1. Before upgrading to a later version of Confluence Data Center, check if your apps are compatible with that version. Update your apps if needed. For more information about managing apps, see Using the Universal Plugin Manager.

  2. If you need to keep Confluence Data Center running during your upgrade, we recommend using read-only mode for site maintenance.  Your users will be able to view pages, but not create or change them. 

  3. We strongly recommend that you perform the upgrade first in a staging environment before upgrading your production instance. Create a staging environment for upgrading Confluence provides helpful tips on doing so.

As of Confluence Data Center 7.9, you can now upgrade to the next bug fix version (for example, 7.9.0 to 7.9.3) with no downtime. Follow the instructions in Upgrade Confluence without downtime.

When the time comes to upgrade your deployment, perform the following steps:

Step 1: Terminate all running Confluence Data Center application nodes

Set the number of application nodes used by the Confluence Data Center stack to 0. Then, update the stack.

If your deployment uses standalone Synchrony, scale the number of Synchrony nodes to 0 at the same time.

To udpate the stack:

  1. In the AWS console, go to Services > CloudFormation. Select your deployment’s stack to view its Stack Details.

  2. In the Stack Details screen, select Update stack.

  3. From the Select template screen, select Use current template, and select Next.

  4. You’ll need to terminate all running nodes. To do that, set the following parameters to 0:

    1. Maximum number of cluster nodes

    2. Minimum number of cluster nodes

  5. Select Next. Continue to the next pages, then apply the change using the Update button.

  6. Once the update is complete, check that all application nodes have been terminated.

Step 2: Update the version used by your Confluence Data Center stack

Set the number of application nodes used by Confluence Data Center to 1. Configure it to use the version you want. Then, update the stack again.

If your deployment uses standalone Synchrony, scale the number of Synchrony nodes to 1 at the same time.

To update the stack again:

  1. From your deployment’s Stack details screen, select Update stack again.

  2. From the Select Template screen, select Use current template, then select Next.

  3. Set the Version parameter to the version you’re updating to.

  4. Configure your stack to use one node. To do that, set the following parameters to 1:

    1. Maximum number of cluster nodes

    2. Minimum number of cluster nodes

  5. Select Next. Continue through the next pages, then apply the change using the Update button.

Step 3: Scale up the number of application nodes

You can now scale up your deployment to your original number of application nodes. You can do so for your Synchrony nodes as well, if you have standalone Synchrony. Refer back to Step 1 for instructions on how to re-configure the number of nodes used by your cluster.

Confluence Data Center in AWS currently doesn't allow upgrading an instance without some downtime in between the last cluster node of the old version shutting down and the first cluster node on the new version starting up.  Make sure all existing nodes are terminated before launching new nodes on the new version.

Backing up

We recommend you use the AWS native backup facility, which utilizes snap-shots to back up your Confluence Data Center. For more information, see AWS Backup

Migrating your existing Confluence site to AWS

After deploying Confluence on AWS, you might want to migrate your old deployment to it. To do so:

  1. Upgrade your existing site to the version you have deployed to AWS (Confluence 6.1 or later).

  2. (Optional) If your old database isn't PostgreSQL, you'll need to migrate it. See Migrating to Another Database for instructions. 

  3. Back up your PostgreSQL database and your existing <shared-home>/attachments directory.

  4. Copy your backup files to /media/atl/confluence/shared-home in your EC2 instance.  

  5. Restore your PostgreSQL database dump to your RDS instance with pg_restore.
    See Importing Data into PostgreSQL on Amazon RDS in Amazon documentation for more information on how to do this.   

Important notes

  • When you create a cluster using the CloudFormation template, the database name is confluence. You must maintain this database name when you restore, or there will be problems when new nodes are provisioned.  You will need to drop the new database and replace it with your backup. 

  • You don't need to copy indexes or anything from your existing local home or installation directories, just the attachments from your existing shared home directory.  

  • If you've modified the <shared-home>/config/cache-settings-overrides.properties file you may want to reapply your changes in your new environment.  

  • The _copy method described in this AWS page, Importing Data into PostgreSQL on Amazon RDS, is not suitable for migrating Confluence.

Administering and securing Bitbucket Data Center on AWS

Administering Bitbucket Data Center in AWS

See Administering Bitbucket Data Center in AWS for information about performing administration tasks on a Bitbucket instance within AWS, including:

  • configuring variables when launching Bitbucket in AWS

  • maintaining, resizing, upgrading, migrating, and customizing your Bitbucket deployment in AWS

  • additional details about the components within the Bitbucket Server AMI

Securing Bitbucket within AWS

AWS is accessed over the public Internet, so it is important to apply appropriate security measures when running Bitbucket Server in AWS. See Best practices for securing Bitbucket in AWS for security guidance on a range of security topics, including Amazon Virtual Private Cloud (VPC), Security Groups, and SSL.

Performance guidelines

To get the best performance out of your Bitbucket deployment in AWS, it's important not to under-provision your instance's CPU, memory, or I/O resources. Whether you choose to deploy Bitbucket Data Center, which offers performance gains via horizontal scaling, or a single node Bitbucket Server instance, we have specific recommendations on choosing AWS EC2 and EBS settings for best performance per node.

If you are using the CloudFormation template, these settings are already included. Otherwise, see Infrastructure recommendations for enterprise Bitbucket instances on AWS.

Mirroring

Smart Mirroring can drastically improve Git clone speeds for distributed teams working with large repositories. For an overview of the benefits to mirroring, see Mirrors. The Bitbucket Data Center FAQ also answers many common questions about smart mirroring (and mirroring in general). 

For detailed instructions, see Set up a mirror.

Last modified on Jun 28, 2023

Was this helpful?

Yes
No
Provide feedback about this article
Powered by Confluence and Scroll Viewport.