Create an issue and a sub-task
The building blocks of any project are issues. Issues act as the packets of work that travel through their respective workflows within their projects until the work is completed.
An issue can have subtasks that can be assigned and tracked individually. You can also control issue-level security to restrict an issue to select members of your team.
On this page, you'll learn more about creating and converting issues and subtasks, and setting issue-level security. You can also import multiple issues and subtasks via the CSV import. Learn how to import multiple issues from a CSV file.
For those just getting started, head over to our admin docs to learn how to configure issue types.
Before you begin
You need the Create Issue project permission for the issue's relevant project.
Create an issue
To create an issue anywhere in Jira:
- Select Create (
 ).
). - Type a Summary for the issue.
- Complete all required fields and any other fields that you want.
- Optional: To change which fields appear when you create another issue, select Configure Fields and select and deselect the fields you want. When you next create an issue, the selected fields will be displayed.
- Optional: To create other issues with the same Project and Issue Type, select the Create another checkbox. Depending on your configuration and issue creation history, some fields may be pre-populated. Review these before creating the new issue.
- When you're finished, select Create.
When you create an issue using the global navigation bar as above, you can select the roles to which you want to restrict the issue. Learn more about restricting access to an issue.
You can quickly add multiple issues to your project from the board. To do this, select + Create in the left-most board column, complete the summary and save. However, if you have any mandatory fields for issues you create, selecting + Create will take you to the Create dialog.
Clone an issue
Clone an issue to quickly create a duplicate of it in the same project. The cloned issue contains most of the same details stored in the original issue, like the summary, affected versions, and components. Some details aren't cloned, like time logged, comments, history, and links to Confluence pages. The issue status also returns to the first step of the corresponding workflow, and the resolutions are cleared. The cloned issue can be linked to the original issue, but doesn't have to be.
To clone an issue:
- Open the issue
- Select more actions (•••) > Clone
- Optionally edit the cloned issue's Summary
- If applicable to the issue you're cloning, you can also select from these options:
- Clone subtasks to copy existing subtasks
- Clone attachments to add any existing attachments
- Clone links to add any existing linked issues
- Clone sprint values to copy across the issue's current and closed sprint values
- Select Create
Create a subtask
A subtask can be created for an issue to either split the issue into smaller chunks or to allow various aspects of an issue to be assigned to different people. If you find a subtask is holding up the resolution of an issue, you can convert the subtask to an issue, to allow it to be worked on independently. If you find an issue is really just a subtask of a bigger issue, you can also convert an issue to a subtask.
You can only create subtasks if your administrator has enabled subtasks, and has added the subtask issue type to the project's issue type scheme.
- Open the issue you'd like to be the parent issue
- Select Create subtask (
 ) under the issue summary
 - Add an issue summary and select Create
Note that when you create a subtask, the following values are inherited from the parent task:
- project
issue security level
You can customize the Create subtask screen to show the fields you use most often. To do this, select Configure Fields at the top right corner of the dialog, and use the All and Custom links to switch between the default screen and your custom settings. Your changes are saved for future use.
Work with issue types
Change the issue type in the issue view
After you create an issue, you may want to change its type to better represent the work that needs to be done. For example, you may want to turn an issue that was raised as a task into a bug.
- Open the issue you're working with
- Click the issue type icon in the top-left corner next to the issue key
- Choose the new issue type

If there are different fields in the new issue type, or if it has a different workflow, we'll open the move issue screen to complete the change.
Convert a subtask to an issue
- Navigate to the subtask issue you would like to convert.
- Select more (•••) > Convert to Issue.
- In Step 1. Select Issue Type screen, select a new issue type (i.e. a standard issue type) and select Next.
- If the subtask's current status is not an allowed status for the new issue type, Step 2. Select New Status screen is displayed. Select a new status and select Next.
- In Step 3. Update Fields screen, you will be prompted to enter any additional fields if they are required. Otherwise, you will see the message 'All fields will be updated automatically'. Select Next.
- The Step 4. Confirmation screen is displayed. If you are satisfied with the new details for the issue, select Finish.
- The issue will be displayed. You will see that it is no longer a subtask, that is, there is no longer a parent issue number displayed at the top of the screen.
Convert an issue to a subtask
- Open the issue and select on the issue type icon at the top-left of the issue
- Select Subtask from the list of available issue types
- Select the parent issue for the new subtask
You can't convert an issue to a subtask if the issue has subtasks of its own. You first need to convert the issue's subtasks to standalone issues, then you can convert them to subtasks of another issue if you need to. Subtasks can't be moved directly from one issue to another—you need to convert them to standard issues, then to subtasks of their new parent issue.
Restrict access to an issue
While we recommend working openly, there are times where you may want to restrict who can view a particular piece of work. For example, you may want to restrict who can view tasks related to sensitive financial information, hiring or other personal employment information, or security-related software engineering work.
You can restrict who can view an issue in both company-managed and team-managed projects, but the procedure is different in each.
You can't edit project permissions or roles on the Free plan for Jira Software or Jira Work Management, and you can't configure work-level security on any Free plan (including Jira Service Management). Find out more about how project permissions work in Free plans. To take advantage of Jira's powerful project permission management features, upgrade your plan.
Restrict access to an issue in a company-managed project
In company-managed projects, you can restrict access by setting the issue’s security level.
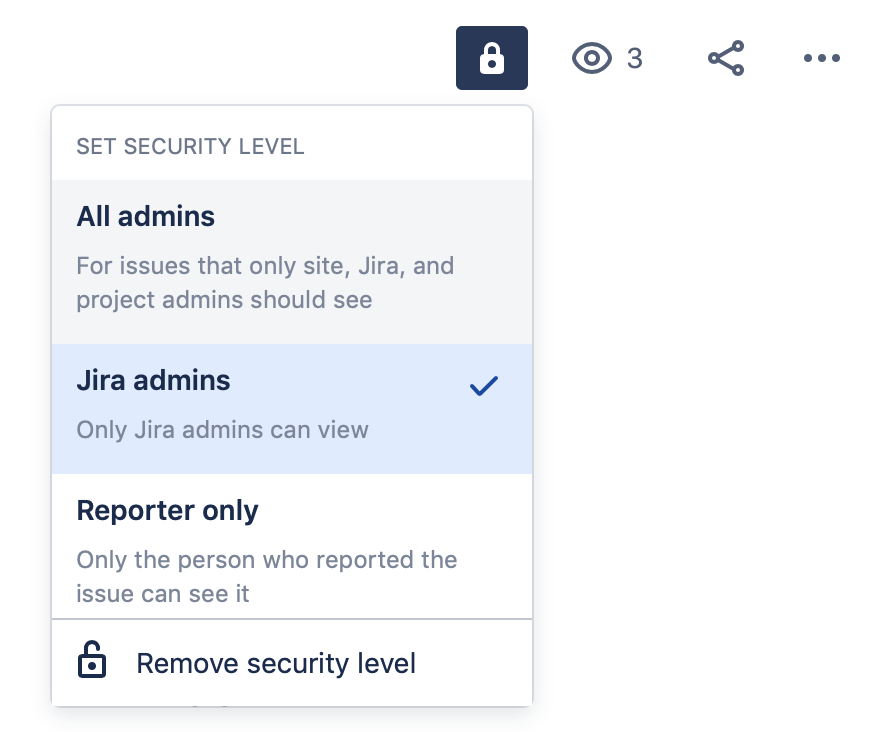
To set the issue security level on issues in company-managed projects:
Choose the lock icon at the top-right of the issue. This icon only appears if the project has a security scheme configured.
Select the desired security level.
You can also remove an issue's security level by selecting the lock icon and selecting Remove security level.
Jira admins can add, edit, or remove security levels (and their membership) through issue security schemes. Learn more about issue security schemes.
Delete an issue
To delete an issue, you must have the Delete issues permission in the project where the issue was created. Learn more about project permissions.
To delete an issue:
- Navigate to the issue and view its details.
- Select ... > Delete.