Installing and upgrading Git
This page describes how to:
The information on this page applies to installing or upgrading Git on either your local machine, or on the Bitbucket Data Center instance.
Check your version of Git
The versions of Git supported by Bitbucket are listed on Supported platforms.
You can check your current version of Git by running the git --version command in a terminal (Linux, macOS) or command prompt (Windows).
For example:
git --version
git version 2.7.4
If you don't see a supported version of Git, you'll need to either upgrade Git or perform a fresh install, as described below.
Install or upgrade Git on Linux
Use your package manager to install Git. For example, on Ubuntu 13.10, use:
sudo apt-get install gitAlternative download options are:
- Download a version of Git that is compatible with your version of Bitbucket from the Git website.
- If you are using a different Linux distribution, you may need to use a different package repository to get the latest stable version of Git. See the Git website
- If you want to use a more recent version of Git than your package manager provides, you can install Git from source. Make sure you check the version is compatible with Bitbucket.
Now check the Git version – you should see the new version of Git.
If you still can't see the expected Git version, you may need to add the Git install location to your path. Open your ~/.profile file in a text editor and add this line, where <path/to/git> is the install location for Git:
export PATH=$PATH:<path/to/git>You can use the which git command to find the install location for Git.
Install or upgrade Git on macOS
Download a version of Git that is compatible with your version of Bitbucket from the Git website.
Click on the downloaded .dmg file, then double-click the .pkg icon to run the installer. This will install the new version of Git over the existing version:

Alternatively, you can:
- Use the native Git bundled with macOS.
- Use Homebrew to download and install Git.
Now check the Git version – you should see the new version of Git.
If you still can't see the Git version, you may need to add the Git install location to your path. Open your ~/.profile file in a text editor and add this line, where <path/to/git> is the install location for Git:
export PATH=$PATH:<path/to/git>You can use the which git command to find the install location for Git.
Install or upgrade Git on Windows
Download a version of Git that is compatible with your version of Bitbucket from the Git website.
Run the Git installer, ensuring that you install into the same location as any existing Git installation. You can use where git to locate existing installations. Installing Git for Windows (msysGit) also installs a supported version of Perl.
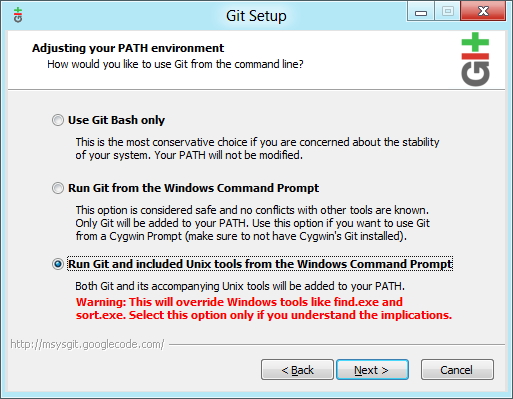
To ensure that git.exe is available in the path, choose either:
- Run Git from the Windows Command Prompt, or
- Run Git and included Unix tools from the Windows Command Prompt.
Do not select Use Git Bash only when installing or upgrading Git for the Bitbucket instance -- this will not work.
Now, check the Git version – you should see the new version of Git.
![]() msysGit is the only supported distribution when running Bitbucket on Windows. Cygwin Git is not supported and has known issues.
msysGit is the only supported distribution when running Bitbucket on Windows. Cygwin Git is not supported and has known issues.
If you have successfully installed msysGit but you receive the error "Unable to find git!" when installing Bitbucket, you should abort the installation, restart the Windows server, then restart the Bitbucket installation.
Restart Bitbucket if necessary
If you've been installing or upgrading Git for the Bitbucket instance, rather than for your local machine, you'll need to stop and restart Bitbucket so that it will pick up the upgraded version of Git. See Start and stop Bitbucket for details.