Using your Scrum backlog
The backlog of a Scrum board shows the issues for your project grouped into a backlog and sprints. In the Scrum backlog, you can create and update issues, drag and drop issues to rank them, or assign them to sprints, epics, or versions, manage epics, and more. You'd typically use the Scrum backlog when building a backlog of issues, planning a new version, and planning a sprint.
Before you begin
Different functionalities in the Scrum backlog require different permissions. For example, to start a sprint, you need to be a project administrator for all projects that match the board's filter. See Permissions overview for more information.
About the Scrum backlog
An issue will only be visible in the Scrum backlog if:
- the issue isn't a subtask,
- the issue matches the board's saved filter,
- the issue's status maps to one of the board's columns (but not the Done column), and
- there's at least a status being mapped to the right-most column.
For example, if you have the columns To Do, In Progress, and Done, ensure that you have a status mapped to In Progress at least. If you map all the statuses to the first (To Do) column, you won't see any issues in the Scrum backlog.
Accessing the Scrum backlog
Go to the Backlog of your Scrum project.
Here's an example of a Scrum backlog with an issue selected: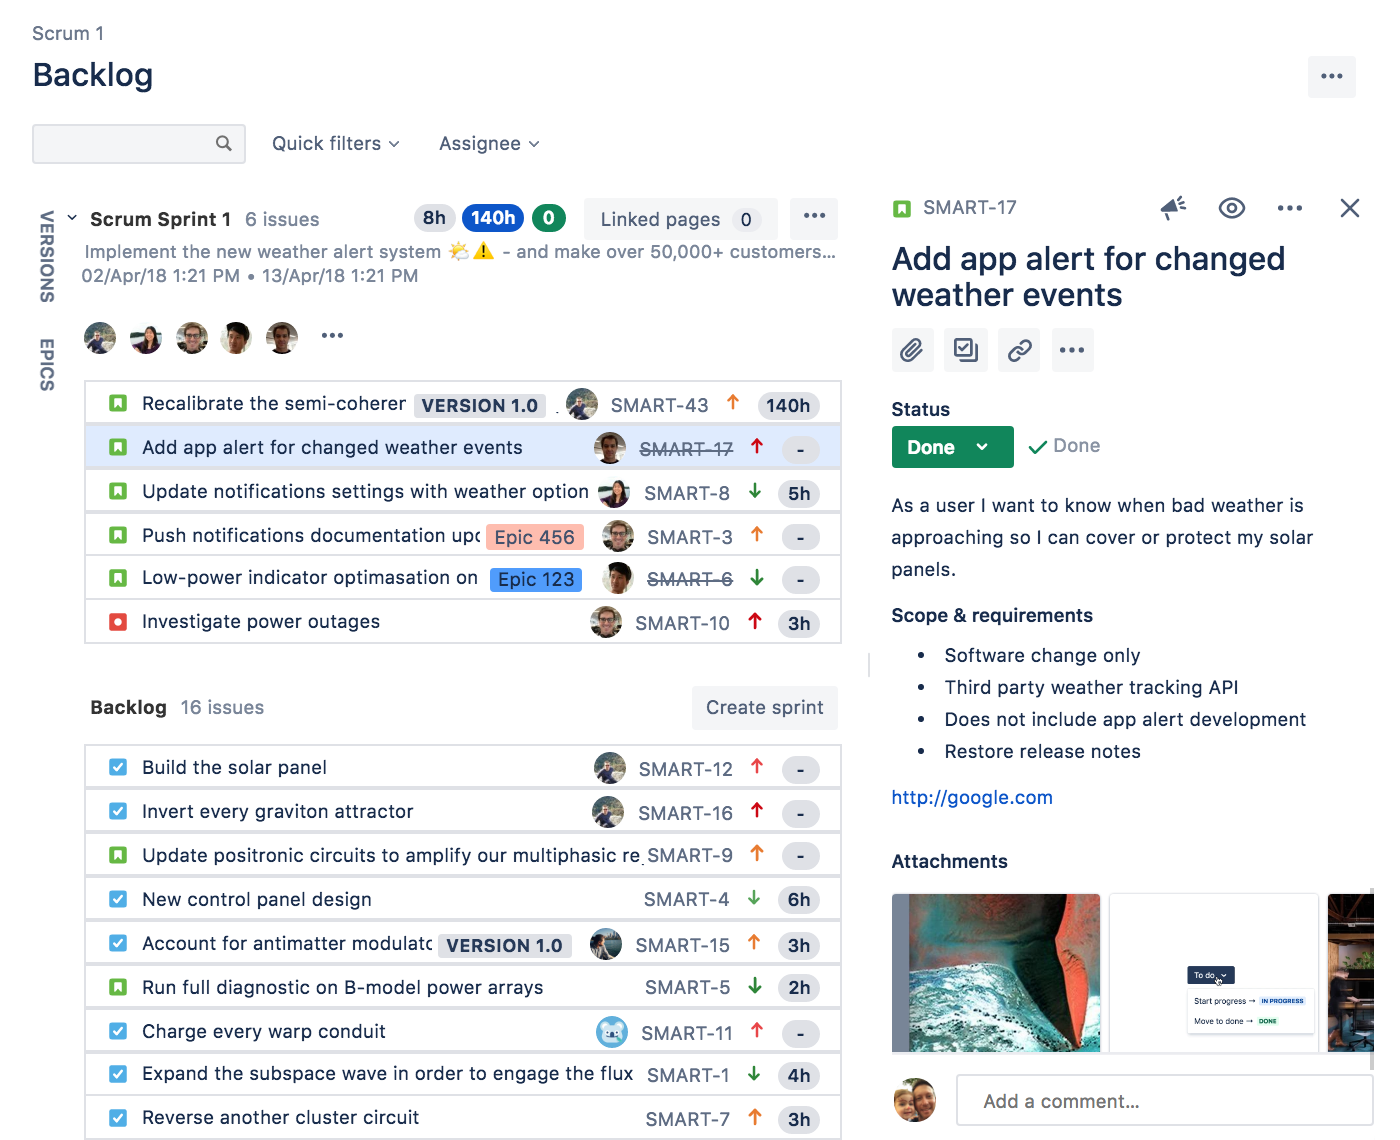
We're rolling out a new issue view, with a consistent appearance across Jira and one screen to view and edit. It looks a little different and some procedures have changed slightly, so take a look at What is the new Jira issue view? to see what's changed.
What can I do in the Scrum backlog?
| Task | Instructions |
|---|---|
| Add issues to the backlog | Click Create in the navigation bar.
|
| Prioritize the backlog | Drag and drop an issue to rank it. You can also right-click the issue to open a menu that allows you to send it to the top or the bottom of the backlog. |
| View and edit an issue's details | Click an issue on the board to view the issue detail view and edit issue details. To open the issue in a separate tab or window, right-click on the issue key. To view the details of an epic, click the epic lozenge on the issue itself. |
| Estimate stories | Use the 'J' and 'K' keys to move through issues in the backlog and show the details on the right-hand side of the screen. Use the 'E' key to edit an issue, then update estimates or story points as you go. By default, the Story Points field is only available to issues of type 'story' or 'epic'. See Configuring estimation and tracking for details. |
| Identify the workload for users | The avatars for users who have work assigned to them in a sprint are shown at the top of a sprint. Click ••• (next to avatars) to view the sprint workload for assignees. |
| Create subtasks | Click an issue and click Subtasks are useful for breaking a story down into implementable chunks. |
| Transition an issue | Drag and drop an issue from the Backlog section to the relevant sprint section, to move the issue from the backlog to the relevant sprint. When transitioning multiple issues... Depending on the following conditions, you can press the Shift or Ctrl key to select and transition multiple issues from the backlog to the next status in your project's workflow:
|
Split an issue | Right-click an issue and select Split issue. You can split an issue in the Backlog or sprint sections, including any future sprints and any active sprint. Splitting an issue is useful when an issue is so big that it's better to divide it into two or more issues to make work more manageable. What happens when I split an issue?
What happens to the issue details?
|
| Flag an issue | Select an issue and select ••• > Add flag. |
| Delete an issue | Select an issue and select ••• > Delete. |
| Find issues | Create your own Quick Filters to view only the issues you want. See Configuring Quick Filters for details. Search for an issue by name, code, or assignee. |
| Organize how many issues are visible | We want to make sure you don't have to wait for your backlog to load, so, by default, we show you a maximum of 100 issues (90 from the top of your backlog and 10 from the bottom) and hide the remaining ones. If you want to see all issues, click the Show all issues hyperlink that splits your backlog. This will load all your issues. If you have more than 100 issues, you can click |
| Organize stories into epics | Click EPICS (aligned vertically, left side of the board) to show the 'EPICS' panel. You can create epics, drag and drop issues into epics, and filter by epics via this panel. An epic is essentially a large user story, used for grouping smaller stories. For example, you may have a 'Performance' theme for your release, which you could capture as an epic. |
| Plan versions | Click VERSIONS (aligned vertically, left side of the board) to show the 'VERSIONS' panel. You can create and edit versions, assign issues to versions via drag-and-drop, and filter by versions via this panel. Note, you need to have at least one version in your project for this panel to display. |
| Plan sprints | Click Create sprint, then drag and drop issues into your new sprint. You can also drag and drop the horizontal divider to add or remove multiple issues. The sprint footer will display the number of issues and total estimated work. When you're happy with the issues for the sprint, click Start sprint, and the stories will move into the Active sprints. While a sprint is active in the Active sprints, you can still plan subsequent sprints in the backlog, but you won't be able to start them until the active sprint is completed. (You can, however, drag and drop an issue in the backlog onto the active sprint.) |
The new issue view lets you choose a two-column layout if you have enough screen real estate. Drag the divider between the backlog and a selected issue to give your issue details more space.
Next steps
![]() Need help? If you can't find the answer you need in our documentation, we have other resources available to help you. See Getting help.
Need help? If you can't find the answer you need in our documentation, we have other resources available to help you. See Getting help.