Installing Marketplace apps
Apps (also known as add-ons or plugins) extend what your Atlassian application can do.
With just a few clicks, you can browse the Atlassian Marketplace and install apps in your application, all without leaving your Atlassian product.
On this page:
A note about safety: apps are very powerful, they can change the behavior of almost any part of the Atlassian application. It's very important that you trust an app before you install it. Always be aware of where (and who) an app comes from.
Install a cloud app
If you have an Atlassian Cloud application, you can subscribe to a wide range of cloud compatible apps.
To install a cloud app:
- From the top navigation bar in your product, select Settings (
 ).
). - Select Find Apps.
- Search by the app name, or choose a category.
- Follow the prompts to Get app, or get a Free trial.
You can't use the file upload method to install apps in Cloud applications.
Install a Data Center app
Apps are installed using the Universal Plugin Manager (also known as UPM). The method you use will depend on whether the app is available on marketplace, and if your site is behind a firewall.
Install an app from Marketplace
If your application can reach the Marketplace site, you can browse for apps without leaving your application.
To install an app:
- From the top navigation bar in your application, select Apps, and then Manage apps.
- Select Find apps. This is usually located in the sidebar of your application's admin console.
- Search by the app name, or choose a category.
- Follow the prompts and choose to Install, Buy now, or start a Free trial.
See Finding new Marketplace apps for more information on how to browse for new apps.
Once installation is complete, the app will be listed on the Manage apps page. You may need to enter a license before you can use the app.
Install an app from a file
This method is useful if your firewall prevents the Universal Plugin Manager from accessing Atlassian Marketplace, or if you have developed your own custom app.
To download a specific version of an app from Marketplace, from the Versions tab, select See all versions. Make sure you download the appropriate file for your Data Center site.
Apps are normally distributed as JAR or OBR (OSGi Bundle Repository) files. These are the only types of app distribution files that are accepted by the file upload mechanism.
UPM supports two installation flows depending on whether the App signing feature is enabled or disabled.
If you do not see the option to upload an app on the Manage Apps page, you may need to provide a startup argument in Jira to enable this.
App signing enabled
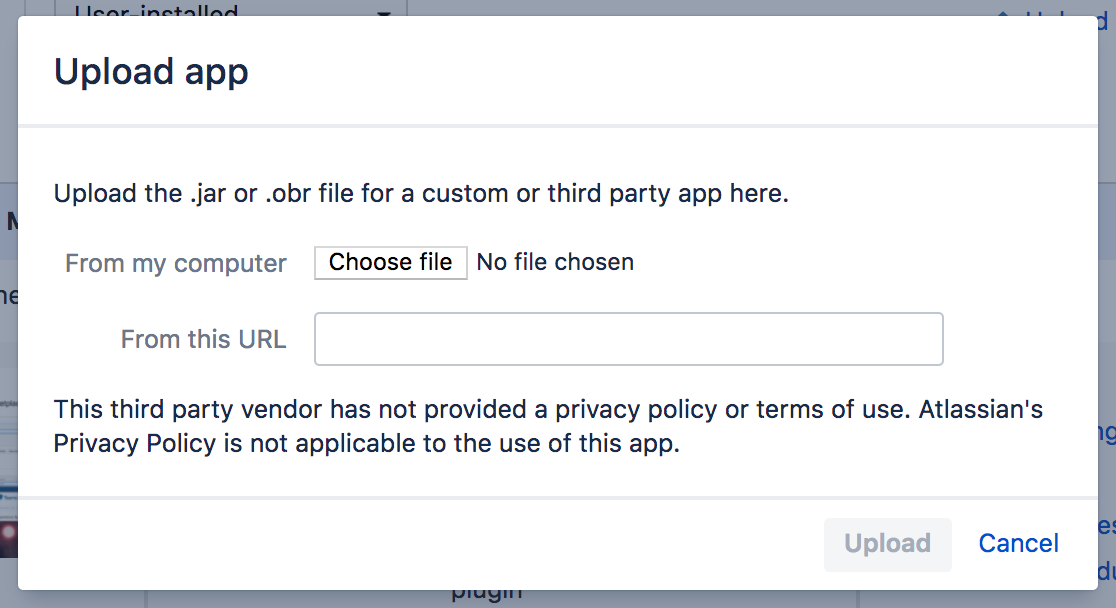
- From the top navigation bar in your application, select Apps, and then Manage apps.
- Select Upload app.
- Select the app file (it will be a .jar or .obr file) or enter the URL where the file can be found.
- Enter app signature.
- Select Upload.

Screenshot: The upload app dialog with app signing enabled
App signing disabled
- From the top navigation bar in your application, select Apps, and then Manage apps.
- Select Upload app.
- Select the app file (it will be a .jar or .obr file) or enter the URL where the file can be found.
- Select Upload.
Screenshot: The upload app dialog with app signing disabled
Once installation is complete, the app will be listed. You may need to enter a license before you can use the app.
Enter a license for your app
If you have installed a paid app, you'll need to apply a license. Some apps will provide a configuration page where you can enter a license, but for most you can expand the app listing,
To enter an app license:
- From the top navigation bar in your application, select Apps, and then Manage apps.
- Select your app in the list to expand the listing.
- Paste your license key into the License key field.

Screenshot: app listing showing license field
Free apps don't require a license.
Bundled Data Center apps
From February 2021, the following apps are bundled with Data Center. You'll need to either upgrade to a Data Center product version with the app included, or install the version of the app listed below on a site with a Data Center license.
You don't need a separate app license, we’ll recognise your product's Data Center license:
- Team Calendars for Confluence 7.0.7
- Advanced Roadmaps for Jira Software 3.29.5
- Insight Asset Management for Jira Service Management 8.7.1
- Insight Discovery for Jira Service Management 2.29.0
If you still see a license error after upgrading the app, you may also need to upgrade Universal Plugin Manager to version 4.3.0 or later
Read more about this in our FAQ
Troubleshooting
If you attempt to install a file that isn't a JAR or OBR file in the Manage add-ons or Manage apps page, one of the following errors appear:
Could not find a handler capable of installing the app at filename. Check that the file is a valid app.
Could not find a handler capable of installing the add-on at filename. Check that the file is a valid add-on
You should refer to the installation instructions provided with the app in this case, as there may be additional steps you need to complete first.
Install a Plugins 1 legacy app
About plugin framework versions
Apps come in three types: Plugins 1, Pugins 2 (for Data Center and Server applications), and Connect and Forge apps (for Atlassian cloud applications). The most prominent type for Data Center and Server applications is Plugins 2. This version number refers to the version of the underlying Atlassian SDK framework used to build the app. This identifier is distinct from the app's individual versioning scheme.
Apps built with the Plugin 2 SDK use the internal OSGi framework built into Atlassian applications. In some cases, Plugins 1 apps may not be installable in the host application. Instead, you must install them manually. If you attempt to install a Plugins 1 app using file upload when not supported, an error message similar to the following appears:
The add-on name-version.jar is a type 1 add-on. Type 1 add-ons cannot be dynamically installed. For more information on installing type 1 add-ons see the UPM documentation.
A few considerations apply to installing or uninstalling add-ons created with the SDK version 1 framework. These types of add-ons are identified in their Marketplace listing as 'Plugins 1' add-ons.
Installing Plugins 1 type add-ons in JIRA and Bamboo
- You cannot install Plugins 1 add-ons into JIRA or Bamboo using the Universal Plugin Manager. You must download the add-on distribution and follow its specific installation instructions. Such add-ons have a Download button rather than an Install button in their listing. In most cases you will need to move or download the file to the
<INSTALL_DIR>/atlassian-jira/WEB-INF/libdirectory. - Similarly, Plugins 1 JIRA and Bamboo add-ons do not have an Uninstall button. You must remove the add-on from the file system manually.
- In Confluence, you can install and uninstall Plugins 1 add-ons using the Universal Plugin Manager. You should see an Install or an Uninstall button with the add-on entry.
Once you have downloaded or created your add-on JAR file, follow these steps to install it to JIRA:
- Shut down JIRA.
- Copy your JAR file (e.g., example_plugin.jar) into the directory:
- If you are installing a Plugins 1 add-on, copy the JAR file into your JIRA installation directory under
atlassian-jira/WEB-INF/lib/. - If you are installing a Plugins 2 (OSGi) add-on, copy the JAR file into your JIRA home directory under
plugins/installed-plugins/.
- If you are installing a Plugins 1 add-on, copy the JAR file into your JIRA installation directory under
- Start JIRA.
- Confirm the installation by going to Administration > Manage Add-ons. Your add-on (e.g., example_plugin) should appear in the list as enabled.
If you attempt to install a Plugins 1 add-on by copying its JAR file into the installation directory meant for Plugins 2 add-on (or vice versa), JIRA provides a warning indicating that the add-on has been installed into the wrong directory.
However, there may be a very small number of Plugins 1 add-ons (such as the JIRA RPC Plugin) which, if accidentally installed into the Plugins 2 directory (<JIRA home directory>/plugins/installed-plugins/), do not generate this warning. Nevertheless, the add-on does not function correctly and the 'Manage Add-ons' page typically indicates that this add-on has zero modules.
To resolve this problem, reinstall the JAR file into the correct directory as follows:
- Shut down JIRA.
- Move the JAR file to
<JIRA installation directory>/atlassian-jira/WEB-INF/lib/ - Restart JIRA.