Disaster Recovery Guide for Jira
The following concepts are often referenced in this guide:
- Recovery Point Objective (RPO): how up-to-date you require your Jira instance to be after a failure.
- Recovery Time Objective (RTO): how quickly you require your standby instance to be available after a failure.
- Recovery Cost Objective (RCO): how much you are willing to spend on your disaster recovery solution.
- High availability: a strategy to maximize uptime for a service even when one or more components fail. In Jira's case, it means providing access to the application and an acceptable response time. High-availability planning usually includes automated correction and failover within the same location. Check out the high-availability guide for Jira
- Disaster recovery: a strategy to resume operations in an alternate data center (usually in a different geographic location) when the main data center becomes unavailable (in other words, a disaster). Failover, oftentimes to another location, is a fundamental part of disaster recovery.
- Failover: one machine takes over from another machine if the first one fails. This could be done within the same data center or from one data center to another. Failover is usually a part of both high availability and disaster recovery planning.
Before you begin
The disaster recovery strategy for Jira doesn’t cover the broader business practices, like setting the key objectives (Recovery Point Objective, Recovery Time Objective, and Recovery Cost Objective), standard operating procedures (SOPs), and others.
The guide describes how to perform disaster recovery via a "cold standby" strategy. This means that the standby Jira instance isn’t continuously running and administrators need to perform particular actions to start the standby instance and ensure it’s in a suitable state to service the organization’s business needs.
The following table includes the main components that you need to consider in the disaster recovery plan.
| Jira installation | The standby instance should have the exact same version of Jira as the production instance. |
|---|---|
| Database | This is the primary source of truth for Jira and contains most of the application’s data except for attachments, avatars, and installed apps. The database needs to be replicated and continuously kept up to date to meet your Recovery Point Objective (RPO)1. |
| Attachments | All issue attachments are stored in the Jira Data Center Attachments stored in Amazon S3 won’t be replicated. Learn more about configuring Amazon S3 |
| Search index | The search index isn’t a primary source of truth and can always be recreated from the database. Recreating the index can take a significant amount of time for large installations. During this process, the functionality of Jira might be greatly reduced until the index is fully recovered. Jira Data Center provides tools for reducing this recovery time to the bare minimum. If you're using Lucene on your instance and you enable index recovery, all index snapshots will be stored in the Jira Data Center |
| Plugins | User-installed apps are stored in the Jira Data Center sharedhome. You also need to replicate them to the standby instance. |
| Other data | Other non-critical items stored in the Jira Data Center sharedhome should also be replicated to the standby instance. Such files include user and project avatars, scripts and other plugin resources, configuration files, caches, indexes, and others. |
Clustering considerations
If you have a clustered environment, you also need to be aware of the following factors.
You must set up clustering before activating a disaster recovery instance, even if it involves creating a single-node clustered environment. If you attempt to set up a single-node instance without enabling clustering, it won’t work, and the disaster recovery setup will fail.
| Standby cluster | There configuration of the standby cluster doesn’t have to reflect the configuration of the live cluster. It may contain more or fewer nodes, depending upon your requirements and budget. Fewer nodes may result in lower throughput but that may be acceptable depending on your circumstances. If you have a standby cluster, the node IDs of the standby nodes must be different from those of the live cluster. |
|---|---|
| File locations | There are two home directories in Jira Data Center:
|
| Starting the standby cluster | It's important to initially start only one node of the cluster. Allow it to recover the search index and check it is working correctly before starting additional nodes. |
Setting up a standby instance
Step 1. Install and configure Jira as a disaster recovery installation
- Install the same version of Jira on the standby instance.
- Configure the instance to attach to the standby database. Learn more about connecting Jira to a database
Configure the instance to be a disaster recovery installation. This enables the automatic index recovery mechanism to kick in when Jira starts.
Add the following tojira-config.propertiesin the Jira home directory of the standby instance:disaster.recovery=true
Don’t start the standby Jira instance as this will write data to the database
If you want to test the installation, you can temporarily connect it to a different database and then start Jira to make sure it works as expected. Don't forget to update the database configuration to point to the standby database after your testing.
Step 2. Implement a data replication strategy
Replicating data to your standby location is crucial to a cold standby failover strategy. You don't want to fail over to your standby Jira instance and find that it's out of date or that it takes many hours to reindex.
To prevent any data loss, we recommend replicating the entire content of the sharedhome folder.
Set up database replication
The following Jira-supported database suppliers provide their own database replication solutions:
You need to use a database replication strategy that meets your Recovery Point Objective (RPO), Recovery Time Objective (RTO), and Recovery Cost Objective (RCO)1.
Set up the replication of files
Jira can automatically manage the replication of files to a secondary location. These include attachments, avatars, installed apps, and, if you use Lucene, index snapshots as well.
Consider that files added by Jira apps will require other ways of replication. In these cases, you should contact the app developer for recommendations.
If you store attachments or avatars in Amazon S3, they won’t be replicated as well. Learn more about configuring Amazon S3
The default replication folder is sharedhome/secondary. If you want to change the location, set the jira.secondary.home property to the desired path in the jira-config.properties file. If you are running Jira in clustered mode, the secondary home must be a path accessible to all nodes.
To enable the file replication:
In the upper-right corner of the screen, select Administration
> System.
Under Advanced, select Replication.
On the File replication settings page, select Edit settings.
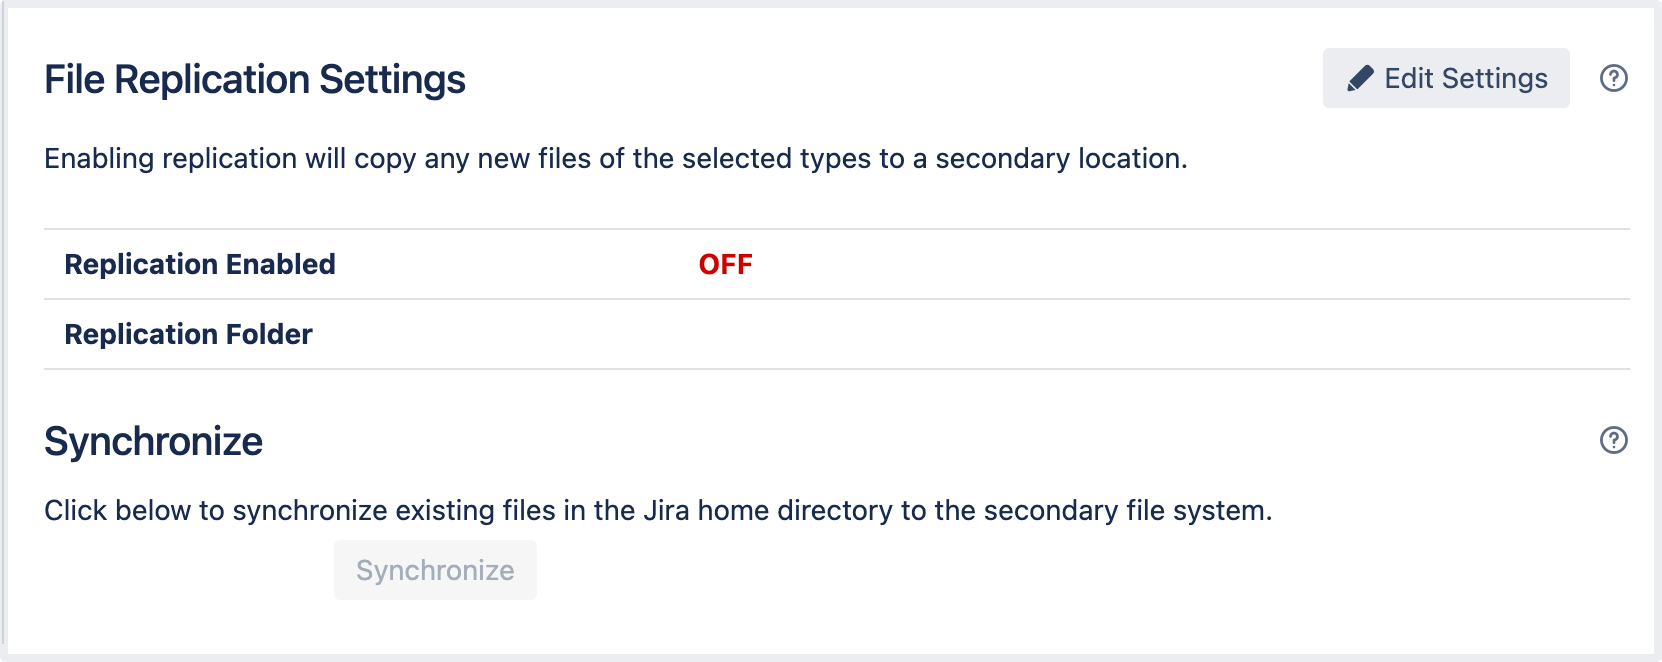
- Enable replication for the needed file types.
If you enable file replication for the first time, select the Synchronize button to synchronize files.
File synchronization can be a long-running operation. To ensure that it doesn’t prevent access to Jira, we recommend synchronizing files outside the peak hours.
After the initial synchronization, Jira will automatically update your secondary copy. This secondary copy is written asynchronously so the performance of your primary Jira instance won't be affected.
If you change any of the file replication settings, you'll need to do the synchronization again. We also recommend that you do this outside of peak hours.
Performing disaster recovery testing
Be extra careful when testing any disaster recovery plan as simple mistakes may damage data on your live instance. For example, if testing updates are inserted into your production database.
Without proper caution during testing, you may also detrimentally affect the ability to recover from a real disaster.
The key element of successful recovery testing is to keep the main data center as isolated from the disaster recovery testing as possible.
Step 1. Isolate your production data
This is the required step before performing any testing.
Database isolation
Temporarily pause all replication to the standby database.
Replicate the data from the standby database to another database that is isolated and has no communication with the main database.
Attachments, apps, and indexes
Ensure that no app updates or index backups occur during the test:
Disable index backups.
Instruct system admins to not perform any updates in Jira.
Attachments shouldn’t cause any problems. Health checks in the failover instance are going to give enough information if the folders have the write permissions. Learn more about health checks in Jira
Installation folders
Clone your standby installation, separate from both the live and standby instances.
Change the connection to the database in the Jira
localhome/dbconfig.xmlto avoid any conflicts.
After these steps, you can resume all replication to the standby instance, including the database.
Step 2. Perform the disaster recovery testing
After you've isolated your production data, follow these steps to test your disaster recovery plan:
- Ensure that the new database is ready, with the latest snapshot and no replication.
Verify that you have a copy of Jira on a clean server with the proper
dbconfig.xmlconnection.- Ensure that you have Jira
sharedhomemapped in the test server as it was in the standby instance. If you use Lucene, it’s important to have the latest index snapshot in the snapshot in Jirasharedhome/export/indexsnapshotsfolder. - Disable email. Learn more about configuring Jira application emails
Start Jira in Disaster recovery mode. Add the following to the
jira-config.propertiesfile on each node:disaster.recovery=true
Handling a failover
If your primary instance becomes unavailable, you will need to fail over to your standby instance. This section describes how to do this. It also includes instructions for checking data in your standby instance.
Step 1. Fail over to the standby instance
The basic steps to failover to the standby instance are:
- Ensure your live instance is shut down and no longer updating the database.
- Ensure that the Jira
sharedhomedirectory does not exist on the standby instance./indexarchive - Copy the contents of the Jira
sharedhome/export/indexsnapshotsto Jirasharedhome/import/indexsnapshots. - Perform any required steps to activate your standby database.
- Start Jira in the standby instance.
- Wait for Jira to start and verify that it's operating as expected.
- Update your DNS, HTTP Proxy, or other front-end devices to route traffic to your standby instance.
After Jira starts, you should check the log in Jira localhome/log/atlassian-jira.log
Step 2. Check the data in your standby instance
To complete the following steps, you need to have the Jira administrator rights with the Browse projects permission for all projects. Learn more about permissions in Jira
After you have failed over to your standby instance, perform these checks before users start accessing the system and changing data.
In the upper-right corner of the screen, select Administration
> System.
Under System support, select Troubleshooting and support tools.
On the Instance health checks tab, validate the indexing and attachments checks.
Database and index consistency
A successful check will show:

An unsuccessful check will show:

You should verify that the item count and updated date are within your organization's Recovery Point Objective.
Attachments
A successful check will show:

An unsuccessful check will show:

If the check doesn't work, you can manually determine the recovery point:
In your database, run the following SQL query:
select issueid, created from fileattachment order by created desc limit 1;In Jira, go to Issues > Search for issues, and then run the following advanced (JQL) search:
id=<issue_id>where
<issue_id>is the issueid returned by the SQL query in the previous step.Open the issue returned by the search and check if the issue attachments are visible. If you can’t see them, check some slightly older issues. You should be able to determine the most recent attachment that’s available as well as which attachments are missing.
Returning to the primary instance
In most cases, after you’ve resolved the problems that caused the disaster, you'll want to return to using your primary instance. This is easy to achieve if you can schedule a reasonably-sized outage window.
You need to:
- synchronize your primary database with the state of the secondary.
- synchronize the primary attachment directory with the state of the secondary.
- recover the index state on the primary server.
Step 1. Prepare for using your primary instance
Attachments and other files
Before you start the cutover process, use rsync or a similar utility to synchronize most of the attachments to the primary server.
Similarly, you should synchronize the installed apps and logos before you start.
Search index
If you use Lucene, enable index snapshots on the standby (running) instance so that you have a recent index snapshot. You should copy it to a location that’s accessible from the primary instance.
Step 2. Perform the cutover
- Shut down Jira on the standby instance.
Confirm that the data from your secondary database has been synchronized to your primary database.
- Start Jira.
- If you use Lucene, log in to Jira and restore the index from the index snapshot. You'll need to know the name and location of the snapshot file.
- Verify that Jira is operating as expected.
- Update your DNS, HTTP Proxy or other front end devices to route traffic to your primary server.
Get help
If you need help with configuring your disaster recovery plan or have any related issues, here are some helpful resources.
Troubleshooting tips & FAQs
If you encounter problems after failing over to your standby instance, the following FAQs may help.
Atlassian Community
Check out what other Jira users are saying, or look for related conversations. Our community brings together app developers, admins, regular users, and Atlassian staff.
Feel free to share your best practices, questions, and comments. Here are some of the answers relevant to this page:
Atlassian Partners
Our experts may be able to help you implement a disaster recovery plan specific to your environment. Contact the Atlassian Partners team