Set up a Synchrony cluster for Confluence Data Center
If you have a Confluence Data Center license, two methods are available for running Synchrony:
- managed by Confluence (recommended)
Confluence will automatically launch a Synchrony process on the same node, and manage it for you. No manual setup is required. - Standalone Synchrony cluster (managed by you)
You deploy and manage Synchrony standalone in its own cluster with as many nodes as you need. Significant setup is required. During a rolling upgrade, you'll need to upgrade the Synchrony separately from the Confluence cluster.
If you want simple setup and maintenance, we recommend allowing Confluence to manage Synchrony for you. If you want full control, or if making sure the editor is highly available is essential, then managing Synchrony in its own cluster may be the right solution for your organisation.
On this page:
On this page we'll guide you through the process of setting up a standalone Synchrony cluster, hosted on your own infrastructure. The ability to run your own Synchrony cluster is only available with a Data Center license.
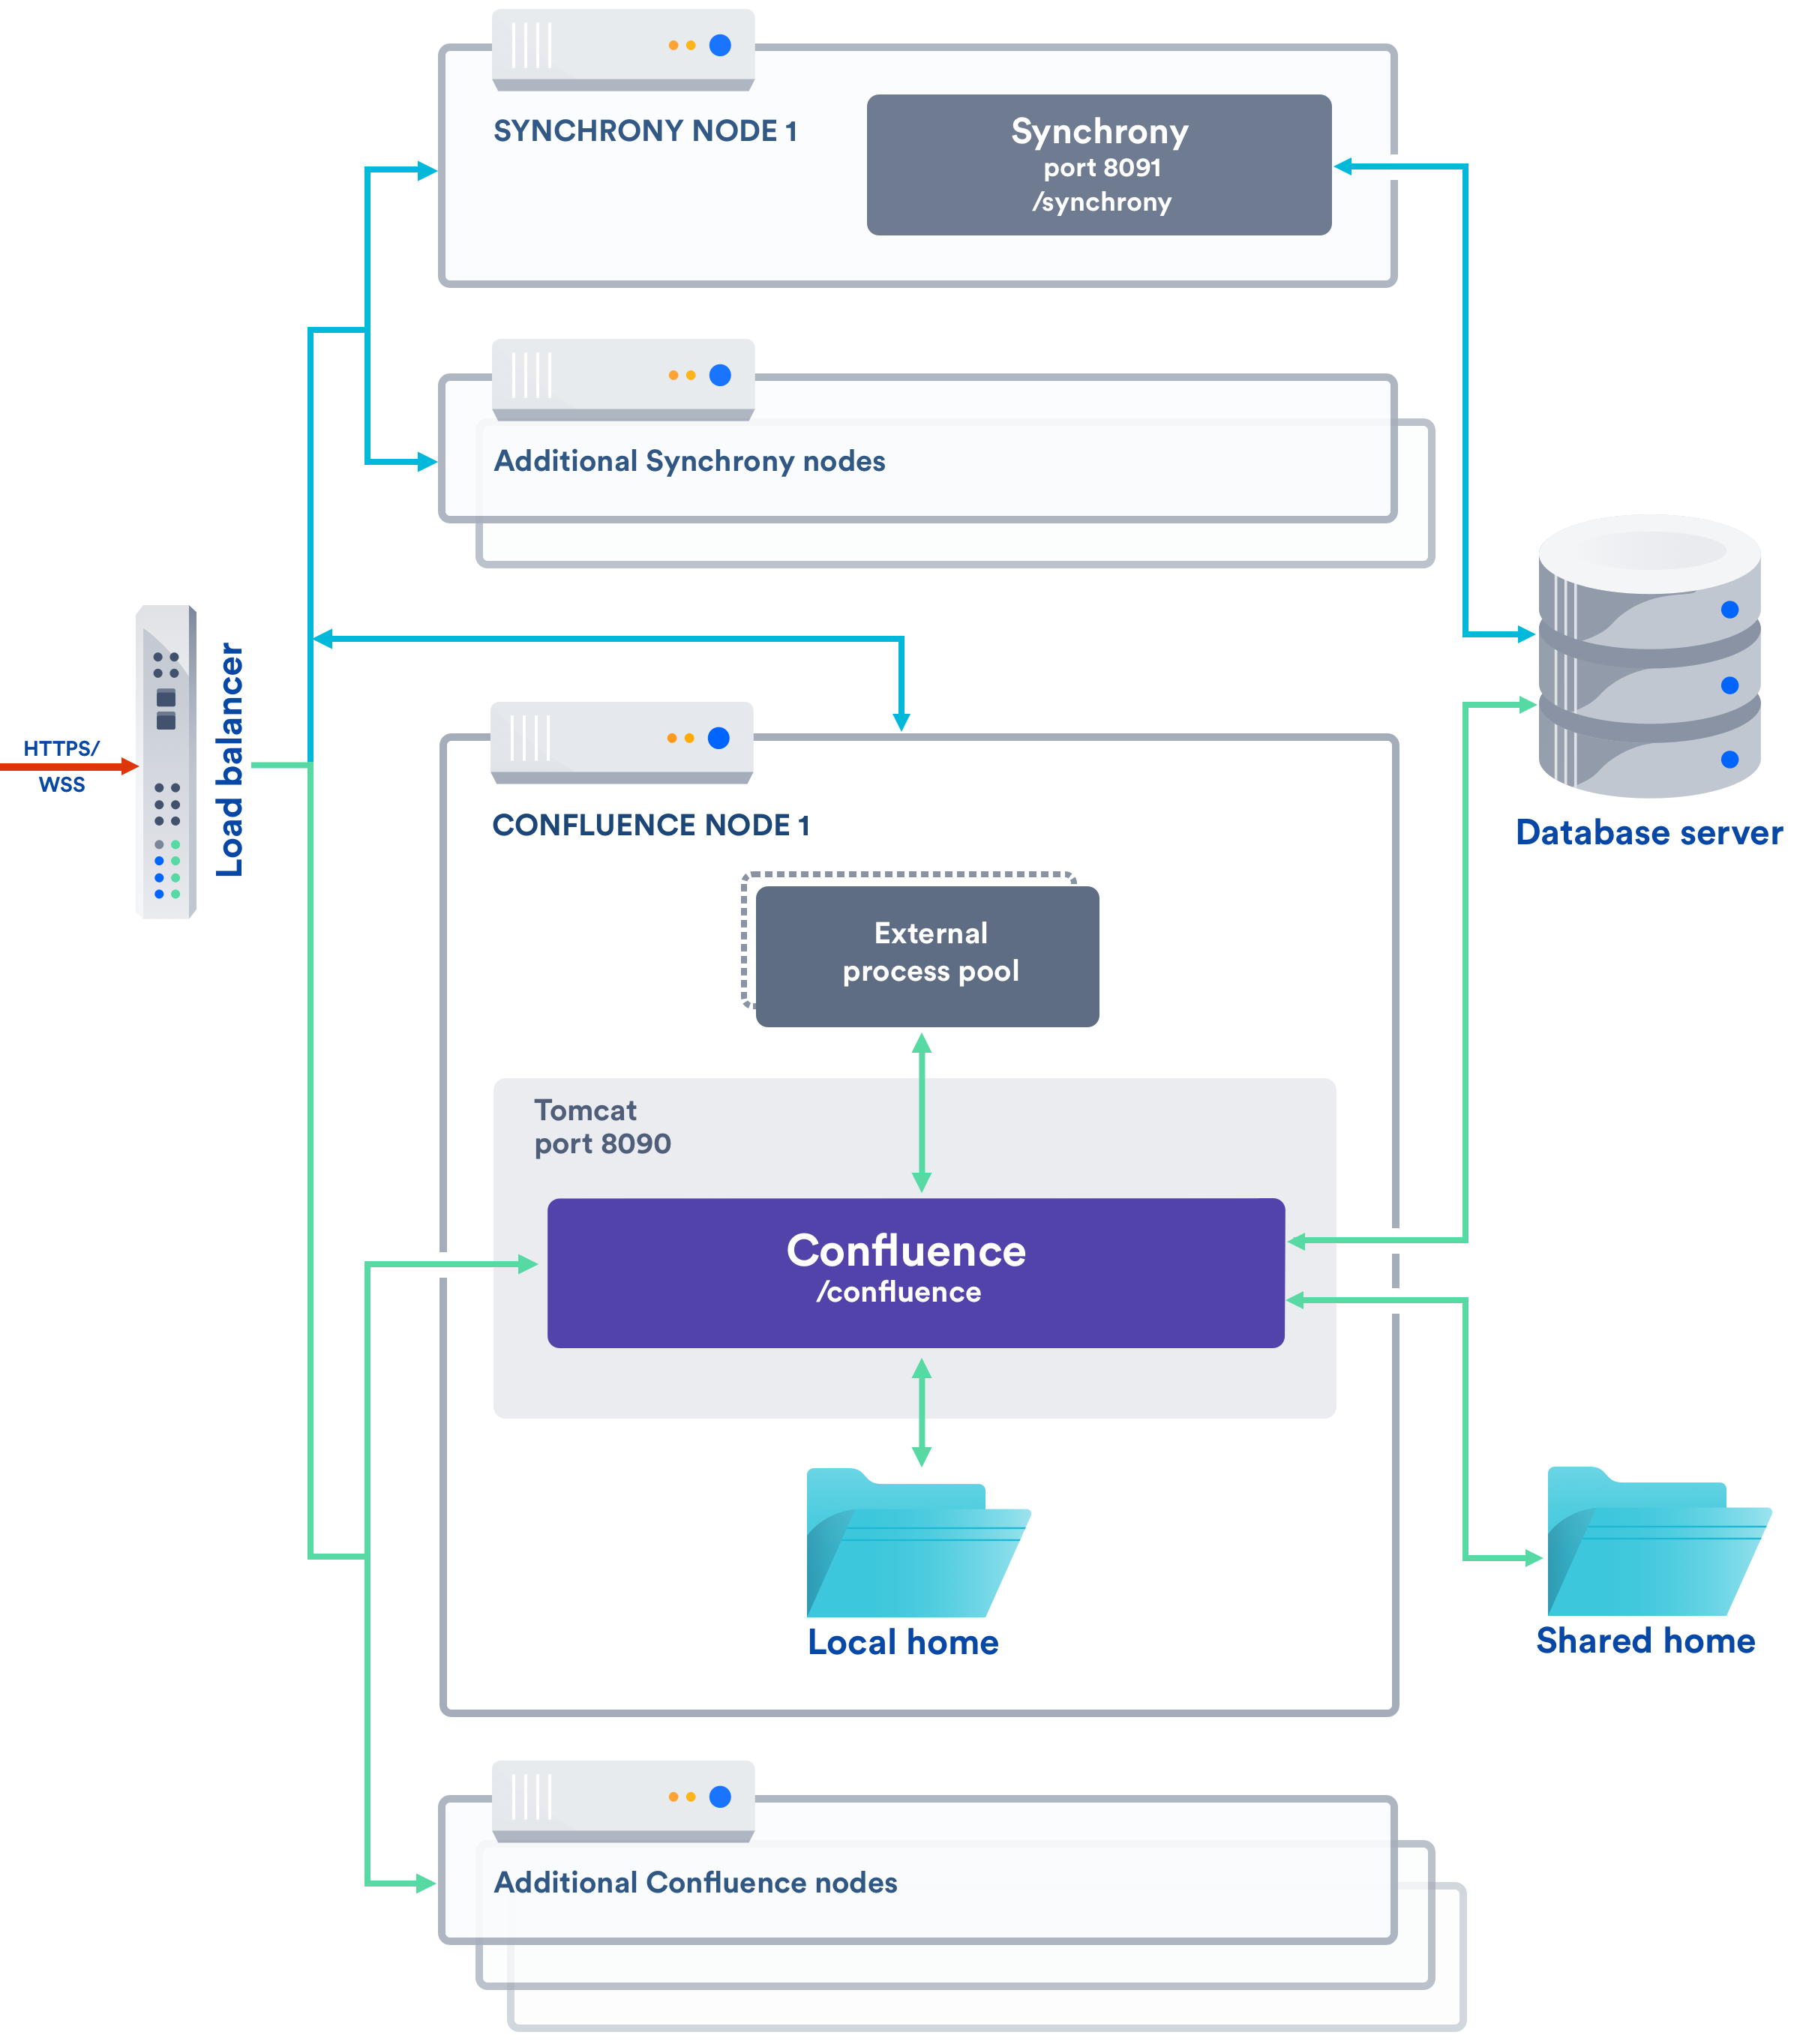
Architecture overview
Here's a simplified view of the architecture when you manage Synchrony yourself, in a seperate cluster. Note that this diagram doesn't show communication between nodes.
If you enabled collaborative editing prior to Confluence Data Center 6.12, standalone Synchrony will be your default setup.
If you would prefer a less complex setup, see Migrate from a standalone Synchrony cluster to managed Synchrony to find out how to allow Confluence to manage Synchrony for you.
Set up a Synchrony standalone cluster
This page will guide you through setting up a Synchrony standalone cluster on your own infrastructure.
If you're using AWS or Azure, using one of our templates may be a more efficient way to set up Confluence with a standalone Synchrony cluster.
1 Provision your Synchrony nodes
For the purposes of this guide, we assume you have already provisioned the hardware or virtual instances for your Synchrony nodes. We recommend starting with 2 Synchrony nodes.
You should allow 2GB memory for Synchrony, and enough disk space for the Synchrony application and logs.
2 Create the Synchrony home directory
To create the Synchrony directory on your first Synchrony node:
- Grab the
<install-directory>/bin/synchronydirectory from one of your Confluence nodes and move it to your new Synchrony node. We'll call this your<synchrony-home>directory. - Copy
synchrony-standalone.jarfrom your Confluence local home directory to your<synchrony-home>directory. - Copy your database driver from your Confluence
<install-directory>/confluence/web-inf/libto your<synchrony-home>directory or other appropriate location on your Synchrony node.
3 Edit the start and stop scripts
We provide scripts to start and stop Synchrony on each node. These need to be edited to add information about your environment:
- Edit the
<synchrony-home>/start-synchrony.shorstart-synchrony.batfile - Enter details for all of the required parameters listed under Configure parameters.
See Required properties below, for a description of each. - Enter detail for any optional properties you may want to specify.
See Optional properties below for a description of each. - Save the file.
- Start Synchrony by running the start-synchrony script.
- Visit
http://<SERVER_IP>:<SYNCHRONY_PORT>/synchrony/heartbeatto check Synchrony is running.
4 Add additional Synchrony nodes and configure your load balancer
To create your second Synchrony node:
- Copy your <synchrony-home> directory to the second Synchrony node.
Start Synchrony on that node using the start-synchrony script. As each node joins you'll see something like this in your console.
Members [2] { Member [172.22.52.12]:5701 Member [172.22.49.34]:5701 }- Configure your load balancer for Synchrony traffic.
For best results, your load balancer should allow WebSocket connections. SSL connections must be terminated at your load balancer, as Synchrony can't accept HTTPS requests.
You can choose to use the same load balancer for both Confluence and Synchrony, or two seperate load balancers. When we refer to the Synchrony load balancer, we mean whichever load balancer is handling Synchrony traffic. - Make sure the Synchrony port (8091) is open. Ports used by Atlassian Data Center Applications has a good summary of all ports Synchrony uses in Data Center. This is the only one that needs to be open.
5 Start Confluence one node at a time
Now that Synchrony is running in a cluster, it's time to get Confluence involved. It is essential that you stop Confluence on all nodes before continuing.
- Stop Confluence on all nodes.
Start Confluence on one node with the following system property.
This property is used to tell Confluence where to find Synchrony, and prevents Confluence from automatically launching a Synchrony process on your Confluence node.-Dsynchrony.service.url=http://<synchrony-load-balancer-url>/synchrony/v1For example
http://42.42.42.42/synchrony/v1orhttp://synchrony.example.com/synchrony/v1- Check that Confluence can connect to Synchrony. Head to Administration menu
 , then General Configuration > Clustering then choose
  > Collaborative editing beside the Confluence node you just started.
The Synchrony mode should be Standalone Synchrony cluster.
If the mode is 'Managed by Confluence', your Confluence node is not connected to your Synchrony cluster. Make sure you're passing the Synchrony service URL system property correctly. - Repeat this process, starting each Confluence node, one at a time, with the
synchrony.service.url.
See How to check the status of Synchrony for Confluence Data Center for more info on how to check Synchrony is running.
6 Enable collaborative editing
If you're installing Confluence for the first time, collaborative editing is enabled by default. If you've upgraded from an earlier Confluence version, or have disabled it in the past, collaborative editing may still be disabled.
To enable collaborative editing:
- Head to Administration menu , then General Configuration > Collaborative editing.
- Choose Change mode.
- Select On and choose Change.
You can now try editing a page. You'll need to access Confluence via your load balancer. You can't create or edit pages when accessing a node directly.
Any users who had the editor open before you made this change will need to refresh in order to continue editing, as the Synchrony URL they're connected to will have changed.
Required properties for Synchrony standalone
These properties only apply when you're running Synchrony standalone in its own cluster. If Synchrony is managed by Confluence (Server or Data Center) these properties don't apply.
The following properties must be provided in the start-synchrony script.
| Property name | Description |
|---|---|
SERVER_IP | Public IP address or hostname of this Synchrony node. It could also be a private IP address - it should be configured to the address where Synchrony is reachable by the other nodes. |
DATABASE_URL | This is the URL for your Confluence database. For example jdbc:postgresql://yourserver:5432/confluence
. You can find this URL in <local-home>/confluence.cfg.xml . |
DATABASE_USER | This is the username of your Confluence database user. |
DATABASE_PASSWORD | (Optional) This is the password for your Confluence database user. If your password contains special characters, Synchrony may silently fail to connect to the database. Rather than hardcoding your password, we recommend setting your password with the environment variable |
CLUSTER_JOIN_PROPERTIES | This determines how Synchrony should discover nodes. You'll be prompted to uncomment a set of parameters for either:
Follow the prompts in the script for the values you need to enter for each of these. |
DATABASE_DRIVER_PATH | This is the path to your database driver file. If you're running Synchrony on its own node, you'll need to copy your database driver to an appropriate location then provide the path to this location. |
SYNCHRONY_JAR_PATH | This is the path to the synchrony-standalone.jar file you copied to this node. |
SYNCHRONY_URL | This is the URL that the browser uses to contact Synchrony. Generally this will be the full URL of the load balancer Synchrony will run behind plus the Synchrony context path, for example Note that it does not end with |
OPTIONAL_OVERRIDES | You can choose to specify additional system properties. See the table below for recognised Synchrony system properties. |
FEATURE_AUTH_TOKEN | This is the flag that turns on and off the Synchrony authentication on the Handshaking REST API. Set it to true, and set Synchrony |
AUTH_TOKENS | This is an authentication token that must be included in the Handshaking REST API call to Synchrony in order for the request to be considered valid. It comes into effect only when |
Optional properties for Synchrony standalone
These properties only apply if you're running Synchrony standalone in a cluster.
When you start Synchrony, we pass default values for the properties listed below. You can choose to override these values by specifying any of these properties when you start Synchrony.
| Property name | Default | Description |
|---|---|---|
cluster.listen.port | 5701 | This is Synchrony's Hazelcast port. Specify this property if you do not want to use port 5701 or if it is not available. As with the Confluence Hazelcast port (5801) you should ensure that only permitted cluster nodes are allowed to connect to Synchrony's Hazelcast port, through the use of a firewall and or network segregation. |
synchrony.cluster.base.port | 25500 | This is the Aleph binding port. Synchrony uses Aleph to communicate between nodes. Specify this property if you don't want to use the default. |
cluster.join.multicast.group | 224.2.2.3 | If the cluster join type is multicast, you can specify an IP address for the multicast group if you don't want to use the default. |
cluster.join.multicast.port | 54327 | If the cluster join type is multicast, you can specify a multicast port if you don't want to use the default. |
cluster.join.multicast.ttl | 32 | If the cluster join type is multicast, this is the time to live threshold. The default, 32, means the scope is restricted to the same site, organization or department. Specify this property if you want to use a different threshold. |
| If the cluster join type is AWS, this is your AWS access key. | |
| If the cluster join type is AWS, you can authenticate by IAM role or Secret key. This is your AWS secret key. | |
| If the cluster join type is AWS, you can authenticate by IAM role or Secret key. This is your AWS IAM role. | |
| us-east-1 | If the cluster join type is AWS, this is the AWS region your Synchrony nodes will be running in. |
| If the cluster join type is AWS, and you want to narrow the members of your cluster to only resources in a particular security group, specify the name of your AWS security group. | |
| If the cluster join type is AWS, and you want to narrow the members of your cluster to only resources with particular tags, specify the AWS tag key. | |
| If the cluster join type is AWS, and you want to narrow the members of your cluster to only resources with particular tags, specify the AWS tag key value. | |
| If the cluster join type is AWS, t his is the AWS endpoint for Synchrony to use (the address where the EC2 API can be found, for example ' ec2.amazonaws.com '). | |
| 5 | If the cluster join type is AWS, this is the joining timeout (in seconds). |
cluster.interfaces | Defaults to the same value as SERVER_IP | This is the network interface Synchrony will use to communicate between nodes. Specify this property if you don't want to use the default, which uses the value of the required property Defaults to the same value as SERVER_IP (also known as synchrony.bind). |
synchrony.cluster.bind | Defaults to the same value as SERVER_IP | This is the Aleph binding address. This should be set to the same value as Specify this property if you did not use the default value for |
synchrony.port | 8091 | This is the HTTP port that Synchrony runs on. If port 8091 is not available, specify this property to choose a different port. |
synchrony.context.path | Defaults to the context path of SYNCHRONY_URL | This is the context path for Synchrony. There should be no need to change this. |
hazelcast.prefer.ipv4.stack | True | If you're running Confluence in an IPv6 environment, you will need to set this property to False. |
cluster.authentication.enabled | true | Set this property to false if you don't want to authenticate Synchrony nodes as they join the Synchrony cluster. This is not recommended. This property was added in 7.17.4. |
cluster.authentication.secret | (automatically generated) | Set this property to change the shared secret used to authenticate Synchrony nodes as they join the Synchrony cluster. The secret must be a string of maximum 40 characters. This property was added in 7.17.4. |
Run Synchrony standalone in an IPv6 environment
If you're running a Synchrony standalone in a cluster in an IPv6 environment, you will need to start Synchrony with the following JVM argument:
-Dhazelcast.prefer.ipv4.stack=falseIf you're using the start-synchrony scripts, simply uncomment this line in the script.
Run Synchrony standalone as a service
If you're running Synchrony standalone in a cluster, and you'd prefer to run Synchrony as a service on each node, see Run Synchrony-standalone as a service on Linux.
It's not possible to run Synchrony standalone as a service on Windows. Consider switching to managed Synchrony instead.
Provide credentials to Synchrony standalone using environment variables
If you're running Synchrony standalone in a cluster, and you prefer to store sensitive information in your environment, rather than directly in the Synchrony startup scripts you can create a synchronyenv file, and use it to provide your database credentials. This is only available in Linux environments.
See Provide credentials to Synchrony standalone using environment variables (Linux)