Create a Blueprint-Style Report
Using a combination of templates and macros you can make a wide range of reports for managing anything from customer interviews, product requirements to IT service catalogs and more. In this tutorial we'll guide you through the process of creating a blueprint-style report.
In this example, we'll create a multi-team status report. Here's the scenario we'll use for this tutorial.
The Design, Development and QA teams working on the Blue Sky Project need to produce a short status update page each week, containing the focus area for the week, contact person, risks and overall status for each team. They like the way the Product Requirements blueprint works and want to be able to manage their status updates in a similar way.
What do each of the players want out of this report?
- Project Lead – Wants an at-a-glance report that shows only the status for each team.
- Team Leads – Want a summary report, including the focus areas and risk, just for their team.
- All team members – Want it to be easy to create the new page each week.
- Management Team – Want to see all the details for a week on one page, and don't want to have to look at a different page for each team.
With this scenario in mind, this tutorial will guide you through how to:
- Create a status update template containing a separate page properties macro for each team's section of the report.
- Create a high level status report, showing just the status of all teams.
- Create a summary report for each team.
- Create your first status update page.
You'll need Space Administrator permissions to complete some of the steps in this tutorial.
Part 1: Create a status update template
First we'll create a page template and add the Page Properties macros.
- Go to Space Admin > Content Tools > Templates
- Choose Create Template
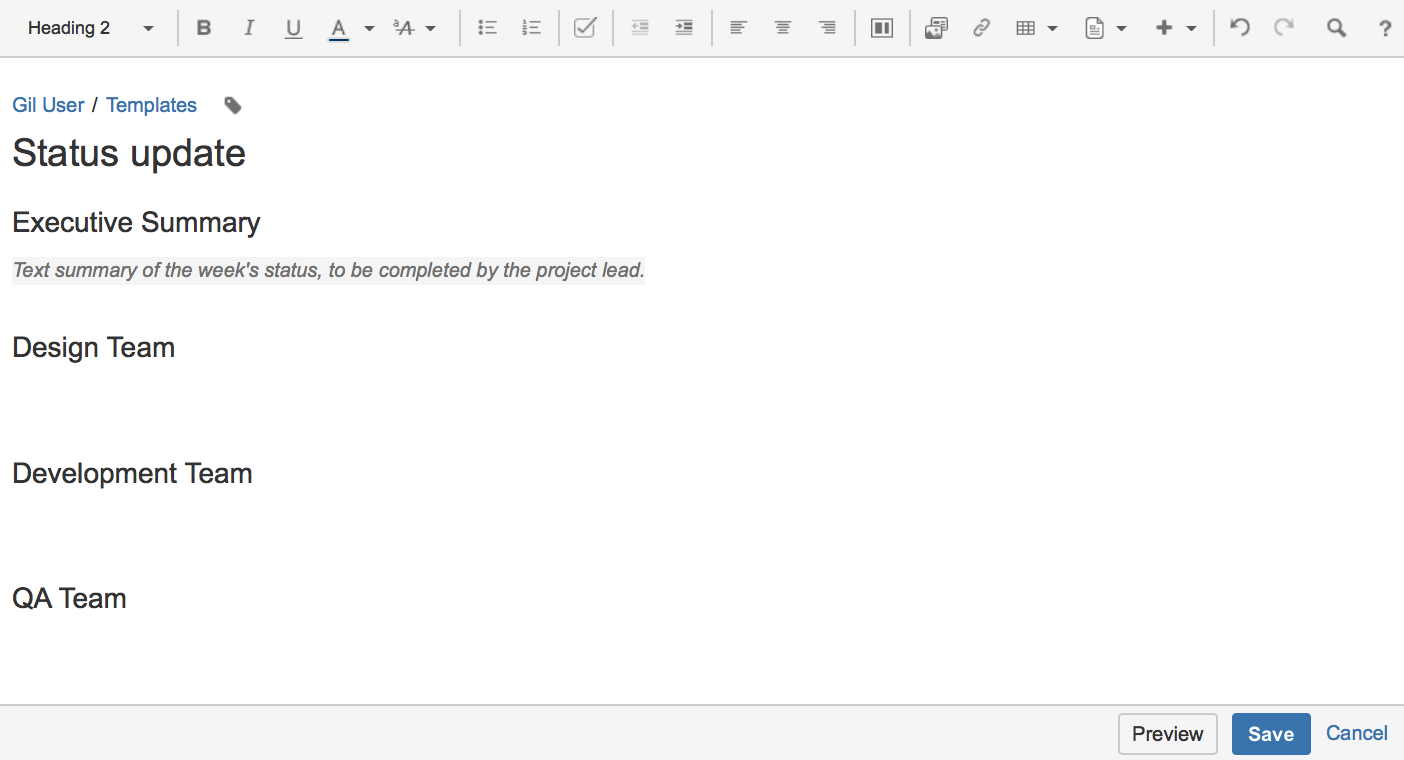
- Give the template a name (in this example the template will be called 'Status Update')
- Add the skeleton of your status report to the page
Choose the label icon
 at the top of the page to add a label to the template (in this example, we'll add the label: 'status-update')
Screenshot: Adding teams to our status update template
Now we'll add a Page Properties macro to record the status of the Design team.- Choose Insert > Other Macros > Page Properties to add the Page Properties macro to the page
- In the macro body create a two column table and remove the heading row
- In the left column enter the column headings for your report (these are known as metadata 'keys')
In this example we'll add 'Design Focus', 'Design Status', 'Design Contact' and 'Design Risks'). - In the right column, leave the cells blank, or enter some instructional text to prompt your users (Choose Template > Instructional Text)
We've also added a status macro. - Edit the Page Properties macro and enter a Page Properties ID for this macro (in this example we'll use 'status-update-design'. This will allow us to report on the status of just the Design team later on)
Repeat this process for the Development and QA teams, remembering to specify a different ID for each macro (we used 'status-update-dev' and 'status-update-qa'). Finally, add any other headings, instructional text or content to your template and Save.
You can enter a Description for your template - this appears in the Create dialog.
Screenshot: Our status update template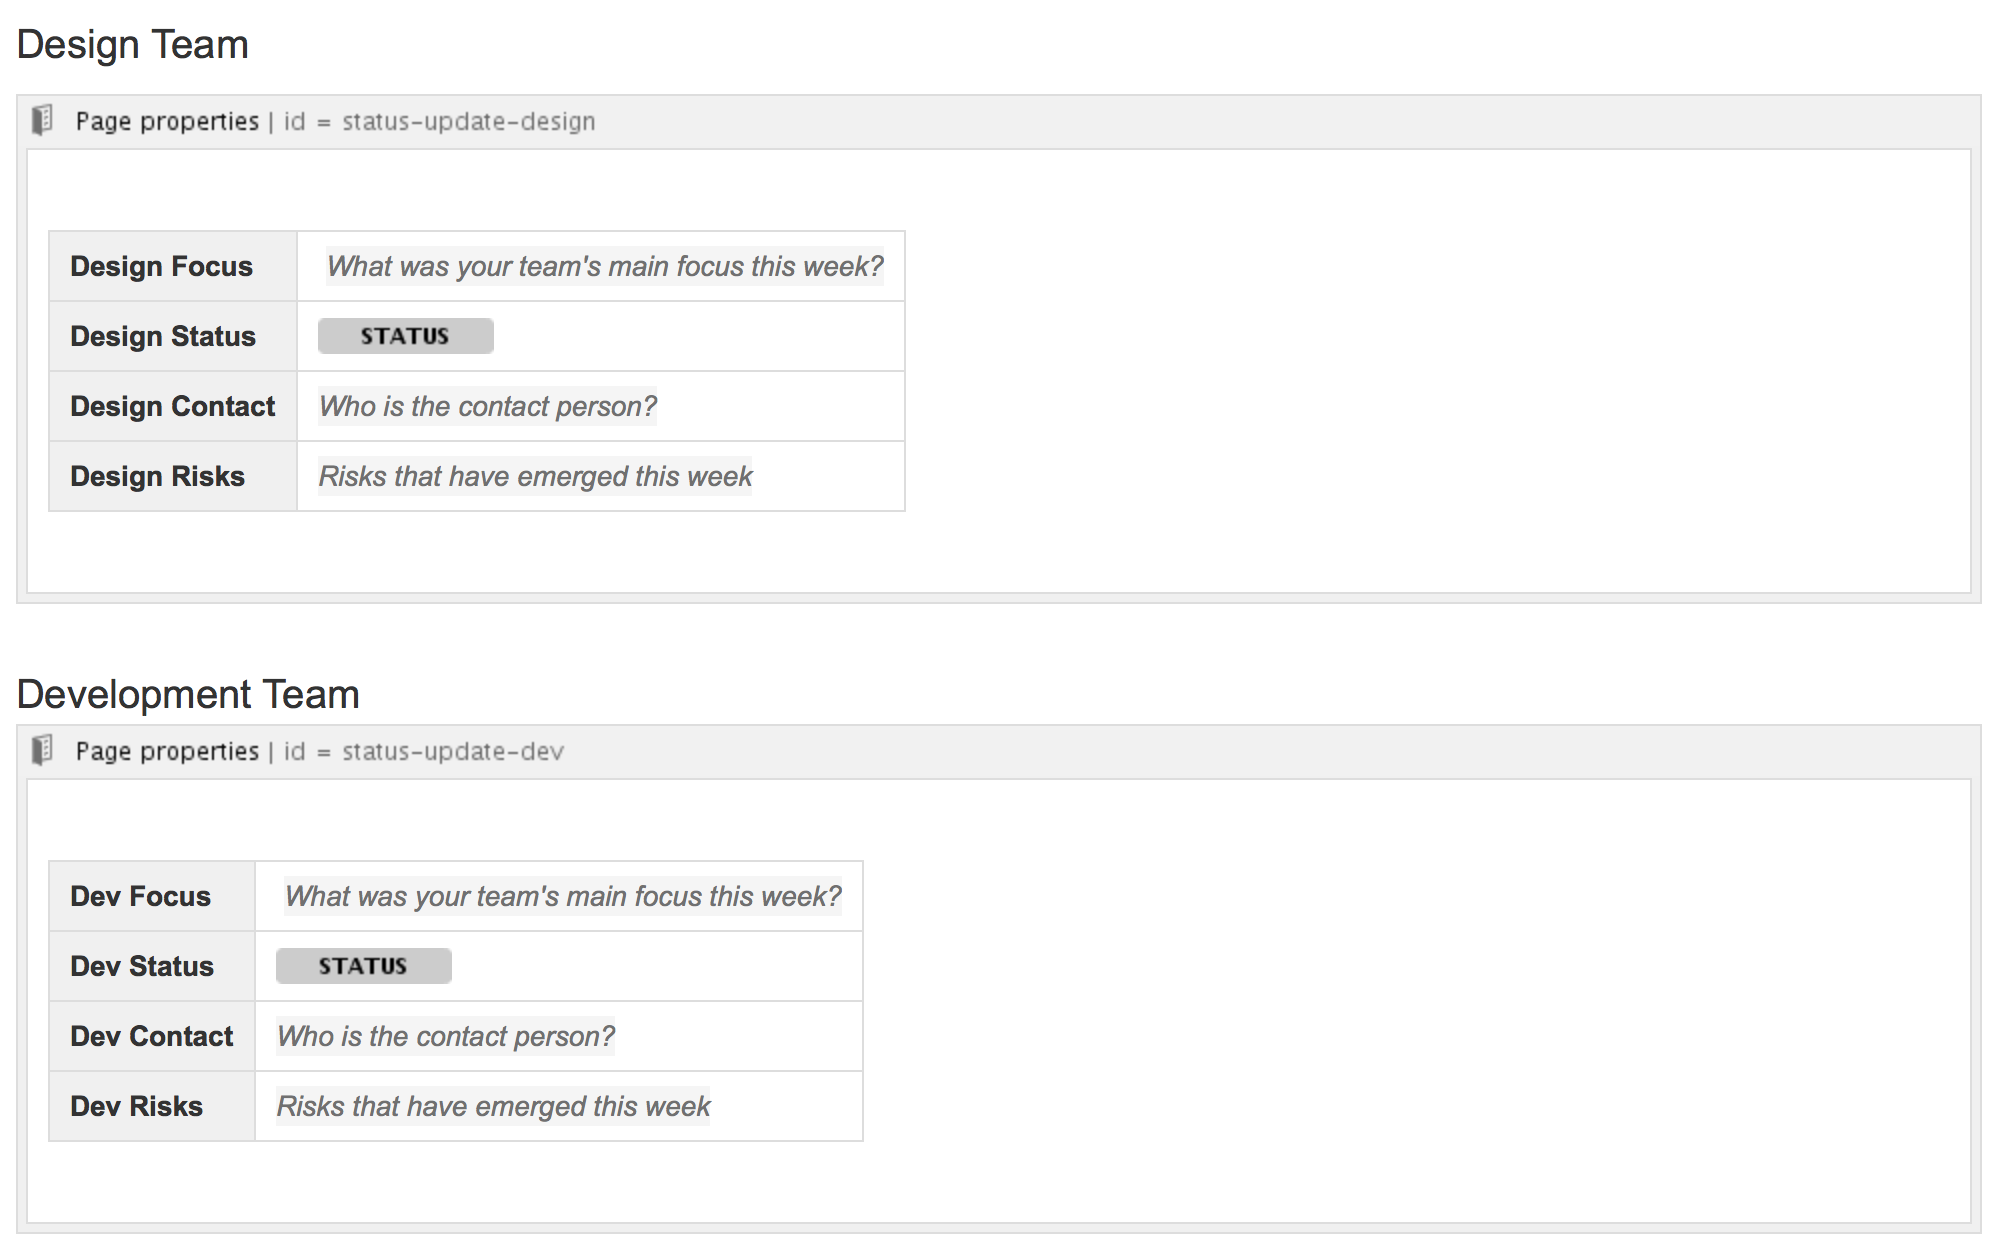
Part 2: Create a report showing the high level status of each team
Next we'll create an index page, just like you see in many blueprints.
- In your space create a new blank page (this will be our 'Status Report - all teams' page, showing just the status of each team)
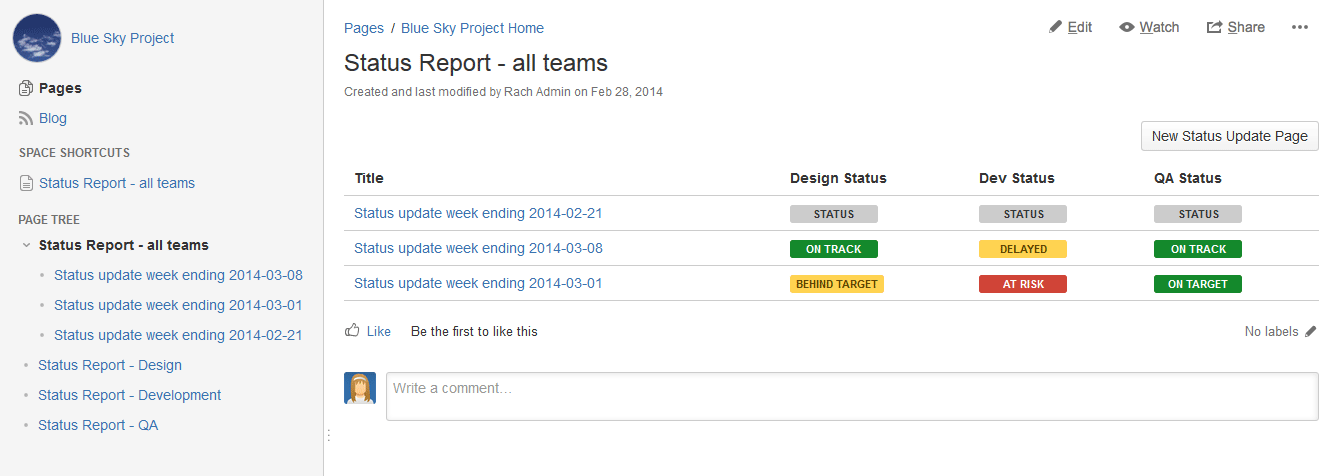
- Choose Insert > Other Macros > Page Properties Report to add the Page Properties Report macro to the page
- Enter the Label to report on (in this example, it'll be the 'status-update' label we added to the template page)
- Leave the Display options > Page Properties ID field blank (we want to report on all the macros on the page)
- In the Columns to Show field, list the 'keys' from each macro that you want to include in the report (in this example, we only want to show the values of 'Design Status', 'Dev Status', 'QA Status')
- Choose Save to add the macro to the page
Screenshot: The page properties report macro on the 'Status Report - all teams' page
Now we'll add a button to the page to allow team leads to easily create new status update pages from the template we created earlier. - Choose Insert > Other Macros > Create from Template to add the Create from Template macro to the page
- Enter the text for the button (in this example we'll call the button 'New Status Update Page')
- Select the template from the Template Name drop down (in this example our template was called 'Status Update')
- Specify the title of any pages to be created (This is a great way to keep your titles consistent. In this example we'll call the page 'Status update week ending @currentDate', which will append the current date when the page is created, as in the meeting notes blueprint)
- Choose Insert
- Add any other content, links or images to the page and Save
- Choose Space Tools > Configure Sidebar > Add Link to add a shortcut to the page on the sidebar
Part 3: Create a separate report for each team
Now we'll create some index pages that show a more detailed summary for each team, starting with the Design team.
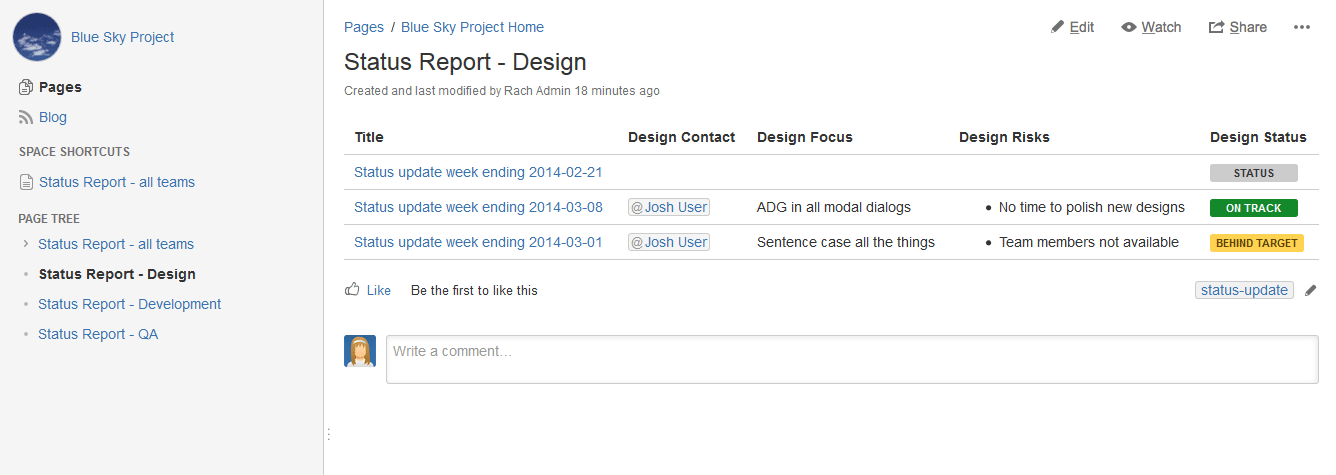
- Create a new blank page – this will be the 'Design Status Report' index page, showing just information for that team.
- Choose Insert > Other Macros > Page Properties Report to add the Page Properties Report macro to the page
- Enter the Label (the page label is once again 'status-update', the label we added to the template)
- Expand the Display options and enter the Page Properties ID that was specified in the Page Properties macro in the template (in this example it was 'status-update-design') – this allows us to report on just information in that macro.
- Leave all of the other fields blank (we want to show all columns from this Page Properties macro)
- Choose Save to add the macro to the page
Screenshot: The page properties report macro on the 'Design Status Report' index page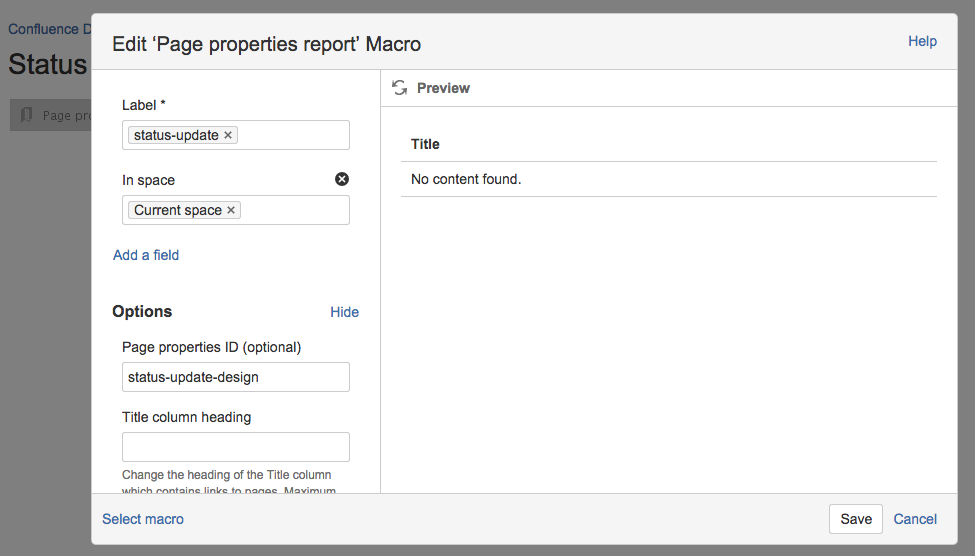
- Add any other content, links or images to the page and Save
- Choose Space Tools > Configure Sidebar > Add Link to add a shortcut to the page on the sidebar
- Create a new page and repeat this process for each team
Remember to specify a different Page Properties ID each time (in this example 'status-report-dev' and 'status-report-qa').
If your Design, Dev and QA teams have their own team spaces, this summary report could even be created in their team spaces. Just be sure to specify the space where the Status Updates pages are created in the Restrict to spaces field, to make sure the macro can find the pages to report on.
Part 4: Create your first status update page
That's it! Create from template ![]() in the Confluence header, then select Status Update, or use the Create a new status update button to make your first status update page. Just like a blueprint, but 100% made by you.
in the Confluence header, then select Status Update, or use the Create a new status update button to make your first status update page. Just like a blueprint, but 100% made by you.
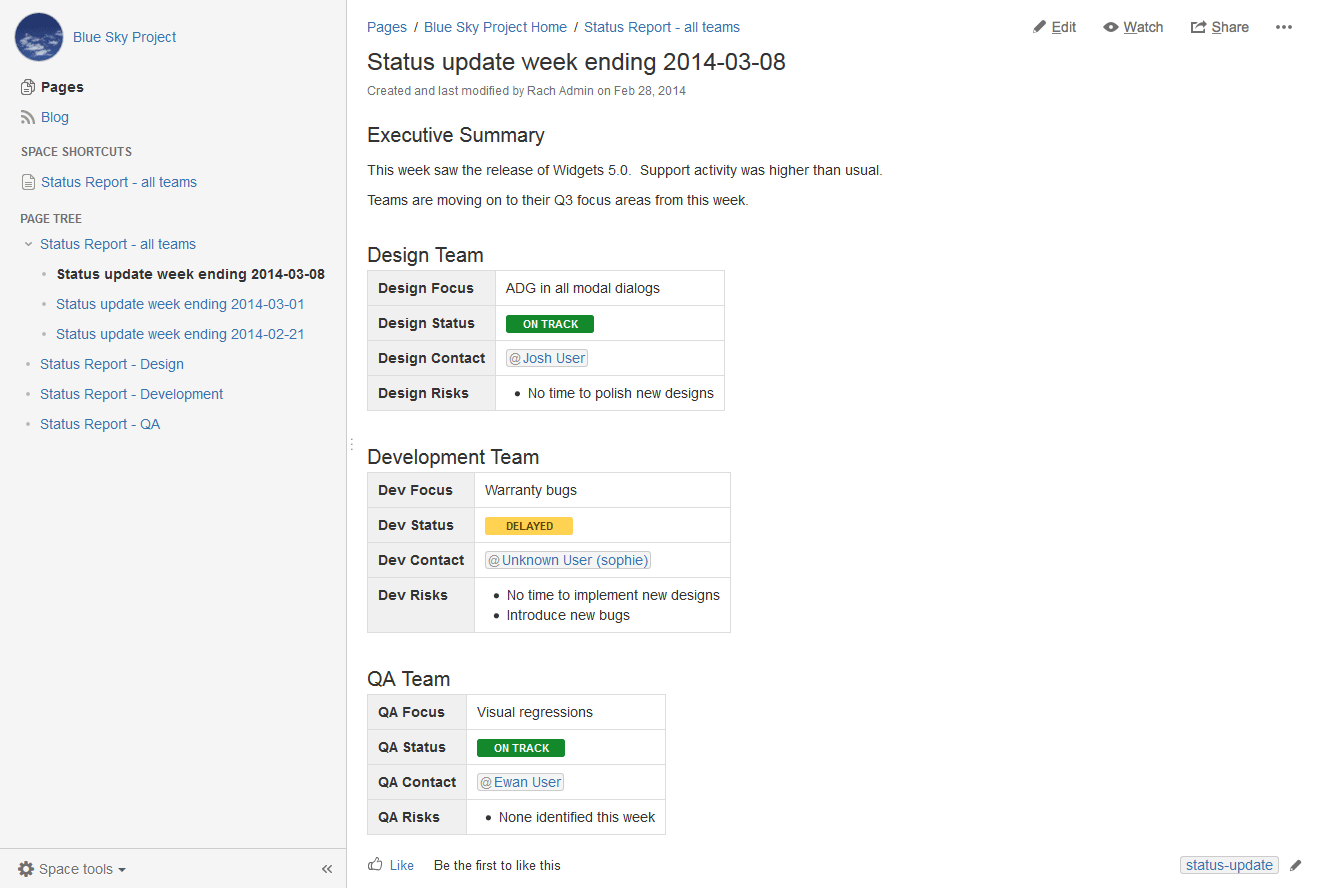
Here's how our finished pages look.
Screenshot: Team Leads and the management team still have a single page for the weekly status update
Screenshot: The Project Lead can see the status of each team, each week, at a glance in the All Teams status report.
Screenshot: Each team can see their focus, risks and status at a glance in their status report.
Remember, these concepts don't just apply to status updates – you can use them for any purpose at all.