Change the Java vendor or version Confluence uses
When you install Confluence Data Center using the installer, it will run Confluence with the Java Runtime Environment (JRE) that was bundled with that Confluence release.
If you want to use a different Java vendor, version, or you want to install the full JDK, you can tell Confluence to use the version of Java installed on your server.
Not all vendors and versions are supported, and some versions have known issues, so always check the Supported Platforms page as using an unsupported version can cause problems in Confluence.
On this page:
Check your current setup
How you change Confluence's Java path depends on whether you originally installed Confluence using the installer, or manually from a .zip or .tar.gz file.
The easiest way to check how Confluence is currently finding your Java is to:
- Go to
<install-directory>/bin/setjre.shfile (Linux) orsetjre.bat(Windows) file. Scroll to the bottom of the file and look for a line similar to the following. The file path may be different in your file.
In Linux:JRE_HOME="/opt/atlassian/confluence/jre/"; export JRE_HOMEIn Windows:
SET "JRE_HOME=C:\Program Files\Atlassian\Confluence\jre"
If a line similar to the one above is present, then JRE_HOME is set in this file by the installer, and you should use the installer method for Windows or Linux below.
If this line isn't present, JRE_HOME is not set in this file (because Confluence was installed manually), and you should use the environment variable method below.
Installer method - Windows
The way you do this depends on whether you run Confluence manually using the start-confluence.bat file, or as a Windows service.
In these examples we're going to point Confluence to the Eclipse Temurin OpenJDK JRE, which is installed on our Windows server at C:\Program Files\Eclipse Adoptium\jdk-11.0.16.101-hotspot. The location of your JRE will be different, but the steps are the same for any supported Java vendor and version.
If you start Confluence manually
To change the Java that Confluence uses if you start Confluence manually in Windows:
In Command Prompt, use the following command to check that Java is installed and has been added to your path correctly.
> java -versionThis will return your Java version. If nothing is returned, or it returns the wrong version, check the installation instructions for your Java vendor.
Stop Confluence.
In the Confluence installation directory edit the
<install-directory>/bin/setjre.batfile and change the last line to point to your local Java installation, as in the example below.SET "JRE_HOME=C:\Program Files\Eclipse Adoptium\jdk-11.0.16.101-hotspot\bin"If this line isn't present, exit this file and use the environment variable method below.
Start Confluence.
Go to Administration menu
 , then General Configuration > System Information and check that Confluence is using the expected Java version.
Remember, when you next upgrade Confluence this file will be overwritten, so you will need to re-apply this change to the new setjre.bat file.
If you run Confluence as a Windows service
To change the Java that Confluence uses if you run Confluence as a Windows service:
Open the Tomcat properties dialog. See How to set system properties for Confluence running as a service on Windows for a step-by-step guide to locating your service and launching the Tomcat dialog.
Choose the Java tab.
Update the Java Virtual Machine line to point to the AdoptOpenJDK jvm.dll, as in the example below. The path to your Java installation will be different to our example.
C:\Program Files\Eclipse Adoptium\jdk-11.0.16.101-hotspot\bin\server\jvm.dll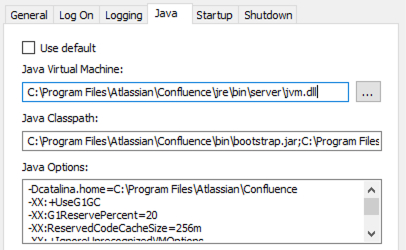
- Restart the Confluence Windows Service.
- Go to Administration menu , then General Configuration > System Information and check that Confluence is using the expected Java version.
Remember, when you next upgrade Confluence this file will be overwritten, so you will need to re-apply this change to the service.
Installer method - Linux
In this example we're going to point Confluence to the AdoptOpenJDK JRE, which is installed on our Linux server at /opt/java/adoptopenjdk/jdk-11.0.4.11-hotspot/. The location of your JRE will be different, but the steps are the same for any supported Java vendor and version.
To change the Java that Confluence uses in Linux:
In Terminal, use the following command to check that Java is installed and added to your path correctly.
$ java -versionThis will return your Java version. If nothing is returned, or it returns the wrong version, see Installing Java for Confluence or check the installation instructions for your Java vendor.
- Stop Confluence.
In the Confluence installation directory edit the
<install-directory>/bin/setjre.shfile and change the last line to point to your local Java installation, as in the example below.
The path to your Java installation will be different to our example.JRE_HOME="/opt/java/adoptopenjdk/jdk-11.0.4.11-hotspot/"; export JRE_HOMEIf this line isn't present, exit this file and use the environment variable method below.
- Start Confluence.
- Go to Administration menu , then General Configuration > System Information and check that Confluence is using the expected Java version.
Remember, when you next upgrade Confluence this file will be overwritten, so you will need to re-apply this change to the new setjre.sh file.
Environment variable method - Windows and Linux
If you installed Confluence manually (the path to the bundled JRE was not automatically set in the setjre file), Confluence will use the path set in the JRE_HOME environment variable. If JRE_HOME is not set, it will use the path set in JAVA_HOME.
See Setting JAVA_HOME variable for Confluence to find out how to set this environment variable in Windows.
Refer to the documentation for your Linux distribution to find out how to set an environment variable in Linux.
You won't need to update the JRE_HOME environment variable when you upgrade Confluence, but you will need to update the path if you upgrade Java.
How Confluence determines which Java to use
The JRE_HOME set in the setjre file takes precedence. If you installed Confluence using the installer, this will be automatically set to the Java version bundled with Confluence.
If JRE_HOME is not set in the setjre.bat or setjre.sh file, Confluence will use the JRE_HOME defined in your environment or service. If it can't find JRE_HOME, it will use the JAVA_HOME environment variable.
Which Java vendor can I use with my Confluence version?
The following table lists the supported Java vendors, and whether Oracle or AdoptOpenJDK is bundled with Confluence.
| Confluence version | Supported Java vendors | Bundled Java vendor |
|---|---|---|
| 6.6.12 and earlier | Oracle JRE | Oracle JRE |
| 6.7.0 to 6.13.1, and 6.14.0 | Oracle JRE | Oracle JRE |
| 6.13.2 to 6.13.x, and 6.14.1 to 7.13.1, and 7.14.0 | Oracle JDK/JRE | AdoptOpenJDK |
| 7.13.2 to 7.13.x, and 7.14.1 to latest | Oracle JDK/JRE | Eclipse Temurin |
Known issues
- You may find that Oracle is still listed as the vendor in System Information. This is a known issue in Confluence which we hope to have resolved soon. The Java version will be reported correctly, so you can use that to make sure Confluence is pointing to the right version.
- AdoptOpenJDK does not include a required font configuration package, which may cause issues when installing in Linux. See Confluence 6.13 or later fails with FontConfiguration error when installing on Linux OS for information on how to install the required package manually.
- AdoptOpenJDK is now known as Temurin.
Upgrading Java
If you choose not to use the bundled Java version, you will need to manually update Java from time to time, to get access to new security fixes and other improvements.
Always check the Supported Platforms page before upgrading, for any known issues affecting particular Java versions.
If upgrading to a major version, for example from Java 11 or Java 17, be aware that some Java arguments will not be recognised in later versions. When you upgrade, make sure you apply your customisations manually, don't simply copy over your old setenv.sh / setenv.bat file, or existing Java options if you run Confluence as a service.